

This post may contain affiliate links. Please read our disclosure for more info.
If you are looking to get into yoga but overwhelmed where to start, this beginner yoga routine is the perfect solution.
This 20 minute yoga routine for beginners incorporates some of the most basic yoga poses to stretch, calm, and tone your entire body.
No matter what your purpose for starting yoga is, I’m glad you have begun, and am happy to walk along the journey with you into showing you just how amazing yoga can be.
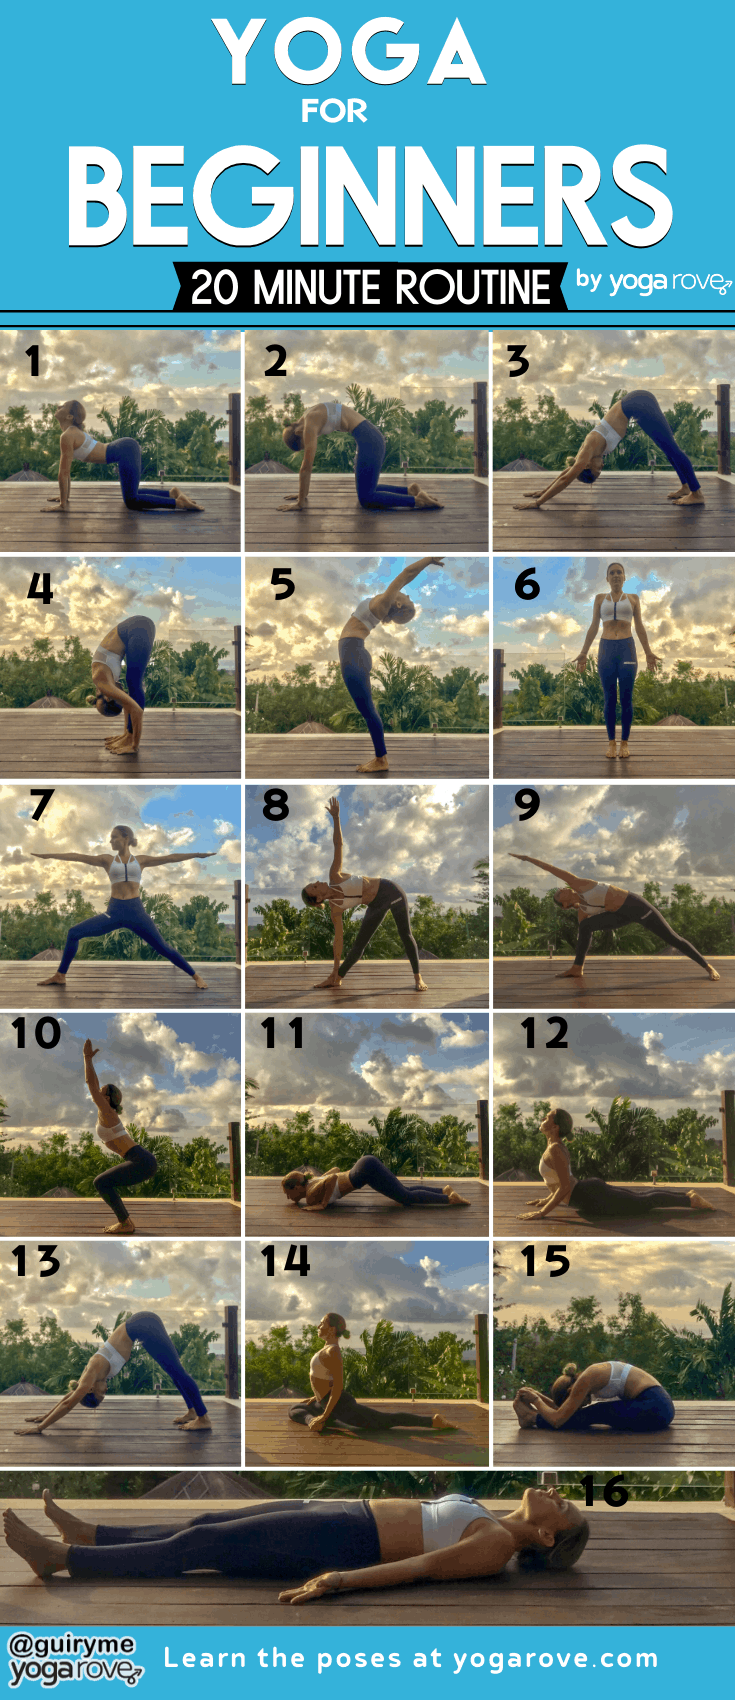
This beginner yoga routine consists of 16 poses. Try to hold each for 15 seconds (or five slow breaths). Go through the sequence up to step 13 (Downward Dog), then repeat the sequence again on the other side before going into the cool down poses. The poses for this 20 minute yoga workout are:
- Cat-Cow– 3 rounds
- Downward Facing Dog– 5 breaths
- Standing Forward Fold– 5 breaths
- Mountain– 5 breaths
- Standing Backbend– 5 breaths
- Warrior II– 5 breaths
- Triangle – 5 breaths
- Extended Side Angle– 5 breaths
- Chair– 5 breaths
- Standing Forward Fold– 5 breaths
- Four Limbed Staff– 5 breaths
- Cobra– 5 breaths
- Downward Facing Dog– 5 breaths
- Pigeon– 5 breaths
- Seated Straight Legged Forward Fold– 5 breaths
- Savasana– 1-2 minutes
This sequence is perfect for building the foundations, toning, and improving flexibility.
Take it as slow as you want and do what feels right for you and your body. If you are not up to holding them for 15 seconds, that is okay! This is your practice. All that matters is you are moving, growing, and learning!
Some of these poses at first glance may feel too advanced for you. All the poses in this yoga sequence are beginner friendly, meaning you can easily modify them to suit your level. I picked these poses because they are dynamic and are all base poses you will need when building your yoga practice.
For modifications, I do suggest having a pair of yoga blocks and a strap- you can check out our yoga tools page for recommendations.
How many calories does a 20 minute yoga routine for beginners burn?
Many people are getting into yoga to lose weight as now there is much more information supporting the effectiveness yoga has on weight loss. One of the key components of losing weight is burning more calories than you consume, meaning implementing exercise into your routine to burn off extra energy.
I’m sure that you are wondering exactly just how many calories does 20 minutes of yoga actually burn.
If you use a simple online calorie calculator you will see that a 150-pound person burns about 62 calories doing 20 minutes of Hatha yoga. The type of yoga and how intense you make it makes a huge difference in calories burned per session.
Compared to Hatha, Vinyasa yoga burns 198 calories per 20 minutes. That is a huge difference! That is because Vinyasa yoga is much more intense and causes your heart rate to increase much more than Hatha, which focuses on basic alignment and postures.
Learning about the different types of yoga and yoga sayings is a great way for a beginner to get started.
This following sequence is meant to be a flowing sequence, which is what Vinyasa yoga is, but you have control of how intense you make it. Start off slow and then once you get the hang of how to do each pose correctly and incorporate your breath, increase the speed and rounds you do on each side to really start burning some fat.
Is yoga actually a good workout?
A “good” workout is not all about the calorie burn. Yes, scientifically you do need more calories out than in to lose weight, but doing excessive cardio everyday is not going to get you long term results, or make getting to your goal any easier.
One of the most important things to ensure fat burn is building muscle, and fortunately yoga is great at building muscle! As explained above, you need to pick the right kind of yoga in order to build muscle, as well as the right kind of poses.
Poses like child’s pose and pigeon pose are great poses to relax and improve flexibility, but you aren’t really creating any type of resistance with your body, so you will not build muscle with these poses.
But poses like chaturanga and warrior III are excellent for activating your core and challenging your body, so you will build muscle with these poses.
But why is building muscle so important?
Muscle requires more energy than fat, so the more muscle you build, the more calories you naturally burn- which means your metabolism increases.
And I don’t mean building huge, bulky muscle- yoga will help you build lean muscle mass with strength building poses. So you’ll be building muscle, improving your strength, and burning fat all at the same time- I don’t think it gets much better than that.
So, now that you know the basics behind it, let’s get to it!
1. Cat and Cow (Marjaryasana and Bitilasana)
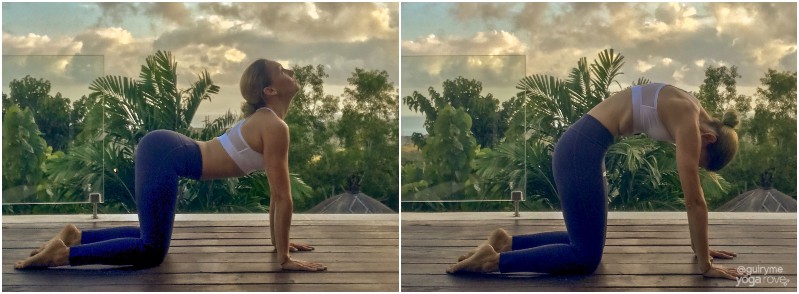
This is a combination of two poses that creates a “flow”. They are great for warming up the spine and feeling around to see where your tighter areas are.
- Start on all fours, with your hands directly underneath your shoulders, and knees hip distance apart. You can choose to keep your toes tucked or untucked, whatever is more comfortable.
- On your next inhale, drop your belly, arch your back, and lift your chest. Allow your gaze to flow upwards. This is cow.
- Now, on your next exhale, slowly begin to round your back, tuck your pelvis, and bring your gaze in towards your chest. This is cat.
- Take a moment and try to become completely in sync with your body and your breath. Stay here for 15 seconds, switching positions on your slow inhale and exhale.
Tip: To warm up your spine even more, try moving through a few dynamic cat-cow’s by moving all parts of your back slowly in a clockwise and counter-clockwise formation, instead of just arching and rounding your back. This can help you feel for any tight areas you might have missed as well!
2. Downward Facing Dog (Adho mukha śvānāsana)
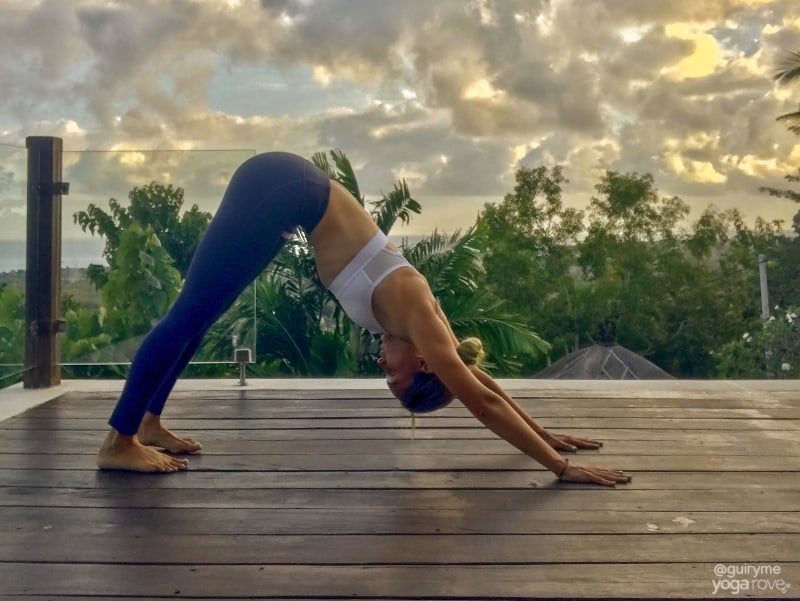
- Come to a neutral spine, still on all fours. Tuck your toes and push your hips up and back, straightening your legs and pushing your heels towards the ground.
- Ground your hands and spread your fingers wide. Engage your arms and drop your ears away from your shoulders.
- Engage your core and pull your belly button up towards your spine. Keep actively sending you hips up and back as you try to send your heels toward the ground.
- It is okay if your feet don’t touch the ground. You can also “pedal” them out by bending one leg at a time while you straighten the other. This will help loosen up the tightness in your hamstrings.
Tip: Make sure to keep your entire body engaged throughout this pose to avoid all of the weight falling onto your upper body. If this pose feels too hard, don’t worry, there are tons of down dog modifications you can do.
3. Standing Forward Fold (Uttanasana)
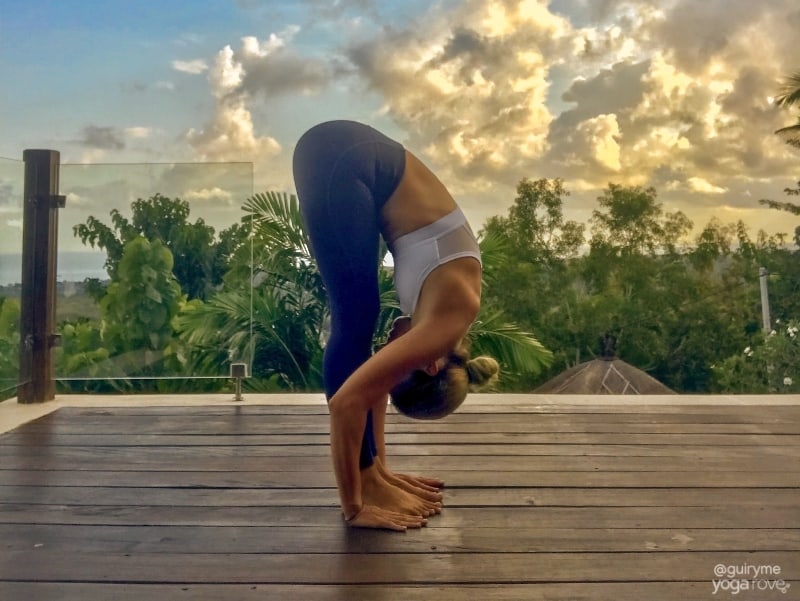
- Keeping your arms where they are, begin to slowly walk your feet towards your hands, keeping them as straight as possible, until you come into your forward fold.
- Bring your feet to touch and reach towards the ground with your hands, or gripping your ankles or legs to fold more with each exhale.
- Make sure not to let your chest collapse here and still engage your entire body.
Tip: If you feel too tight to grab you legs or ankles or fold forward all the way, try using two yoga blocks and adjusting the height to your comfort. You can also decide to grab opposite elbows and sway from side to side in ragdoll pose.
4. Standing Backbend (Anuvittasana)
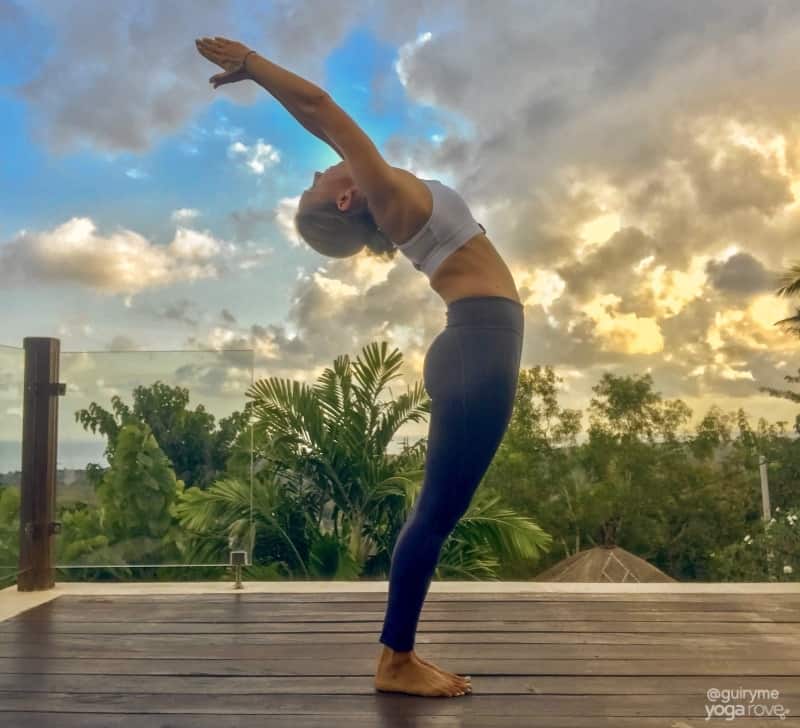
- On your next inhale, keeping your feet grounded, swoop your arms up to come above your head in a prayer position and slightly arch your back as you send your prayer backwards, your gaze following.
- This can be as mild as you want, make sure to listen to your body and only go as far as is needed for you. This is a greater chest opener and you will be able to get deeper into it with practice.
- Breathe here for 15 seconds.
Tip: If it’s too difficult to lift your arms straight up, bring them into goal post formation by bending your arms at 90 degree angles on both sides. Make sure your back is completely straight before you begin to slowly bend backwards.
5. Mountain (Tadasana)
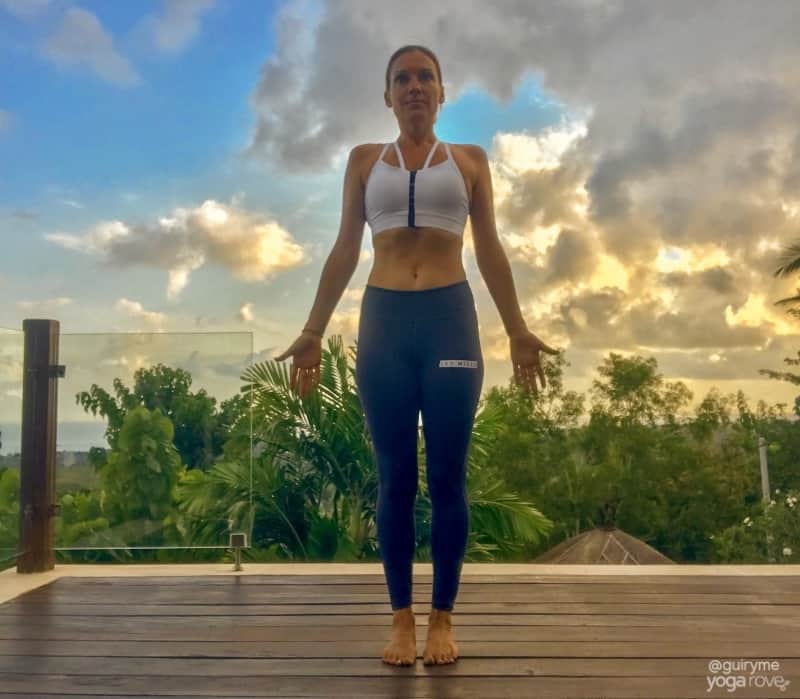
- From you standing backbend, slowly come back to a neutral spine.
- Bring your hands to your sides, palms facing forward and arms engaged.
- Ground your feet towards the floor and activate your legs so your knee caps slightly lift.
- Lift through your chest and drop your shoulders. Breathe here for 15 breaths.
Tip: Your body should stay active during this pose, even though it seems like a simple pose! Your core should be completely engaged, chest forward, and you should be actively grounding all four corners of your feet into the ground.
6. Warrior II (Virabhadrasana II)
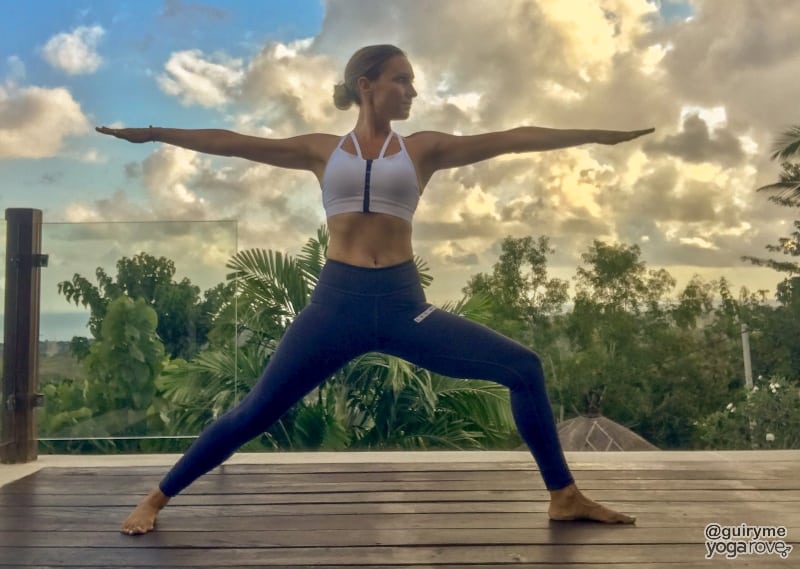
- Step your left foot back to create a wide stance of about 3-4 feet apart, enough so both feet are still grounded.
- Keep your right foot facing forward, and rotate your back toes on a 45 degree angle so they are facing to the left, grounding through the outer edge of your back foot.
- Your body will now be facing the left side of the room. Begin to bend your front leg as much as you can to 90 degrees as you cartwheel your arms open so they are extended towards either side of the room. Keep your gaze over your front fingertips.
- Remember to engage through your back heel and keep your right leg bent. Engage your arms and make sure they are inline with your shoulders.
Tip: Watch to make sure your knee does not move more forward than your front toe to avoid injury.
7. Triangle (Trikonasana)
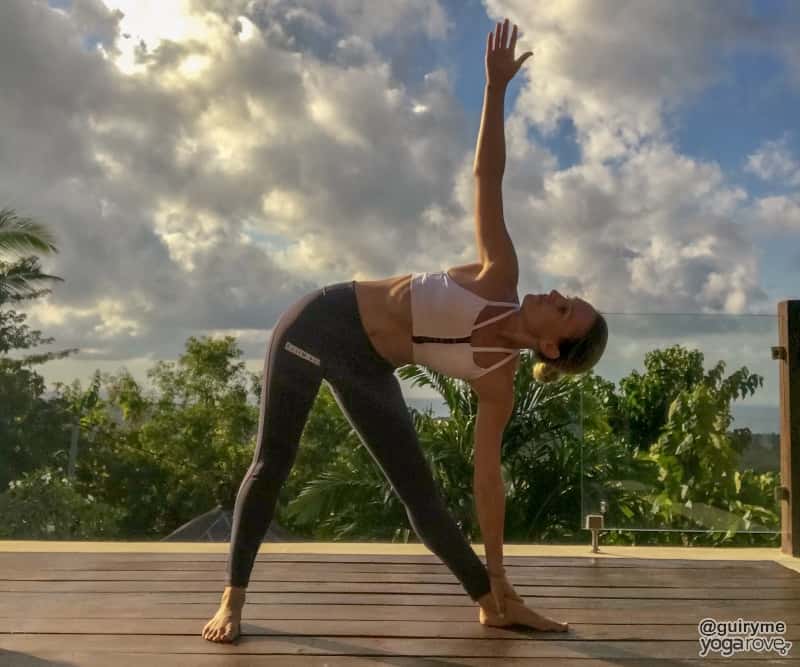
Triangle is a simple and fun transition from Warrior II and a great way to practice your alignment and improve mobility.
- From Warrior II, keeping your feet where they are, straighten your front leg.
- Slowly begin to hinge your body forward and bring your right hand to the inside of your right foot. If you can’t touch the ground yet, that’s okay! You can grab onto your ankle or shin as well.
- As you right hand comes down, your left arm floats up into the air, with your gaze following it.
- Feel free to use a block instead of reaching for your shin. If you are not as flexible, this will actually help you reach better alignment and allow you to open up your chest more.
Tip: Your body should be able to fit in between two walls in the pose, you should be completely linear. So make sure your chest is lifted, your heels are aligned, and your shoulders and hips are in line with each other.
8. Extended Side Angle (Utthita Parsvakonasana)
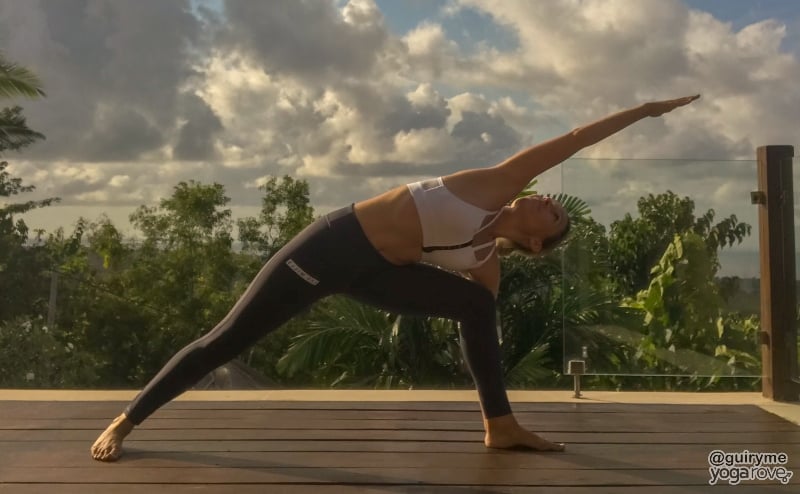
- From Triangle, still keeping the same feet, begin to bend back into your front leg just as you did in Warrior II,
- Remember, your back foot should be completely flat on the ground and on an angle like in Warrior II.
- Your right knee is at a 90 degree angle and your hand is flat on the ground. Use blocks here if you need them as well!
- Keep your left arm lifted and extend it towards the front of the room, forming a straight line of energy all the way down to your left heel.
- Breathe and stay here for 15 seconds, you’re almost done with the sequence!
Tip: Don’t collapse into this pose, actively lift through your chest to get a good side body stretch.
9. Chair (Utkatasana)
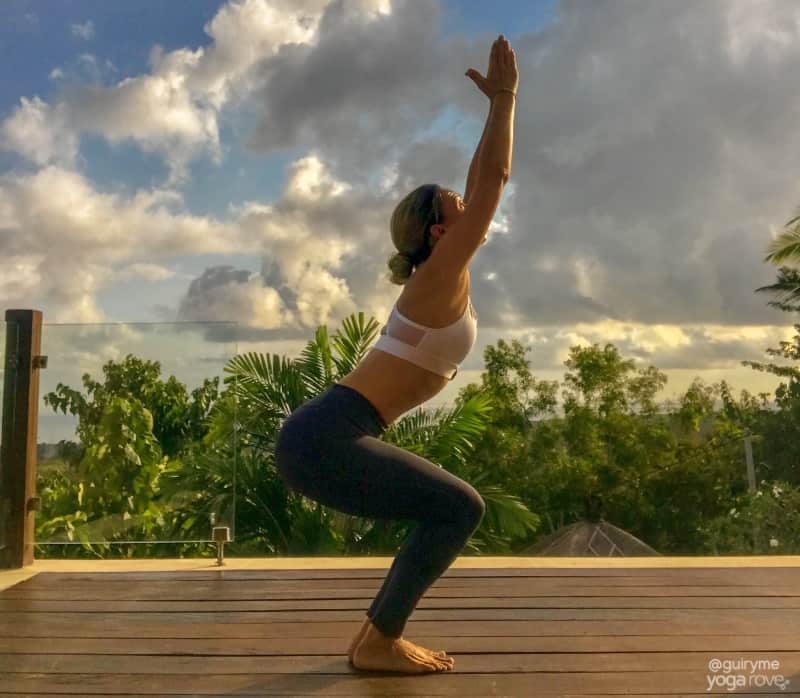
- To transition into Chair, first come briefly back into Warrior II for one breath.
- Keep your right leg bent, and then slowly bring your left foot to meet your right as you rotate your torso towards the front of the room and bring both arms up by your ears.
- Your feet should be together, with most of the weight on your heels, to the point where you can freely move all ten toes.
- Sink your seat deeper with each exhale, and lift up through your chest.
- Hold for 5 breaths, then straighten your legs to come into Standing Forward Fold.
Tip: If this pose feels too difficult, try bringing your hands into a prayer pose at your heart, or even slightly parting your feet from each other.
10. Four Limbed Staff (Chaturanga Dandasana) or Knees-Chest-Chin
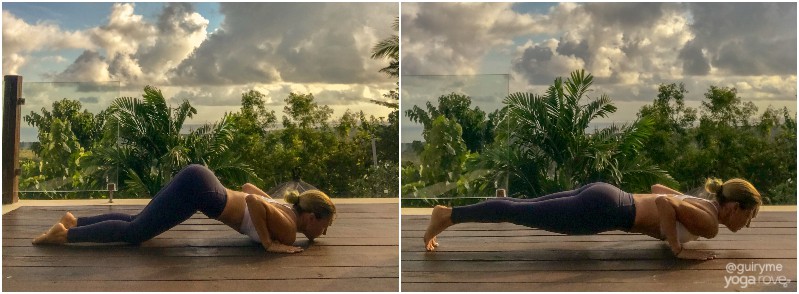
- Plant both hands on the ground by your feet, as you step one foot back at a time into a plank position.
- Squeeze your elbows in tightly towards your body as you bend them and slowly lower yourself to hover above the ground. Hold here for 15 seconds.
- You should be engaging your legs and hovering on the tips of your toes, and engaging your core. Make sure to keep a neutral spine and don’t let your butt come up into their air.
If you lack upper body strength, as I did when first starting out, don’t torture yourself. Drop your knees to the floor for a half Chaturanga, or opt for Knees-Chest-Chin by dropping the knees, then chest, then chin to the floor using the core (still challenging!). Or, in the video tutorial below, Lizette shows you how to properly use yoga blocks to assist you with your Chaturanga.
It is important to build a strong foundation. That is why I still recommend this pose even in a beginner yoga routine.
I did this when first starting out and it was extremely frustrating to me the amount of upper body strength I lacked, but consistently practicing it lead to me being able to do it a few weeks later, and that boosted my confidence substantially.
Setting goals for your practice and achieving them is the best feeling in the world, and will make you want to keep going and keep improving.
But with that being said, listen to your body and if you are not at a full Chaturanga yet, that is okay! Maybe try to hold it for a short amount of time on your last set before you drop to your knees and build from there.
Tip: Feel free to do a modification for this pose such as knees-chest-chin.
11. Cobra (Bhujangasana)
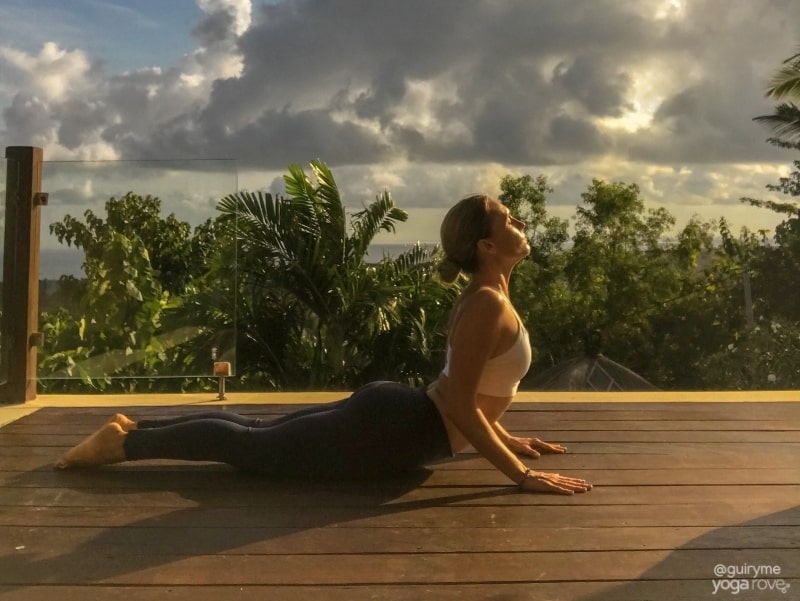
- From Chaturanga, slowly lower yourself all the way down to the floor. Keep your hands where they are, tucked in towards your body.
- Completely ground your legs and the tops of your feet on the ground. Plant your forehead on the ground then on your next exhale lift your chest and abdomen off the ground.
- Stay here and for 5 breaths, then send your hips up and back into Downward Facing Dog.
Tip: If you have a tight low back, spread your legs a little bit wider than your hips to relieve tension.
**From Downward Facing Dog, go back to step 3 (Standing Forward Fold) and repeat the sequence on the other side
12. Pigeon (Kapotasana)
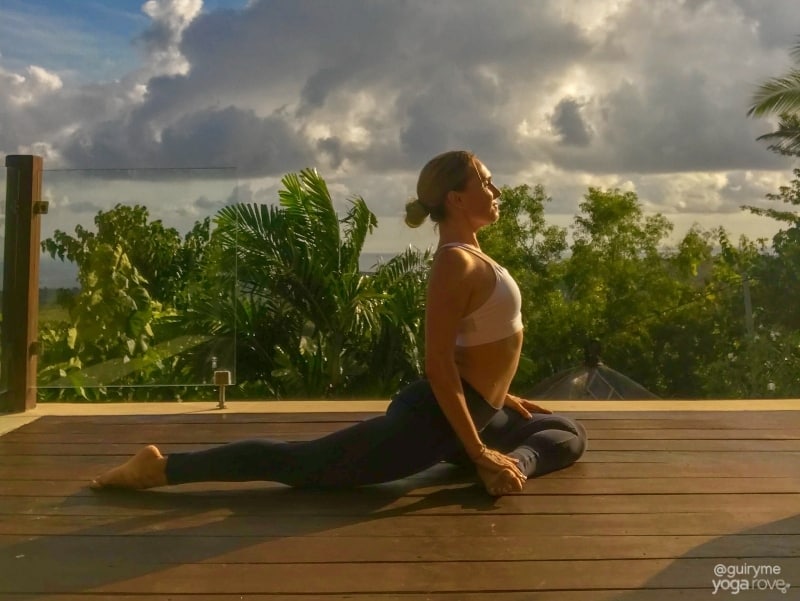
- From your Downward Facing Dog, extend your right leg up into the air, then bring it underneath you so your right ankle is now behind your right wrist.
- The outside of your right shin should now be on the floor. Allow you left leg to come to the ground, and point your back toes to let the top of your foot touch the ground.
- Sink into the pose and adjust your hips, making sure you are not leaning on one more than the other.
- The more you bend your front knee in this pose, the less tension you will feel, so if you feel it is too intense for you, try bending your front leg in a little more until you find the right amount of comfort for you.
- If you find yourself leaning too much onto your right hips, try placing your block underneath it to provide balance.
- Lift through your chest as you lift your arms up into the air. You can choose to stay here for 15 seconds or you can fold over your right thigh.
- Breathe through the tension here for 5 breaths.
Tip: There are many variations of pigeon pose if you find it too difficult. For this variations, you can try placing a block under the side of your bent leg to release the tension in the stretch.
*From here, come back into Downward Facing Dog to repeat on the other side!
13. Seated Forward Fold (Paschimottanasana)
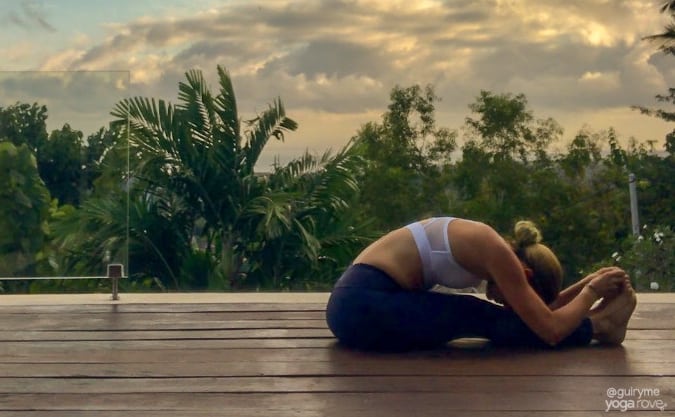
- If you decided to fold in your pigeon, come back up to an upright position. Gently swing your left leg around to the front of your body and straighten both legs out in front of you.
- Shake them out here for a brief moment if you would like. Then, making sure legs are together, flex both feet, and lengthen through your spine.
- Lift both arms up into the air, and using your core, slowly fold over both legs.
- You can use a block here to grab onto to sink deeper into the stretch, or if you cannot yet reach your toes, grab onto your shins or ankles, or use a strap if you have one.
- Don’t let your chest collapse. Keep your back straight and fold in deeper with each exhale.
- Stay here for 5 slow breaths seconds.
Tip: Keep your feet flexed and pulling back towards your body throughout the pose to get a deeper stretch and improve flexibility.
Remember, try to hold each pose for 15 seconds, and breathe for those 15 seconds. It is common when first starting to get lost in your mind due to the discomfort. Allow your breath to bring you back to center.
Repeat this sequence four times, and switch sides each time. So if your left foot was in front for all the poses that allowed it, make sure your right is in front the next time, then switch. This provides balance for your body and prevents one side from being more worked on than the other.
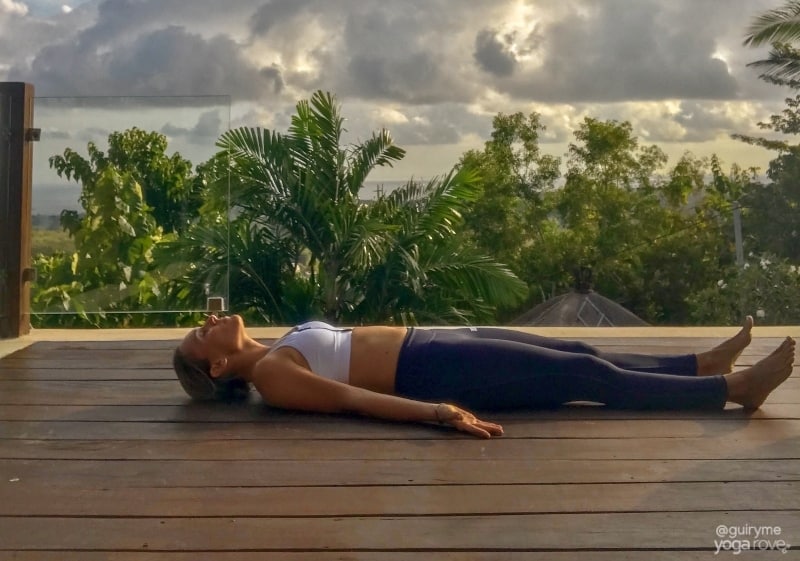
Remember to allow yourself to rest one minute between sets, and one minute after, preferably in Savasana, known as Corpse Pose. This is the ultimate resting pose, and is actually much harder than it looks when first starting out!
After practicing this routine for the next couple of weeks you are eventually going to want to switch it up. We highly recommend practicing yoga partner poses for a challenging and fun experience.
Resting Pose: Corpse Pose (Savasana)
Want to save this routine for later? Pin the complete beginner yoga routine below!
Frequently Asked Questions
Below are questions we commonly get from beginners wanting to get into yoga who start with this routine. If you are just getting started, you may possibly have asked one or more of these questions yourself (I know I did) so we figured we’d put the answers here for everyone.
How many days a week should you practice yoga?
A good starting point is committing to three days a week at the same time. They do NOT need to be hour long sessions- you can build up as you go! Just starting out with a 20 minute session (like this one) will help you see results if you are consistent. If you are struggling maintaining a schedule check out this post on creating a habit out of your yoga practice.
When’s the best time to practice this yoga routine?
This depends on your schedule, but when starting out it’s a good idea to practice around the same time, especially if you are practicing yoga at home, so you begin to identify that time as your practice to help you build it into a habit.
A lot of people enjoy working out right when they wake up in the morning as they prefer to practice yoga on an empty stomach, while others enjoy practicing in the evening to help them unwind. This all depends on you and your goals- typically if your goal is weight loss, working out on an empty stomach in the morning is best for burning fat, but if this is NOT your goal, I think whatever time makes you enjoy the practice most and come back to it again and again is the best choice. 🙂
Should you warm up before practicing yoga?
Yes! Never go into any type of physical activity without warming up. Although this routine has a few poses that can be modified to create a warm up, you want to make sure you do a few gentle poses that wake up you entire body to avoid injury and get you in the correct mindset.
We have an article here about why warming up before yoga is so important which comes with a free printable warm up for you to do before or after all your workouts.
Do you need rest days from yoga?
If you feel sore after practicing yoga, or any type of workout for that matter, I think it’s smart to have a rest day, but that doesn’t mean sitting on the couch all day- this can actually make you MORE sore from the lack of movement.
In a nutshell, you’re sore from build up of lactic acid. In order to break up the lactic acid, you want to make sure you move and stretch, but don’t want to over-stress your body. Try going for a walk or doing a relaxing yoga flow instead.
Related Beginner Yoga Articles:
- Yoga for Neck Pain
- Top 20 Printable Yoga Poses for Beginners
- Yoga for Flexibility
- Sun Salutation for Beginners
I hope you found this post informative and helpful, and this becomes one of your new favorite routines to practice! If you struggle the first time, just stick with it and stay consistent- I know you can do it. Pushing through the beginning is the hardest part.
Remember to download the printable from our FREE resource library where you get access to a ton of other free health and yoga printables!
If you have any other questions please feel free to comment below!
Ally is a Registered Nurse, Registered Yoga Teacher, and Co-Founder of Yoga Rove with her husband Victor. She first started yoga over 7 years ago when she started her nursing career to combat the physical and mental strain, and now loves to teach and help others.
Thanks so much. I just started practicing yoga and your website is so helpful for beginners like me. An endless thank you to you and Victor. More power!
Thank you so much Ally for this yoga for beginners.The tutorial is succinct.I am an undergraduate student so I want to stat a Yoga class for students in my university. This is helpful.If you have any information in how to start a yoga class for people like me,I will really appreciate if you write about it. Thank you so much
I’m so glad you found it helpful! That is wonderful you want to start a yoga class at your college, people would benefit so much I’m sure 🙂
Perfect! Would have loved to see this in video.
This might be a project we will be working on in the new year 😉
Thank you! I really appreciate you publishing various flows to practice. Newbies need the direction for home workout. I will reference the pose directions above until I have them down. It would probably be long but a printable would be great nut a book mark will work too😉 Best, Kathleen
Thank you for the routines, new to this 😊
I am trying to do at least 20 mins every day.
How long do you stay a beginner for? 🤔
Hi. I have already asked somewhere else, but still no answer. The thing is, in the printables, what is the colour code meaning? You have green and blue colours. What do they stand for? Thank you.
Otherwise, your printables and help are awsome, thank you.
Hi Mary!
The blue and green are just the design, they don’t have any correlation with anything. Hope that helps! So happy you are enjoying the printables!
Thanks so much for all this information. I’ve been practicing yoga by myself especially since quarantine started, so I was never really sure whether I was doing a pose correctly. I have a long way to go in terms of self-love and staying present but I’m eager to see how far I go. 🙂
That is awesome Louise! I hope it serves you well in your practice 🙂
Thanks for the routine! Very informative. 👏
Glad you enjoyed it!
well, i am going to be 52 and yes i will try this. you covered all pictures and instructions and the pictures are very clear and i can see details (stands) in each pose. thank you SO much!
Glad you found it helpful Maria!