

This post may contain affiliate links. Please read our disclosure for more info.
When I first started yoga, Chaturanga was by far the absolute hardest and most frustrating pose for me. I would collapse every time I attempted to descend and felt like I was just too weak to get it. I noticed a lot of other people struggled with this pose when they were first starting out too.
Why is Chaturanga so hard? Chaturanga feels so hard because of the amount of upper body strength it involves, which in most cases many women lack. Along with that, you have to have coordination and balance to maintain proper alignment throughout the pose.
Although upper body strength is a big part of why Chaturanga feels so challenging, there are a few other mistakes you might be making that are causing it it be even more difficult that could actually end up causing more harm than good to your body.
What Makes Chaturanga So Hard?
1.It requires upper body strength
During Chaturanga, you are engaging your arms and shoulders a lot, specifically your biceps, triceps, rhomboids, and latissimus dorsi.
Although it is a great pose to build upper body strength, it definitely requires some bit of strength already to even get into the pose. But don’t worry! If you can’t get into the pose right now, we will show you how to build up to it.
2. It involves core engagement
If you’ve ever done a push up, you know that it highly involves the core. Chaturanga is the ultimate “yogi push-up” and involves the core just as much, if not more.
You need to engage your core muscles, specifically your rectus abdominis and transverse abdominis, in order to maintain a straight back.
If your hips are lifting or dipping out of alignment, that means you’re not engaging these muscle enough to maintain correct alignment.
3. It involves balance
Many people are surprised when they hear Chaturanga is considered a balancing pose.
It specifically is an arm balance, as you balancing your entire body’s weight on just your hands and your toes.
The challenging part of Chaturanga is balancing your weight properly to maintain correct alignment and distribute your weight evenly.
In the next few sections I will be going over how to balance properly in the pose and how to help you get there.
Related Article: 10 Minute Yoga Routine to Get Strong, Toned Arms
Mistakes You’re Making During Chaturanga
1. You’re Not Pulling Your Elbows In
This is a very common mistake people make while practicing Chaturanga without even realizing it.
Your elbows are supposed to be hugged tightly into your sides, and for good reason! Practicing Chaturanga with your elbows splayed out puts you at risk for shoulder or wrist injuries due to imbalance of weight.
When you do not correctly align your wrist, elbows, and shoulders, you put more stress on one area, causing strain.
In the next section, I will give you a couple tips on how to help you properly align your elbows using a very simple tool.
2. You’re Not Grounding Through Your Hands
Your hands and your toes are the only body parts supported the rest of your body, so feeling secure and grounded through them is very important for maintaining proper alignment in the pose.
Many people subconsciously tend to lift their palms up and not spread their hands out evenly. This causes more strain to be put on your wrists and arms for trying to maintain balance in a pose that does not have a steady base.
The next time you do the pose, bring mindfulness to your hands. Spread your fingers and completely ground them into the mat. Ground through all corners of your hands. They should feel strong and sturdy. Just like a house, you need a strong foundation in order to support the rest of the structure.
3. You’re Not Fully Engaging Your Core
You might feel like you’re engaging your core, but if your hips are not in alignment with your spine and neck, you still have some work to do.
This is another common misalignment issue with beginners (myself included when I first started) because the core muscles are not strong yet.
When you fully engage your core, you take a lot of the stress off of your shoulders, just like in Downward Facing Dog.
To fix this, you simply need to build up your core strength. Below I will show you prep poses you can do to strengthen your core so you can master Chaturanga.
4.You’re Collapsing Through Your Chest
This is what I did A LOT when I first started practicing Chaturanga- please don’t do this! It puts you at risk for injuring your elbows or straining your arms or shoulders.
It can feel very stressful on the body doing Chaturanga if you have never worked out your chest or upper body. You may not even notice that you are doing this until you bring your attention to it.
When you are practicing Chaturanga, you need to lift through your chest, just how you would in Cobra. When you don’t do this, your chest collapses and you are putting all your weight onto your elbows to support.
Most likely when you do this as well, your elbows are dipping lower than 90 degrees, which is another mistake you want to avoid in the pose to avoid injury or strain.
The way to avoid doing this is building up your chest strength through prep poses which I’ll go into in a bit.
5. You’re Gazing in the Wrong Direction
Your gaze plays a big role while practicing yoga, and pretty much any movement you do. Where your gaze goes your body goes. It is natural. If you are looking back at your toes in Chaturanga, most likely your alignment is going to be sent backwards.
You want your body to be slightly forward in this pose by pushing forward with your feet.
Keep your gaze slightly forward to help you maintain proper alignment and lift through your chest and shoulders.
How to Properly Do Chaturanga
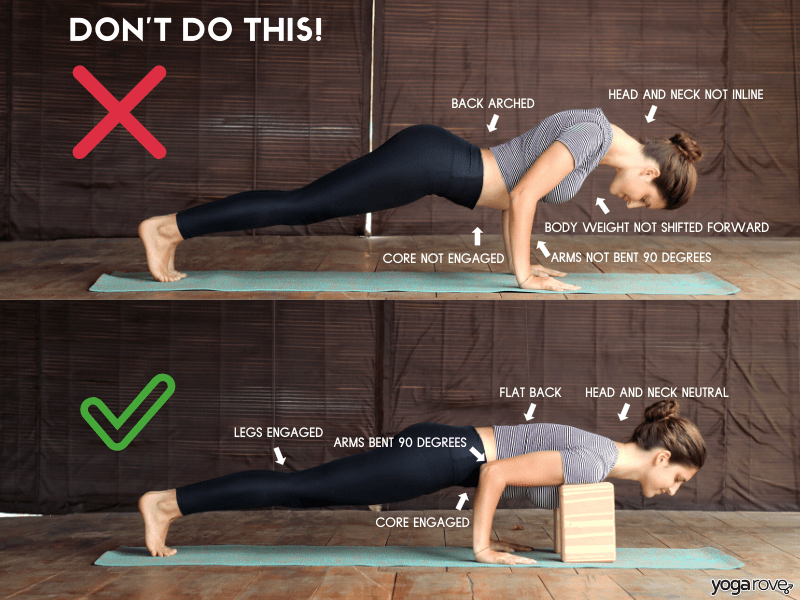
- To properly practice Chaturanga, start in a Plank position. Make sure your wrists, elbows, and shoulders are aligned. Your feet should be parallel and inner hip distance apart. Your core is engaged here.
- Tuck your elbows into your sides and shift your weight forward. Make sure your elbows are lined up with the heels of your hands and you are expanding through your shoulders, not letting them collapse.
- Keep this form as you slowly begin to descend, stopping when your elbows are at a 90 degree angle.
- Engage your legs, pulling the kneecaps up. The core is engaged, the hips are inline forming one straight line from your head to your heels.
- Lift through your chest and expand through your shoulders to help you not collapse your upper body.
- Stay here and hold. You will eventually build up the amount of time you can hold the pose.
Tips to Help You Master Chaturanga
Whether you’re having trouble mastering Chaturanga due to lack of core strength, arm strength, balance, or endurance, below are a few tips to help you get there.
1. Use blocks to help you build up your strength.
There are two different ways to you can use blocks in Chaturanga to help you build strength depending on your main problem area:
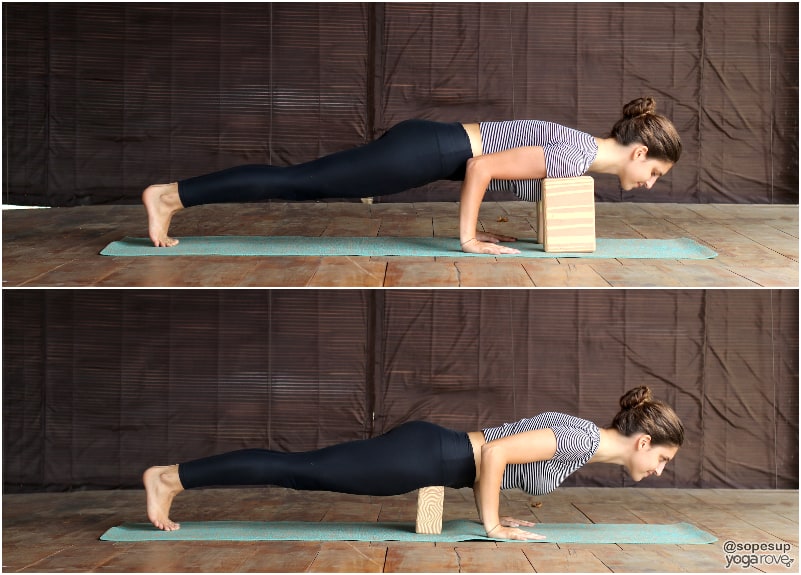
- Try placing two blocks near your shoulders when first starting out to give you more support in your shoulders if you lack upper body strength.
- Place a block underneath your core if you have a hard time keeping your core engaged and your back in constantly arching.
Don’t be mistaken, these modifications do not make the pose easier- it will make you realize how much of your body you actually have to use in this pose! It will help you build your upper body and core strength though and help you practice with proper alignment without dipping your elbows or too low and learn to properly engage your core.
2. Use a strap to help you practice proper alignment.
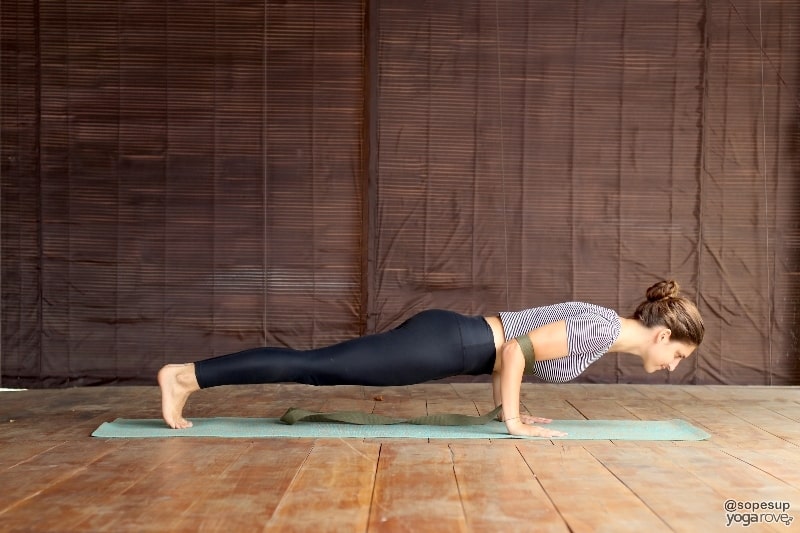
If you’re having a hard time keeping your elbows tucked in, try this trick using a yoga strap to correct your alignment.
Wrap the yoga strap around your upper arms and tie it. It will help you keep your elbows tucked into your sides as you lower down!
3. Practice prep poses to help you strengthen proper muscle groups
Build up proper strength and alignment through prep poses that are much less stressful on your body and that you are more able to do.
Below I have a list of the best poses to do to build up to Chaturanga along with tutorials on how to do them.
4. Never give up!
This is one of the most important, if not the most important, thing thing to do! You will never succeed in your goals if you give up. The most important thing is to keep practicing, be consistent, and keep going.
No one gets the pose on the first try. I was nowhere able to do this pose when I first started and felt so discouraged. But after practicing it for a few weeks consistently, I was able to do it with proper form. It felt like such an accomplishment.
YOU can do it to with consistent practice and by following these tips.
Beginner Yoga Poses to Practice to Build Up to Chaturanga
The following poses help build up your arm, shoulder, wrist, chest, and abdominal strength. They are great poses to practice to build up to Chaturanga!
1. Forearm Plank
Forearm plank of course works the abdominals, but is also a great pose to strengthen the shoulders. The great thing about this pose according to Jason Crandell, is that it works the exact same combination of core muscles you use for Chaturanga.
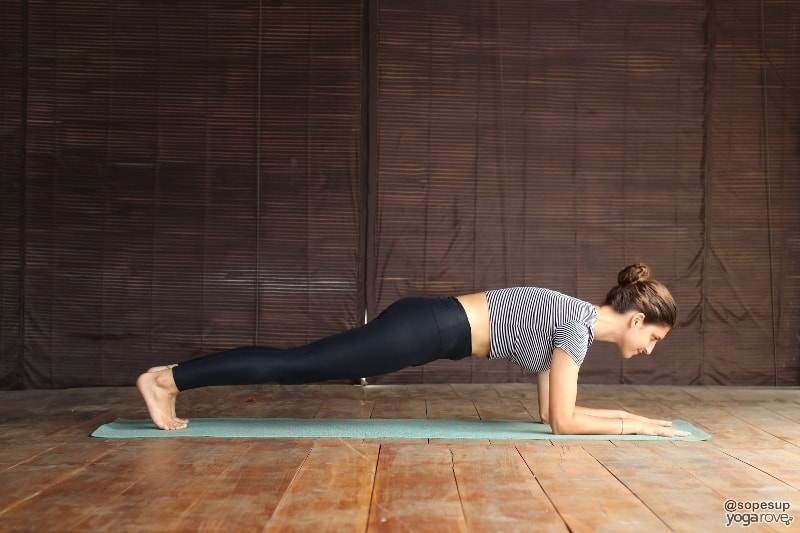
To do Forearm Plank:
- Start on all fours, then come onto your forearms.
- Spread your hands wide, grounding through them. Make sure your forearms in parallel to each other and inline with your elbows. Your elbows should be directly under shoulders.
- Once you have the alignment, step your feet back. Engage your core and create a straight line with your spine and hips, being sure not to dip or raise the hips to much.
- Broaden through the shoulders throughout the pose to keep a lifted chest.
- Try to hold the pose for 15 seconds starting out then build up to longer holds.
2. Sphinx
Sphinx and Cobra Pose are very similar, but I think Sphinx is much more beginner friendly for those that are just starting to work on your shoulders and chest.
Sphinx is a mild backbend, and works on strengthening the abdominal muscles and spine. It is also great for opening the chest and practicing expansion through the shoulders.
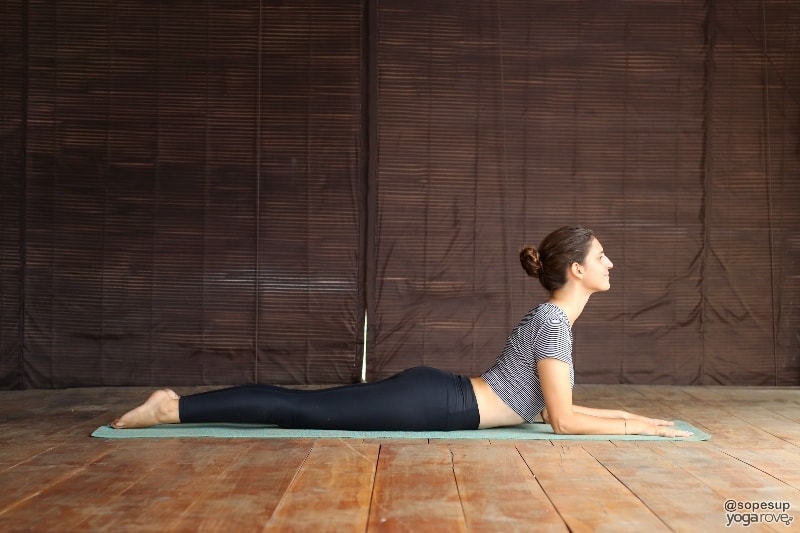
To do Sphinx Pose:
- Come on your stomach, resting on your forearms. Your legs should be about hip distance apart.
- Your elbows should be slightly forward from your elbows to reduce pressure in the shoulder joints. make sure your forearms are parallel and inline with the elbows.
- Drop your shoulders away from your ears and expand through your shoulder blades. Lengthen through your spine and engage your core.
In the video tutorial, she holds the pose for 5 minutes. If you are not ready to hold it this long, start with 30 seconds and build up to 5 minutes as your goal.
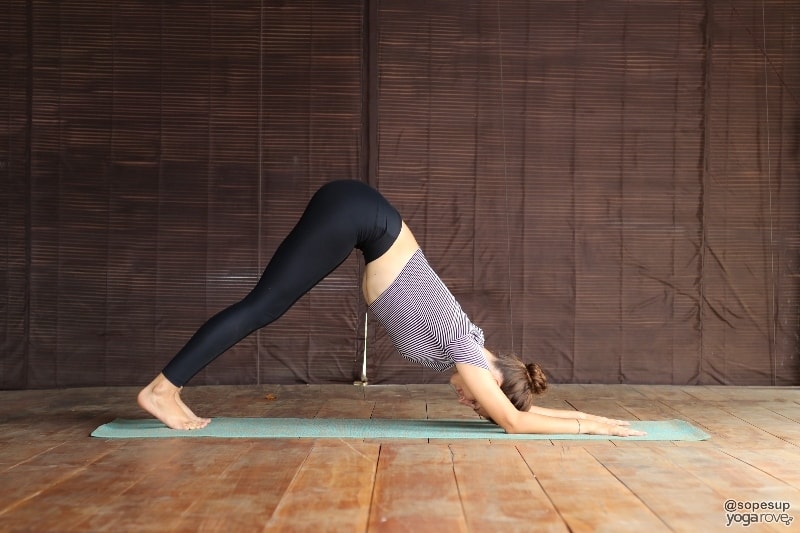
3. Downward Facing Dog
Downward Facing Dog is a great pose for building strength and opening the chest. Mastering this pose into becoming your “resting pose” is a great goal to have as it prepares you for so many other poses.
This pose helps you practice balancing your body weight and teaches you to engage your core so your weight doesn’t all fall onto your upper body, an important factor to remember in Chaturanga!
To do Downward Facing Dog:
- Start on all fours with legs inner hip distance apart and toes tucked and hands strongly grounded with fingers spread wide.
- On your exhale, send your hips up and back into the air. If you have tight hamstrings, bend one leg at a time to loosen them.
- Keep your hands grounded as you engage your arms and shoulders, keeping them away from your ears. Expand through your shoulder blades as you would in Sphinx Pose. If you feel all the weight is on your upper body, that means you are not engaging your core enough.
- Fulling engage your core. Engage your thighs, sending your kneecaps up. Extend through your heels.
- Start by holding this pose for 15 seconds and building up to longer holds.
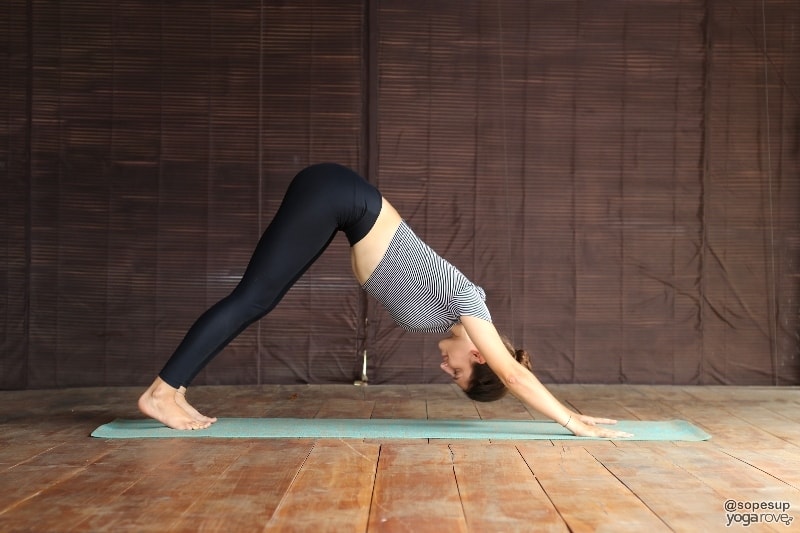
4. Dolphin
Dolphin pose really works your shoulders and your core, in my opinion even more than Downward Facing Dog. This is also a great option for people with wrist issues where Downward Dog is not comfortable for you yet.
To do Dolphin Pose:
- Come onto all fours, then come onto your forearms, making sure forearms are inline with elbows and underneath shoulders. Your legs should be inner hip distance. Spread your fingers wide and ground through your hands and forearms.
- Tuck your toes, then on your exhale, send your hips up and back just like in Downward Facing Dog. The more you walk your feet in, the more challenging the pose becomes. Do what feels right for your body!
- Extend through the heels and engage your core. Make sure you are expanding through your shoulder blades and lifting through your chest throughout the pose.
- Try to hold for 15 seconds then build up to longer holds.
5. Locust
Locust Pose really is great for strengthening the back and abdominal muscles. It is another pose that help your practice opening your chest and expanding through your shoulder blades.
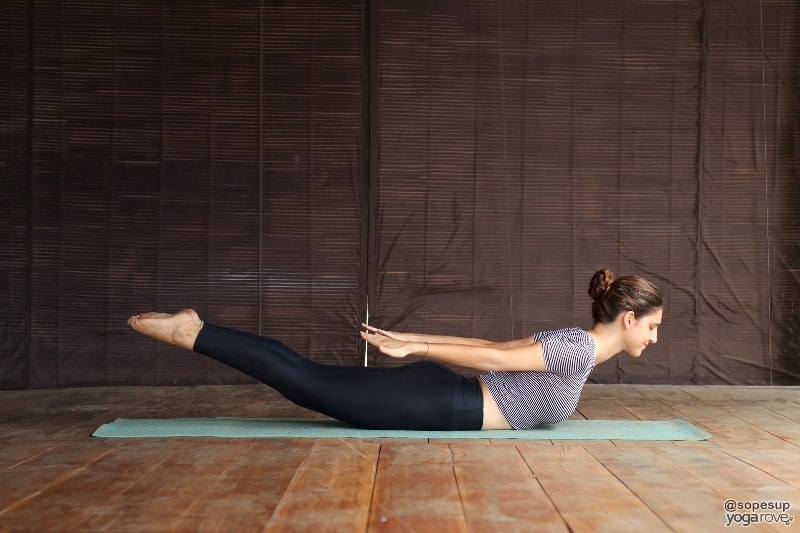
To do Locust Pose:
- Start by laying flat on your stomach with your arms on the mat, palms up, and your forehead resting on the mat. Keep your toes untucked.
- On your exhale, lift your arms, chest, and legs off the ground. Keep your legs straightening together, and keep your arms straight with your palms facing up.
- Lift through your chest and squeeze your shoulder blades together.
- Try to hold for 5 seconds starting out then slowly lower everything to the ground.
Related Questions
How long should you aim to hold Chaturanga? Start out with trying to hold Chaturanga for 5 seconds, then eventually try building up to 30 seconds. There is no “right” set amount of time you need to be able to hold the pose. The most important thing is that you are practicing it with proper alignment.
How long does it take to build up to Chaturanga? Everyone’s body is different! It completely depends on how often and how consistent your practice. Other factors also include how much body strength you have prior to trying to master it as well as any other misalignments in your body. As long as you keep practicing and don’t give up, you WILL eventually get it!

Ally is a Registered Nurse, Registered Yoga Teacher, and Co-Founder of Yoga Rove with her husband Victor. She first started yoga over 7 years ago when she started her nursing career to combat the physical and mental strain, and now loves to teach and help others.
Great ! this is exactly what I was looking for, Ally!
looking forward to practicing the preparatory asanas.
thank you.
Happy to be able to help Xenia!
Thanks for this, it is really helpful 🙂
Glad you found it helpful Nircree 🙂
Very helpful and informative. You explain the do’s and don’t thoroughly and help to make us aware of where we’re failing in the pose. I enjoyed reading this and am looking forward to taking time to read through all of the information on this fantastic site. I’m so glad I found it.
Glad you found it helpful Linda!
Bit late to comment maybe, but I just found this website and this chaturanga breakdown is so great. I just left an inperson class where the teacher explained this pose so confused, and thanks to you I get it (sadly I lack the arm strength to do it properly, but thankfully you even provided for that – thanks!)
Glad you found it helpful Josephine! This was a big struggle for me in my practice as well! I hope it helps you further along your journey towards Chaturanga 🙂
Your blog is so well-written, the tiniest of details for those willing to notice.. the gaze, the weight distribution, the alignment of the toes and heels… much like a good teacher. Thanks so much! 🙂
So glad you have found it helpful Kavya!
I actually read that squeezing your elbows in isn’t a good way either. Your elbows should neither be glued to your sides nor splayed out, but pointed straight backwards as aligned with each individual’s shoulder width. I was doing chaturanga incorrectly for a long time because I was holding my elbows in too tightly to my body, but I have rather wide shoulders, and so my elbows were always pointing slightly in, resulting in an outward rotation of my humerus head, causing front shoulder pain. Not a lot, but enough to cause me to research and search out a teacher who debunked both the “90 degrees is necessary” and the “elbows glued to your sides” myth, as we learn more about body mechanics and individual needs to cultivate strength and stability.