

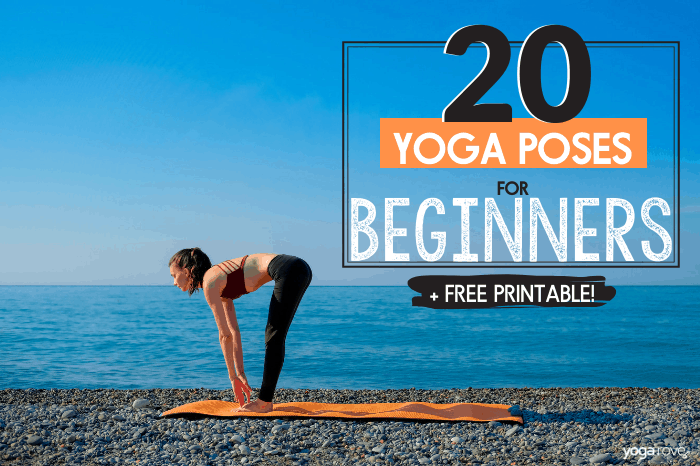
This post may contain affiliate links. Please read our disclosure for more info.
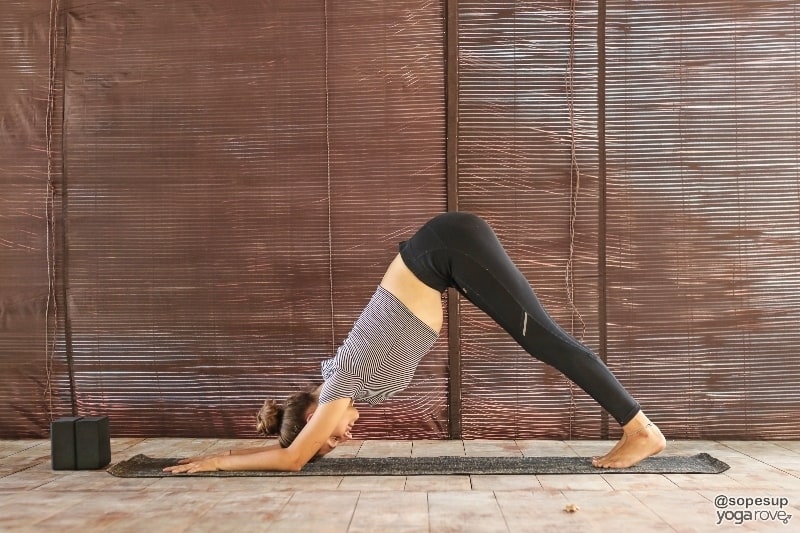
Downward Facing Dog is one of the most recognizable poses of western style yoga. Downward Dog commonly goes by its Sanskrit name of Adho Mukha Svanasana and it is an essential pose to learn for your practice and is especially important to learn correctly.

Downward Dog is a key pose as many other poses start from there. It offers a solid foundation for any yoga sequence and is a perfect standalone pose as it positively affects your whole body. Adho Mukha Svanasana is an inversion pose which offers many benefits. In addition to being an inversion, Down Dog can also be used as a resting pose throughout your practice.
Benefits of Downward Dog
Adho Mukha Svanasana is one of the most beneficial yoga poses, mentally and physically. Downward Dog not only offers visible changes in your body, it also makes you feel better mentally, leading to a better quality of life, for you and the people around you. This pose delivers a full body stretch while at the same time lengthens and strengthens your bones and muscles.
Physical Benefits:
- Improves blood circulation
- Improves digestion
- Relieves back pain
- May relieve neck pain and/or migraines
- Strengthens shoulders, back, arms and legs
- Stretches spine, shoulders, back, arms, legs, hamstrings, calves, hands and feet
- Tones stomach and arms
- Increases bone density
- Increases energy
Mental Benefits:
- Reduces stress
- Reduces anxiety
- Can relieve insomnia
- Shifts perspective as you literally see things upside down
- Boosts your mood by bringing more oxygen to your brain
- Increases and improves focus and awareness
- Promotes patience
How to Do Downward Dog
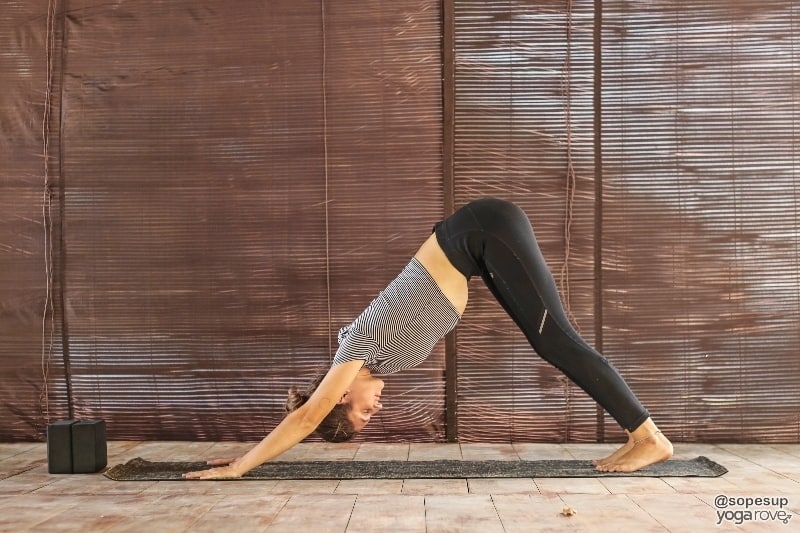
- Start on all fours, with wrists inline with shoulders and toes tucked.
- On your exhale, push your hips up and back, straightening your legs.
- Engage you arms, while keeping in mind to keep your shoulders away from your ears.
- Engage your core and legs, lifting up through your kneecaps.
- Press through your heels, and “pedal” your feet back and forth if you feel tight.
This is just a general how-to. Below we are going to go into how to warm up for this pose, and some modifications you can make.
Warming Up for Downward Dog
There are numerous poses you can do before coming into Down Dog. These poses will gently warm up your muscles as you move into Adho Mukha Svanasana.
1. Plank Pose
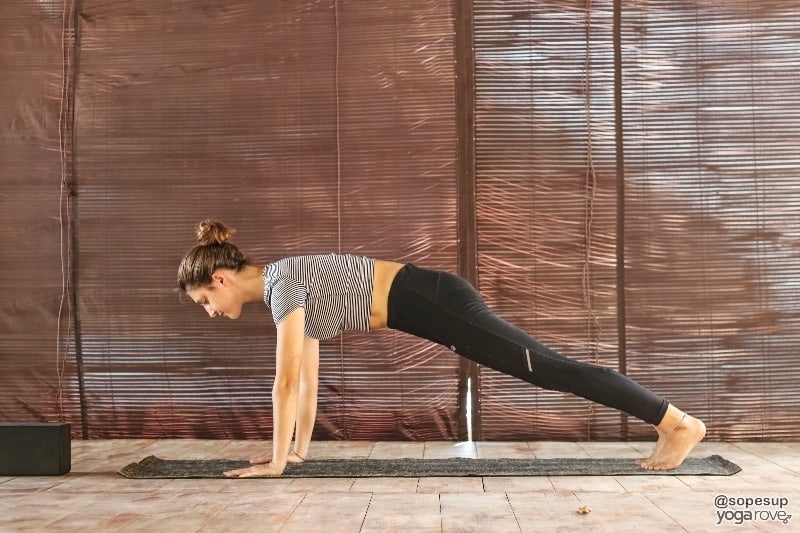
- Start on all fours, with hands underneath shoulders and inline with wrists.
- Step one foot back at a time to come into Plank.
- Engage your core to bring your pelvis into alignment. You want to form one straight line with your body, so make sure you are not dipping or elevating your hips out of alignment.
2. Dolphin
- Start in Tabletop position with knees hip width apart.
- Come down onto your forearms, keeping them parallel to each other and even with your shoulders.
- Using your core, lift your hips up and back to come into Dolphin.
- Engage your core to stay lifted and prevent all your weight from dumping into your shoulders.
3. Upward Facing Dog
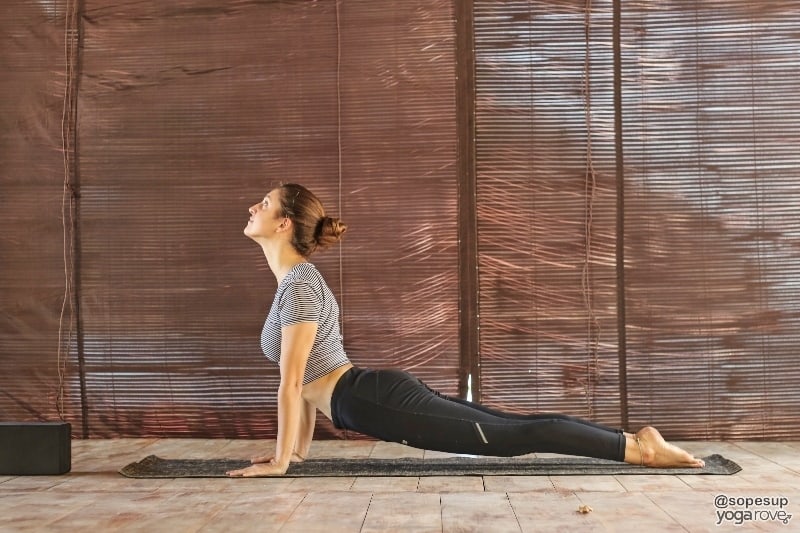
- Start lying belly down on the ground and toes untucked.
- Place your hands flat on the ground by your sides with your fingertips landing slightly behind your shoulders.
- On your exhale, lift your upper body completely off the ground, straightening your arms and dropping your shoulders.
- As you are doing this, press the tops of your feet into the mat, lifting your thighs, knees, and shins off the ground.
- Let your gaze floating upward and lift through your chest.
4. Cat/Cow
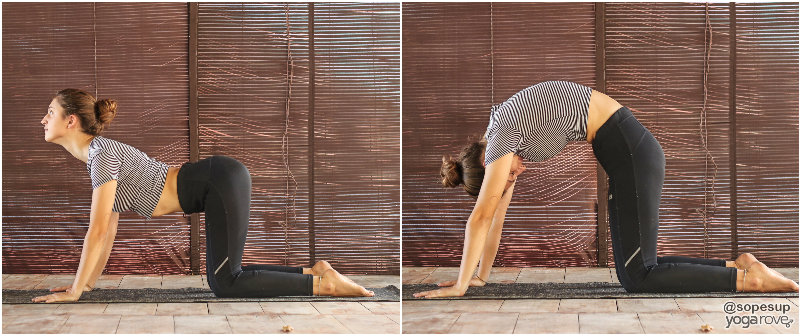
- Start on all fours in a neutral position, toes tucked or untucked.
- On your inhale, drop your belly, arch your back, and lift your gaze to come into Cow Pose.
- On your exhale, hollow your belly, round your back, and drop your gaze to come into Cat Pose.
- Repeat this flow of two poses for a few rounds.
Mistakes People Make During Downward Dog
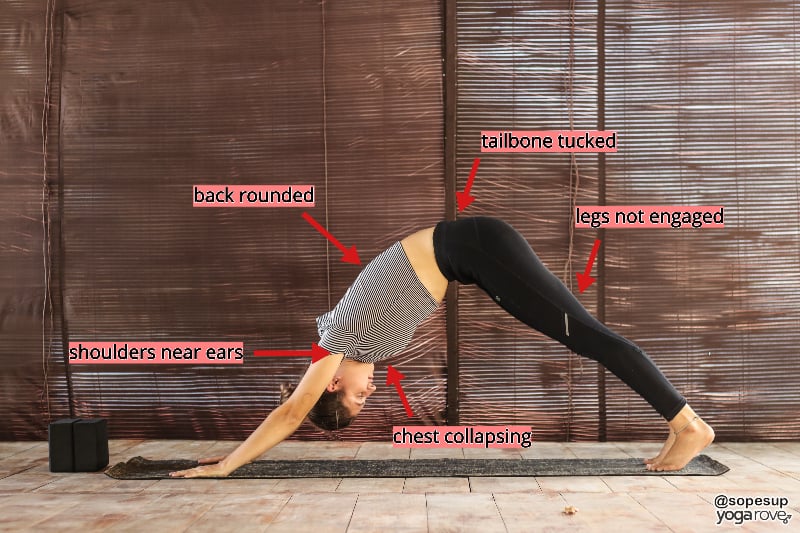
There are various mistakes people make when there are in Downward Facing Dog. Most people tend to make the same mistakes and they are typically…
- Your hands are not shoulder width apart: having your hands too close together can create cramping in the shoulders, your aim is to create space between your shoulders.
- Feet are not hip width distance apart: similar to why you want your shoulders apart, you are trying to create space between your hips.
- Fingers too close together: keeping your fingers too close together creates more strain on your wrists.
- Locking your knees: locking your knees and elbows are really rough on your joints, it also makes you become stiff and rigid which makes it hard to balance.
- Locking your elbows: same as above.
- Dropping your shoulders: this puts too much tension and pressure on your neck and spine.
- Straining your neck: this creates tension instead of relieving it.
- Lifting your heels too high: creates an imbalance and does not properly stretch your legs.
- Not engaging your core: when you don’t engage your core – you bring all the tension and pressure into other parts of your body.
- Forgetting to breathe: this sounds silly but ensuring that you take long deep breaths will help you focus on the pose while relieving stress and tension.
Beginner Modifications for Downward Dog:
As with most yoga poses there are modifications you can take if you are a beginner, injured or pregnant. This pose should feel good. You should feel a comfortable full body stretch.
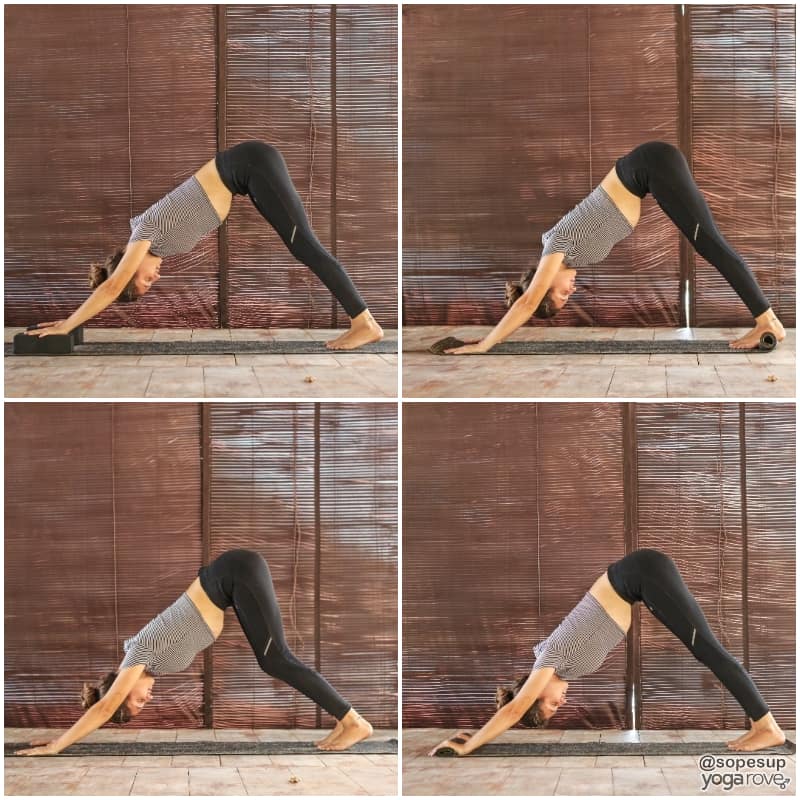
- You can use blocks underneath your hands: bringing blocks underneath your hands will help support your wrists.
- Use a rolled up mat underneath your heels: this provides your heels more support if they are too lifted and can also help you stretch more.
- Bend your knees as much as you need to: if you find that your hamstrings and calves are tight, bending your knees can help alleviate some of that strain.
- If you are pregnant and start to feel dizzy or lightheaded: drop into child’s pose with open knees and use a block underneath your chest or forehead to keep your belly lifted off the mat. ALWAYS consult with your doctor about how far into pregnancy down dog is safe for you and your baby.
- If your wrists hurt: put a rolled up mat underneath the heels of your hand.
- Come into dolphin: drop down to your forearms, leaving you tailbone high – coming down to your forearms is a good option if you are having pain in your wrists.
- If you’re feeling pinching or crunching in shoulders or neck: press your shoulders down and away from your ears as this will start to elongate your spine.
Alignment Tips to Improve Downward Dog
From child’s pose:
- Press your palms and toes into your mat.
- Lift your tailbone and knees to the sky and begin to straighten your arms and legs.
- Keep a gentle bend in your knees and elbows.
- Drop your head towards your mat letting it fit right between your elbows/upper arm.
- Elongate your spine and neck – creating space between each vertebrae.
- Set your gaze on one single spot between and behind your knees.
- Engage your core – move your bellybutton up and back.
- Press your heels down – even if they don’t ever touch the mat (fellow runners, I am looking at you).
Once you are in the pose, check in with your body and make sure your..
- Hands are shoulder width apart – or wider.
- Feet are hips width distance apart – or wider.
- Spreading your fingers.
- Breathing – I know this sounds silly, but a lot of people forget to breath. Make sure you are taking long, slow, deliberate and deep breaths in and out of your nose. Try focusing on moving your breath to the space between your shoulder blades.
Possibile Variations
Once you’ve been practicing Downward Dog for a little bit and you are feeling confident with the pose try to challenge yourself with these variations.
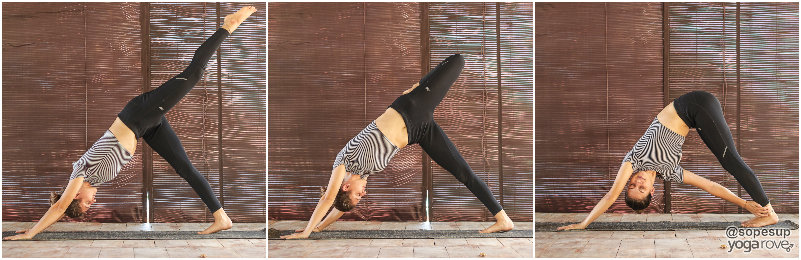
- Three Legged Down Dog: lift your right foot to the sky, keep both hips facing down to the mat, flex your toes towards your face, press your left heel closer to the ground – switch sides.
- Hip- Opener: from three legged down dog, bend your knee then rotate your hips so that your right hip is above your left hip (right hip is closer to the sky and your left hip is closer to the mat) – switch sides.
Amanda has been teaching yoga since 2013. When she’s not teaching or writing she loves to run and surf and is obsessed with dogs.
Thank u. Excellent description of the difficulties of down dog; how to do ; 🙏
glad you found it helpful Ajay! 🙂
Thank you! Really helpful, very clear.
So glad you found it helpful Meg 🙂
Is it more important to not have a rounded back or tucked tailbone than to have straight legs (by engaging the quads). If I am to attain the above then my legs are so bent that I’m nearly kneeling. Ive tried to ‘hinge at the hips’ by leaning at a wall so I’m making a right angle with my torso and legs so feeling the stretch in the hamstrings and calves. Is this OK? I’ve been a runner for many years hence the tightness.
Hi Martin! Yes, having a long straight spine is definitely more important than having straight legs. I would focus on lengthening through the spine first, and maybe trying to “pedal” your feet by straightening one leg at a time to gently stretch your hamstrings if you’d like. Practicing other poses like Ragdoll will also help relieve your hamstrings. We have an article that explains the different poses you can do here: https://yogarove.com/release-tight-hamstrings/. Also make sure you are warming up your body enough before going into Down Dog and focus on warming up the hamstrings a bit more may help.
But even the most flexible people are not able to get straight legs in Downward Dog some days- it all depends on your body and how you warm up that day as well. It will all come with time and practice 🙂 Focusing on how your body feels in the pose and being mindful of the breath is definitely top priority in my opinion!
Could you make a summary infographic for all of the poses in this article? I have the printable already but it is sometimes nice having a colored pose summary of the blog post also! <3 I adore you guys and your website SO MUCH.
So glad you are enjoying our website! You might enjoy our guides if you want breakdowns of each pose in a simplified way that’s all on one page. You can read more about our guides here: https://shop.yogarove.com/products/the-yoga-pose-guide-bundle
Thank you, this was really helpful! Still don’t think I’m doing it right though :/
Glad you found it helpful! What don’t you think you are doing right?
Hi, I am just starting out with yoga, and I am not very flexible or strong. I have trouble staying in Downward Dog because my arms and shoulders are holding all of my weight. It feels just like a plank, and I can’t keep the position for long. In the photos, it looks as if the yogi have relaxed arms. Mine are rigid, trying to hold me up. Any tips? I am working on upper body strength to make the downward dogs easier. Am I just in the wrong position? Thanks!
Hi Julie,
This is most likely due to lack of muscular engagement in the rest of your body- I struggled with the same issue when I first started my practice 🙂
This pose should feel like a full body pose- meaning from your hands pressing evenly into the mat, to your engaged core, to your tailbone reaching up towards the ceiling, and to you heels reaching towards the mat (even if they can’t touch completely). This helps you actively engage each body part to balance your weight easier and take all of the work off of your upper body.
It will take time to build that mind-body connection to notice when you are engaging each muscle but just keep practicing and you will definitely see improvement.
Hope that helps!