

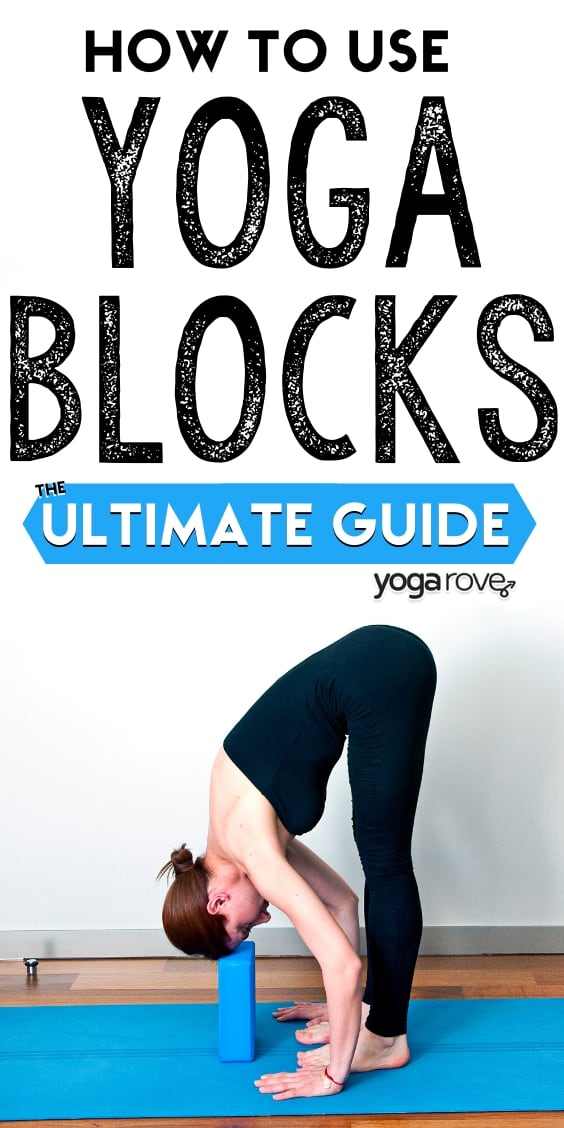
This post may contain affiliate links. Please read our disclosure for more info.
If you’re a beginner to yoga, or have been practicing for a bit but just can’t seem to improve your flexibility or strength, you are probably under utilizing a very important tool: yoga blocks.
Yoga blocks have been used for decades, and were specifically created to aid yogis of all levels in their practice.
But the thing is, when you go to a studio or take a class, they don’t really give you the 101 on how to use blocks to help you. There are a lot of different ways you may have not even thought of that you can use them for.
Why should you use yoga blocks?
Yoga blocks are a really savvy tool to use to help you substantially improve your yoga practice and physical well being. Here are a few things they help you with:
- Build upper body strength
- Practice correct alignment
- Protect and build strength in weak wrists
- Get deeper into poses
I promise after you read this article, you’re going to immediately want to go get yourself a pair of your own blocks! But FIRST, make sure you get the right ones.
Which yoga blocks are best for you?
There are a few different types of yoga blocks, and you’re going to want to pick the one that best suits your practice and your goals. They go based on material and thickness.
Different block materials
- Foam:
These are softer and lighter than the other two types we’re going to go over. These are best for beginners as they may be more comfortable to use in supportive postures.
- Cork:
Some people feel that foam blocks don’t provide enough grip, or are too light for their liking. Cork is the next best option for beginners as they are softer than wood blocks and are heavier. They are also eco friendly and usually last longer than foam blocks.
- Wood:
Yoga blocks were originally in wooden form. Today, they are usually made from bamboo. These are much harder than foam blocks, so I would not say these are best for beginners that are going to use them in restorative poses. The upside is they practically last forever and are very sturdy, but of course that means they are more expensive. They also tend to lose their grip when you get sweaty, so keep that in mind.
To check out our top recommended blocks and the ones we use for our own practices, check out our Yoga Blocks Buyer’s Guide.
Different block sizes
There are generally three different sizes that are used:
9″ x 6″ x 4: Wider than traditional blocks
9″ x 6″ x 3: The average yoga block size
9″ x 6″ x 2: Thinner than average yoga blocks
If you have smaller hands, you might not want to get the thickest blocks as they will be hard for you to grip. The thin yoga blocks can be useful as you are building up your flexibility and do not need as much support anymore.
I suggest starting out with the traditional size of 9″ x 6″ x 3, this is usually a good starting point for everyone. You can then turn the blocks in different ways to make them shorter or taller.
Do you need 1 or 2 yoga blocks?
I would definitely say if you’re going to invest in yoga blocks, invest in a pair of two. Many of the ways yoga blocks are used in helping you deepen into poses usually require one block, but the majority of the ways to use them for strengthening and improving flexibility in poses require two, one on each side.
Luckily, usually when you buy a set of yoga blocks, they automatically come with two, unless you are buying more high end bamboo or wooden blocks.
How to Use Yoga Blocks
Yoga blocks can be used in a variety of ways, but in the end, to benefit you, it really boils down to three main things: lengthening, strengthening, and support. We’ve broken down how to use yoga blocks by providing 12 different examples of yoga poses they can be used in. The ways the yoga blocks are used in the following poses can be carried over to use with other poses as well.
Lengthen
This refers to correcting your alignment and deepening the stretch that you are in.
When you are in a pose that you feel you are struggling to stay in, you need to be using blocks.
When you do this, you are most likely not in good alignment and therefore not obtaining the full benefit of the pose.
Using yoga blocks will help prevent you from over straining yourself, improve your alignment, and get deeper into your poses to become more flexible.
Pretty much anytime your hands are unable to touch the ground in a pose, it would be beneficial for you to use yoga blocks.
Yes, there are alternatives such as resting your hands on your shins or ankle instead, but blocks provide much more stability and comfort than doing that, which in turn helps you get deeper into the pose and improve your flexibility.
Here are a few different ways you can use yoga blocks in different poses to get better alignment and therefore get a deeper stretch.
1.Triangle
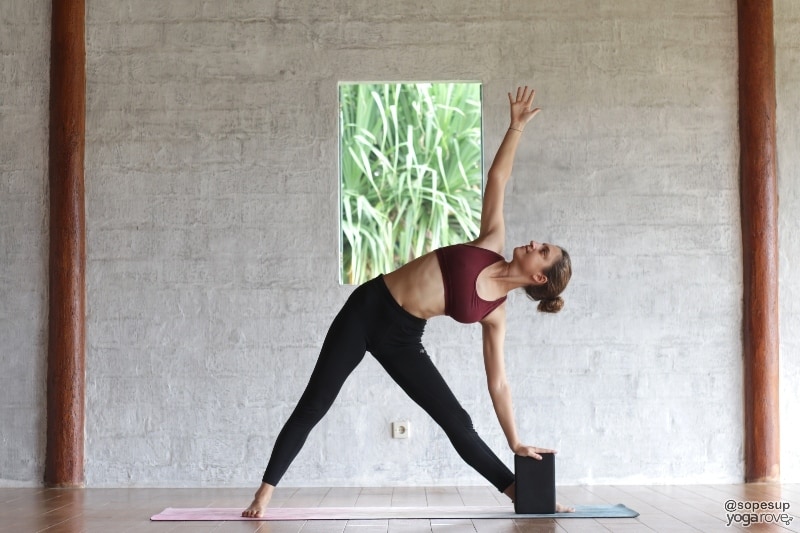
The next time you do Triangle Pose, if you can’t reach the floor, instead of grabbing onto your ankle or shin, use a block. The reason you can’t reach the ground is because you have tight hamstrings. Triangle pose is a great pose to improve your alignment, but this becomes very challenging when you are uncomfortable.
How yoga blocks help: You are supposed to be completely linear in Triangle, as if you can fit between two walls. When your hand is struggling to stay on the ground or your shin, most of the time your body naturally hunches over, in which you are breaking proper alignment. When you use a block in Triangle, you are giving yourself more stability so you can focus on lifting through your chest, lengthening through your finger tips, and folding over your front leg.
How to do Triangle Pose with a yoga block:
- Start in Mountain Pose and step your feet out wide. Turn your left toes to the left at 90 degrees and keep your right toes facing forward.
- Place a yoga block by your left foot, close to the heel.
- Reach your arms up overhead, and gently float your left arm down to rest on the block. Lift through your chest and extend your right arm up towards the sky. Extend through the fingertips and allow your gaze to follow.
- Engage your core and ensure your body is linear, meaning you are not hunching or arching your back.
- Adjust the block’s height based on your needs so you are in proper alignment and still feeling a good stretch.
2.Standing Forward Fold
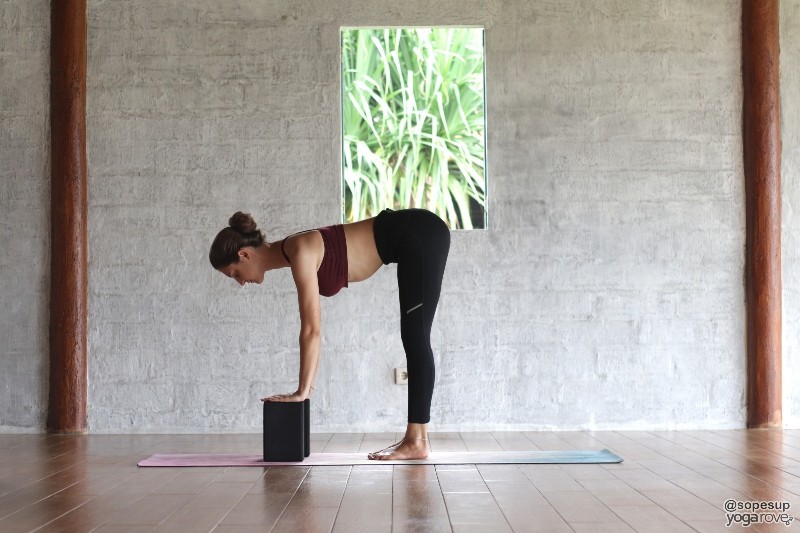
You are unable to reach your fingertips to the ground for the same reason you can’t reach them to the ground in Triangle: tight hamstrings. When you have tight hamstrings in Standing Forward Fold and are struggling to touch your hands to the ground, often your back naturally curls and you are missing out the benefits of the pose.
How yoga blocks help: Standing Forward Fold is a great way to stretch your back and improve flexibility in your hamstrings, but in order to do this, you need to have a straight back. Using blocks gives you extra length and more control over how deeply you fold, so instead of struggling to reach your toes, you can focus on stretching in while maintaining proper alignment in your spine.
How to do Standing Forward Fold with yoga blocks:
- Start in Mountain Pose, and place two blocks in front of your feet.
- Place your hands on your hips and while mindfully maintaining a straight back, engage your core and use it to fold at your hips towards the ground.
- Allow your hands to come to rest on the yoga blocks when you feel your spine starting to curl and you begin to feel a stretch.
- Adjust the height and the distance of the yoga blocks to suit you. Keeping the yoga blocks farther away allows you more control for a milder stretch, while pulling them closer towards your feet will provide a deeper stretch in the hamstrings and hips.
3.Camel
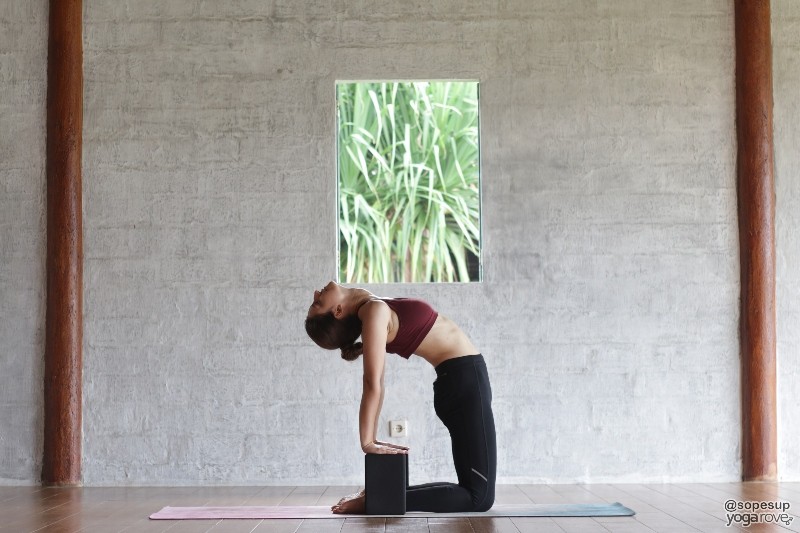
Camel is a great chest opener, but can be really uncomfortable if you have back pain or tight shoulders.
How yoga blocks help: Yoga blocks provide you with extra length so you are not forced into a backbend you are not ready for. Instead, you will have more control over how deep you go and can gradually progress as you become more flexible.
How to do Camel Pose with yoga blocks:
- Start in Hero’s Pose, then lift your seat off your heels and straighten your legs so you are standing on your knees. You legs can be about inner hip distance apart with your toes untucked.
- Place a block on either side of your feet right next to your heels. I suggest starting with the tallest height.
- Lift up tall through your chest as you bring your hands onto your hips to start, then one by one onto each block with your fingertips facing towards your body.
- Allow yourself to come into a mild backbend (as much that is comfortable for you) and let your gaze fall backwards.
- Come out of the pose by first bringing one hand at a time back onto your hips then lift up to a neutral spine.
4. Downward Facing Dog
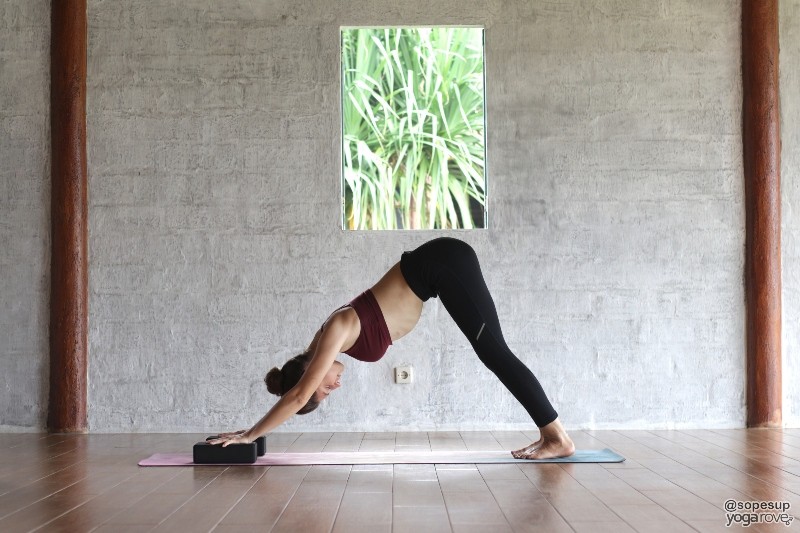
Downward Facing Dog is commonly referred to as a resting pose in yoga, but if you have tried Downward Dog as an inflexible beginner, you know it feels like anything but a resting pose. A lot of people have difficulty balancing their body weight so it does not all fall on their upper body, have discomfort in their wrists, or have difficulty staying in the pose due to tight hamstrings.
How yoga blocks help: Elevating your upper body will take the pressure off your wrists, balancing your body weight, and allow you to comfortably sink deeper into the pose to improve your overall flexibility.
How to do Downward Facing Dog with yoga blocks:
- Start in tabletop position. Grab two blocks and place them underneath your hands. You can choose to use the wide side or thinner side based on the height you prefer and which is more comfortable for your hands.
- Tuck your toes and on your exhale, push your hips up and back. Use the elevation of your upper body to help you sink your heels deeper towards the mat.
- Remember to still engage your core, arms, and legs as you would in this pose without blocks.
Strengthen
Yoga blocks are a great tool to use to build strength throughout your entire body. A lot of yoga poses are great for improving strength, but you may not be reaping the benefits because you are unable to maintain proper alignment, form, or have not built up enough strength to get into the pose.
Blocks are a great way to force your body into perfect alignment and push yourself to use the correct muscles to stay in the pose. You can also use them to provide you with a little extra support in some challenging poses so you have more control over the severity of the pose, allowing you to build strength effectively.
Here are a few yoga poses with blocks that are perfect for building strength:
1. Boat Pose

Boat Pose is one of the best exercises to do to gain true core strength. The problem is, many people lack the flexibility or strength in their core and hip flexors to stay in proper alignment. This decreases the effectiveness of the pose.
How yoga blocks help: In order to really build core strength from boat pose, you need to be completely engaging your legs and core. When you have weak hips or a weak core, it becomes difficult to practice this pose in correct alignment. Squeezing a block between your legs helps you keep your legs straight and forces you to engage your core, making this an excellent strengthening pose.
How to do Boat Pose with a yoga block:
- Start in a seated position with your knees bent and feet flat on the ground. Place your hands on the ground by your hips and place the yoga block between your calves.
- Begin to lean back until you feel your core engage. Be mindful to maintain a straight back and lift through your chest.
- Squeeze the yoga block and bring both legs into the air at a 90 degree angle. You can stay here or lift both legs into a straight position, squeezing the block.
- Bring your hands up along your sides, fingers pointing towards the front of the room.
2. Chaturanga
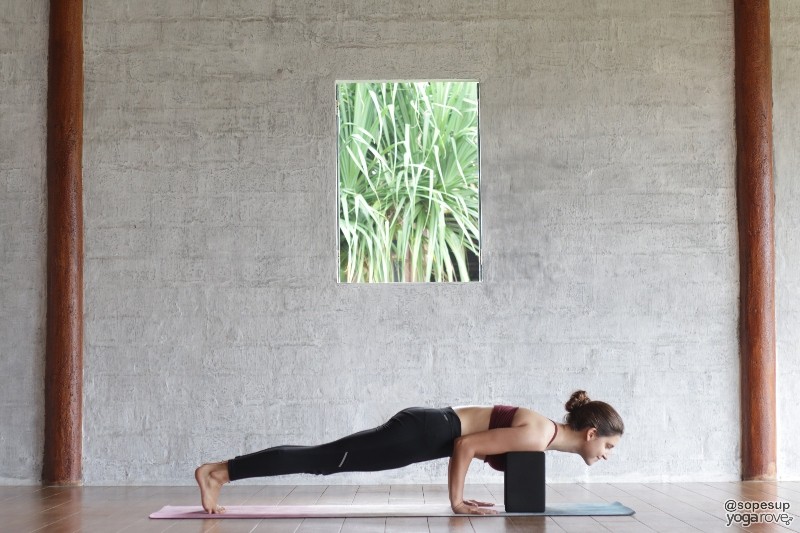
Chaturanga is a great pose to build upper body and core strength, but the problem is, you NEED upper body and core strength to do this pose in the first place. Otherwise you will pretty much collapse to the ground. This was a really hard pose for me to do when I first started. It felt impossible to keep my elbows in and maintain proper form without completely collapsing.
In Chaturanga, you are basically doing a push up with your elbows tucked into your sides. You need to maintain a straight back and engage your core just like you would in a regular push up. But for people who have no upper body strength, they tend to focus all of their attention of the arms, then don’t engage their core, and it pretty much goes downhill from there.
How yoga blocks help: When you place two blocks under your shoulders, you are providing them support and aiding your body into proper alignment. You can then focus on engaging your core and building up your upper body and core strength. Remember, just because the blocks are under your shoulders, does NOT mean you should be resting on them. They are merely there for support until you can build up enough strength to go without them.
How to do Chaturanga with yoga blocks:
- Start in a traditional plank position, and have two blocks placed underneath your shoulders, one on each side at their tallest height.
- Squeeze your elbows in towards your sides, engage your core, and shift your body weight slightly forward.
- Begin to slowly lower yourself by bending your elbows to 90 degrees, in which they will be resting on the yoga blocks.
- Do not let your body rest. Keep engaging your arms, core, and legs. If possible, hold this pose for at least 5 seconds and try to push up after wards to work on building your strength to full chaturanga.
3. L Sit Arm Balance

If you’re finding it hard to take your poses off of the ground, this simple arm balance is a great place to start. You may not be able to get unsupported arm balance because you lack upper body strength, core strength or have tight hamstrings. You need all of these components to be able to successfully do this pose, and doing it supported is a great way to help you improve these three things.
How yoga blocks help: Using a block under your hands gives you extra height, making it more accessible to get your body off of the ground. Now you can focus on engaging your legs, core, and arms, and building up your strength from there.
How to do L Sit with yoga blocks:
- Start in Staff Pose and place a block on either side on your hips.
- Place your hands on the blocks and engage your core and legs.
- Attempt to lift yourself off the ground, using the extra height of the blocks as leverage. Try starting with the blocks at the tallest height possible and holding for an allotted time, then once you are able to easily hold for that time, decrease the height of the blocks.
- Hold for 5 seconds and build up to improve strength.
4. Crow Pose
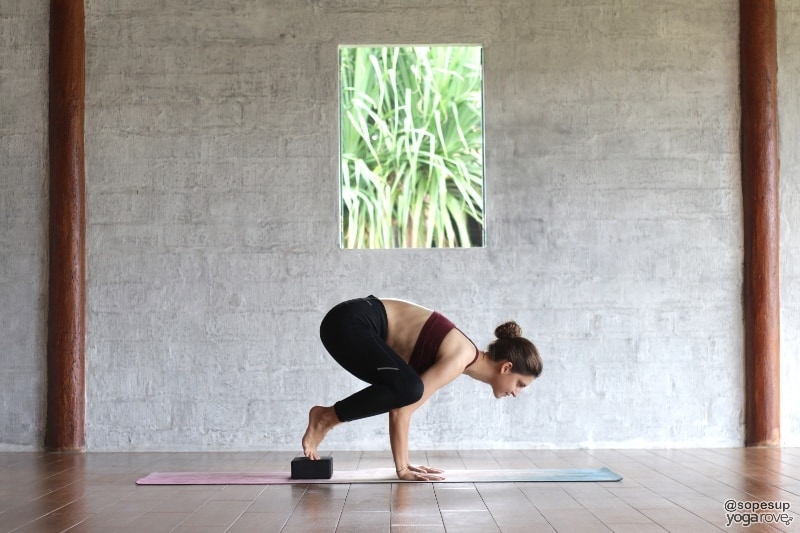
People find crow pose difficult for usually three reasons:
A) they lack the upper body strength to hold themselves up
B) they find it difficult to properly balance their bodyweight to get their feet off the ground
C) they are scared of falling forward onto their face.
How yoga blocks help: Using a yoga block underneath your toes gives you the chance to effectively build and test your upper body strength and gives you the extra support you may need to help you balance your bodyweight.
How to do Crow Pose with a yoga block:
- Start in a supported toe stand with your feet on a yoga block.
- Place your hands onto the ground to come into the prep pose for crow, and then use the elevation of the block to help you.
- Lift one foot off at a time and practice balancing with one foot, and then the other.
- Play around by lifting one foot off at a time and experimenting with your balance.
Doing this consistently will help you master crow pose in no time!
Support
A lot of yoga poses that are classified as restorative can actually be pretty strenuous and ineffective if you lack flexibility. There are several ways you can use blocks in each pose to give you the support you need to deepen into the pose and and unleash the tightness.
1. Hero’s Pose
Hero’s Pose is great for stretching your hips and quadriceps. The most common complaint for people in this pose is that their ankles start to hurt, or the fronts of their thighs cannot tolerate the stretch.
How a yoga block helps: Using a block underneath your seat provides comfort for your ankles and makes the stretch milder so you can stay in the pose for longer. If one block is not enough, feel free to add another!
How to do Hero Pose with a yoga block:
- Start on all fours in a tabletop position.
- Untuck your toes and bring your seat back to sit on your heels, bringing your body into a tall upright position.
- Lift up your seat slightly and spread your feet enough to place a yoga block directly underneath your seat. Feel free to add another block if needed.
2. Shoulderstand
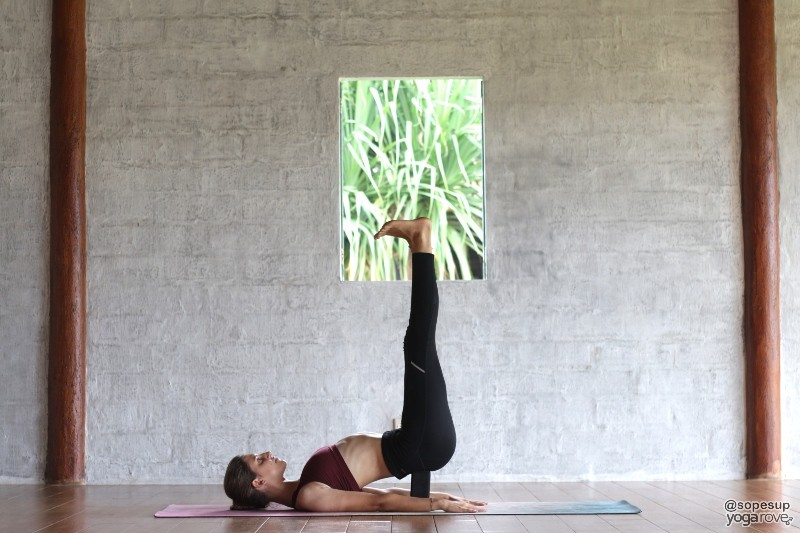
Shoulderstand is a restorative pose that is used at the end of many sequences to wind down. It is great for stretching your lower back and hamstrings, but if you lack flexibility in your hamstrings, you may find it difficult to elevate your legs straight up into the air, or may simply find it difficult to hold up your legs in this pose.
How a yoga block helps: Placing a block right underneath your sacrum gives your back extra support and makes elevating your legs straight into the air much more attainable. This will allow you to focus on engaging your legs and pushing through your heels to get the most out of the pose.
How to do Shoulderstand Pose with a yoga block:
- Start lying down with your legs bent and feet flat on the floor, as if you are preparing for Bridge Pose.
- Lift your seat off the ground and place the yoga block underneath your sacrum. You may have to adjust it a few times until it feel comfortable for you.
- Once the block is set correctly, lift your legs up into the air and flex your feet towards you. You will notice it is much easier to straighten your legs with the block supporting you.
- Allow your arms to rest by your sides.
- Carefully come out of this by lifting up just enough to remove the block and slowly releasing your legs to the ground,
3. Fish Pose
Fish pose is a backbend often practiced after Plow pose, but can feel very awkward if you have poor range of motion in your chest, shoulders, or back. It can tend to feel difficult to stay in and put strain on your neck if you lack the flexibility to use proper alignment.
How a yoga block helps: Placing a yoga block between your shoulder blades allows the rest of your body to relax. This allows you to still obtain the benefits of the backbend while avoiding the discomfort until you have built up your flexibility.
How to do Fish Pose with a yoga block:
- Start in Staff Pose with your hands by your sides. Place a block behind you where you measure your shoulderblades will land when you lie down. (If you don’t get it right, don’t worry, you can easily adjust it)
- Slowly come onto your forearms and allow yourself to rest onto the block. If the block does not feel as though it is in the right place, or you feel pain, move the block and readjust.
- If it feels okay, let your body completely relax onto the block and into the mild backbend. Focus on your breathing and carefully come out of the pose by removing the block and rolling to your side before sitting back up.
4. Pigeon Pose
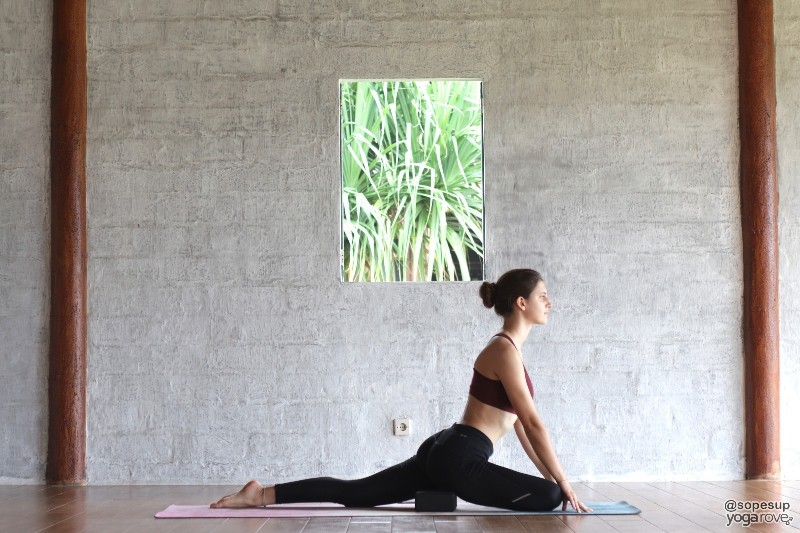
Many people find Pigeon Pose difficult when first starting out for multiple reasons, one of them being that they are unable to keep their knee bent or simply cannot tolerate the pose because of their tight hips. Although this pose is great for releasing tight hips, it’s not very effective if you can’t stay in it for more than 1 second.
How a yoga block helps: Using a yoga block underneath the hips of your bent leg takes the pressure off of your knee and also makes the stretch much milder than if it were practiced on the ground. This will help stretch your hips until you are ready to take the pose down to the ground.
How to do Pigeon Pose with a yoga block:
- Start in a tabletop position with your toes tucked. Bend your right knee and bring it up to come parallel with the mat as much as is comfortable for you. Then place the yoga block underneath your right hip.
- Straighten your back leg and untuck your toes if you feel comfortable doing so. Try to square off your hips as much as you can.
- Continue to lift through your chest throughout the pose, and fold over even slightly if you feel comfortable doing so. To come out of the pose, remove the block and rotate your body to come into a seated position.
I hope this article was helpful for you guys! If you’d like to learn about more poses that can help improve your flexibility, we have a FREE Resource Library full of Yoga Routine Printables you can do anytime. If you’d like to save these poses for later, go ahead and pin the infographic we made:

We are constantly adding to the library, and always email our readers when we’ve added new stuff for them!
Here are a few other resources you may find helpful for improving your flexibility and getting the most out of your practice:
- How to Turn Your Yoga Practice into a Daily Habit
- How to Start a Home Yoga Practice as a Beginner
- 20 Essential Yoga Poses for Beginners

Ally is a Registered Nurse, Registered Yoga Teacher, and Co-Founder of Yoga Rove with her husband Victor. She first started yoga over 7 years ago when she started her nursing career to combat the physical and mental strain, and now loves to teach and help others.
Appreciate your intention and efforts to make this world healthy. It’s really inspiring for me. Your articles are nice and very helpful.
Thank you so much!
Wish you a lot of success in your work. ????
Hi Nitin! Thank you so much, I’m so glad you are finding our site helpful 🙂 Feel free to email us if you ever have any questions along your journey!
I’ve seen so many sites on yoga but none on using the blocks. This is full of information. Most important to me are the clear pictures showing where to place the blocks and how to use them in the poses. Thank you so much for this perfecting information. You are unique!
You’re so welcome Anita! Glad you found it helpful 🙂
This is so helpful! Wish teachers covered this in yoga class.
So glad you found it helpful Carmen!
Thanks so much Ally! I’ve been incorporating the use of blocks more and more into my teaching – people are always genuinely surprised at how much they enjoy using them and how their practice can change and deepen. I love how you’ve explained this so well and am so grateful for the amazing work that you do!
My pleasure! And yes I totally agree- blocks are such an essential tool and can help so much with any level practice! So glad it was helpful 🙂
This is full of information. thanks
Absolutely 🙂
I discovered this site when I searched instructions to use yoga blocks. I had gone to a few yoga classes for beginners–that were anything but!–and had such a hard time that I was very discouraged. I wanted to show these instructions to the instructor! Using these blocks have made me feel much more confident and have helped extremely with my poor, tight, inflexible muscles! Thank you so much!
So happy you found it helpful Ingrid! Yoga blocks are such a handy tool!
Excellent pictures very helpful with comments. Thank you.
Glad you found it helpful Nancy!
Hi Ally, I found this and a lot of the other articles in the library very helpful 🙂 Thaks
So glad to hear that Nircree!
Love! Thank you!
You’re very welcome! 🙂
Thanks,lots of helpful advice and Emails for a newbie.Excellent site.
Thanks Barry 🙂 Glad you are finding it hepful!
Dear Ally
you are doing great work, very informative, I found so many points that were new to me and I will certainly use them in my teaching. God Bless you
Glad to be of help Narendra!