

This post may contain affiliate links. Please read our disclosure for more info.
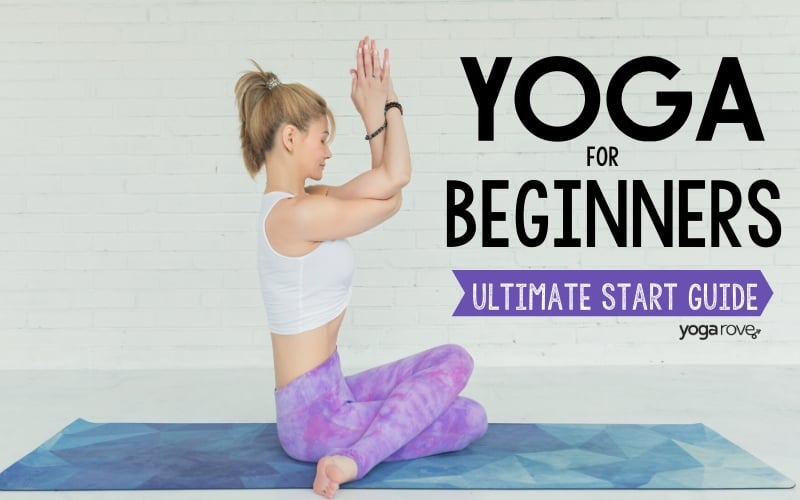
Just started your yoga practice and can’t tell your Down Dog from your Mountain pose? Here are 15 Hatha yoga poses that are great to practice and get to know as a beginner. As a new yogi, take your time learning each pose, listen to your body, and enjoy your yoga journey!
What is Hatha Yoga?
The term Hatha Yoga often gets confused. “Hatha” is the overall umbrella term for yoga that includes multiple types of yoga such as Vinyasa, Ashtanga, and so on and refers to the combination of integrating the breath and physical asanas with one another. But in the western culture, Hatha Yoga is often referred to as a specific type of yoga that incorporates traditional yoga poses at a slower pace than other practices like Vinyasa and Power Yoga. In Hatha Yoga, poses are held for around 5 or more breaths and focus on finding the breath while staying in a posture.
What is the Difference Between Hatha Yoga and Vinyasa Yoga?
The main difference between Hatha Yoga and Vinyasa Yoga is the pace. In Vinyasa Yoga, poses can be held for as little as 1-2 breaths, making it a sweaty, fast paced practice. In Hatha Yoga, poses are held for at least 5 breaths and you are really given the time to settle into the posture and bring your awareness to your breath.
If you’re wondering which type of yoga is best for you, the answer really depends on what you are looking for in a practice and your level of expertise. I always highly recommend starting out with a slower paced practice like Hatha Yoga if you are completely new to yoga so you can really dive deep into the postures and find the version of the pose that works for you.
We also created a video that covers all the poses on this list PLUS 18 other yoga poses with modifications that is perfect for beginners! You can check that out below:
15 Hatha Yoga Poses for Beginners
Below you’ll find 15 popular Hatha yoga poses you will most likely find yourself practicing if you go to a Hatha class. When practicing each pose, make sure to take you time getting into and out of each one, and utilize any props that best suit your needs. Hold each pose for around 5 breaths.
Child’s Pose
This pose is a great place to begin your practice and also a wonderful place to rest when you need a moment to breathe and center. Child’s Pose opens up your body and allows you the space to slow down and connect to your breath.
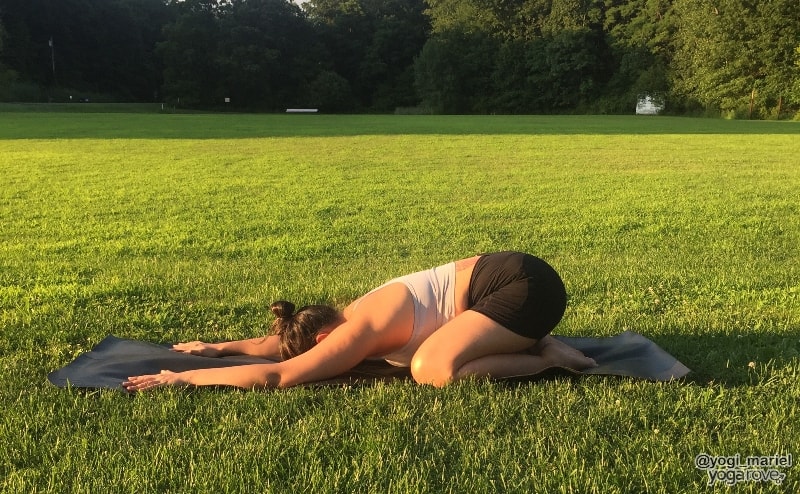
- Start seated at the center of your mat with sitting on your heels with your knees together.
- Open your knees apart as wide the width of your mat.
- Bring your big toes to touch behind you and keep your heels apart. Walk your hands forward until your forehead and arms rest on your mat. Relax your head, hands, and elbows on the mat.
- Soften your shoulders away from your ears and bend your elbows. Keep your shoulders and neck relaxed.
- Sink your hips down toward your heels and feel your side body long.
- Close your eyes and slow down your breath.
Modification: Place a bolster underneath your upper torso to give yourself more space and support.
Cat/Cow
Cat/Cow are two movements linked with your inhale and your exhale. This movement is typically done at the beginning of practice and helps to warm up your spine.
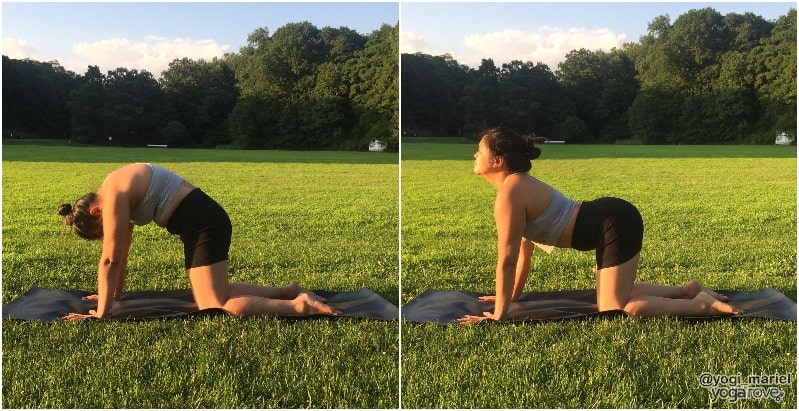
- Begin in a tabletop position on your hands and knees at the center of your mat.
- Check that your hands are under your shoulders and your knees are under your hips.
- Spread your fingers wide on the mat and keep your knees hips width distance apart.
- On your inhale, arch your back and look up, lifting your chin away from your chest.
- As you exhale, draw your belly in and look toward your belly button.
- Repeat for 5 inhales and exhales.
- Keep your arms straight as you breathe and move.
Modification: If you’re wrists are bothering you while doing this, roll up your mat under your hands to create an angle and take pressure off of them.
Standing Forward Fold
A great pose for opening up your hamstrings and lengthening your spine, Standing Forward Fold can be practiced by grabbing the big toes for a deeper stretch. For a more restorative version, you can bend your knees and reach for opposite elbows.
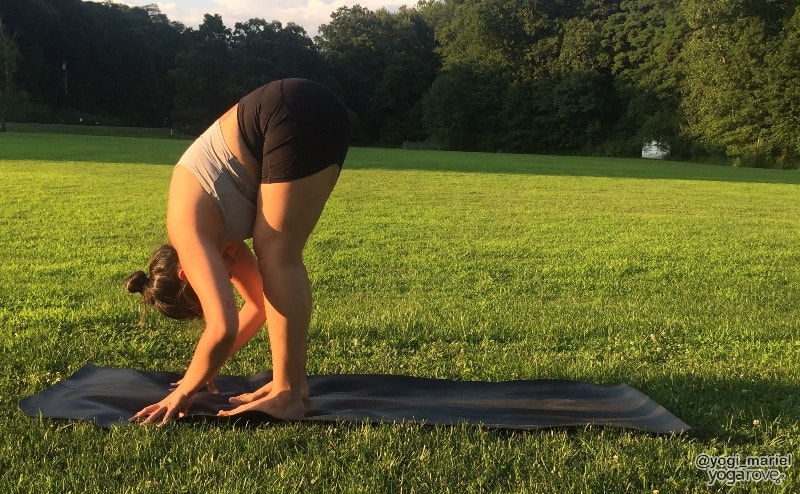
- Stand at the top of your mat. Make sure that your feet are hips width distance with your toes pointing forward.
- Draw your belly in and forward at your hips. Bend your knees if you need to as you fold forward.
- With your middle and index fingers grab onto your big toes and create a tight grip.
- As you inhale, lengthen your spine and look forward, creating a flat back.
- As you exhale, fold forward and bring your stomach toward your thighs.
- Bend your elbows to the side of the room and use your arm strength to pull your belly closer to your thighs.
- Bend your knees if you need, otherwise, begin to straighten your legs. Fire up your legs by rolling your weight forward to the balls of your feet and engaging your thigh muscles.
- Gently pull on your big toes, lengthen your spine, keep your legs strong, and stay for 5 breaths.
Modification: If you feel tension in your hamstrings, use yoga blocks under your hands for support or make a deeper bend in your knees.
Mountain Pose
A tall and energetic posture, Mountain Pose is a great foundation for all standing yoga poses. You learn to root down, as well as find space and openness in your body.
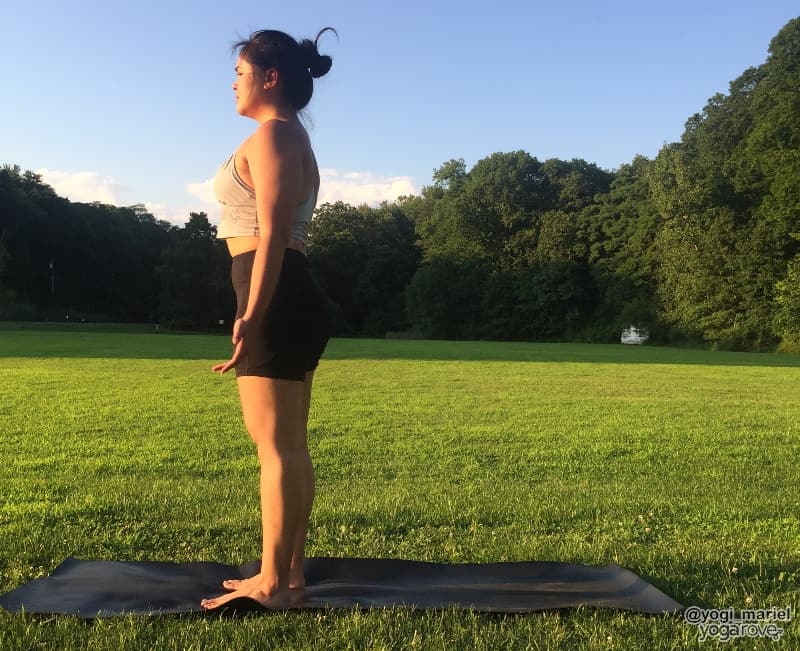
- Stand at the top of your mat with your feet apart hips width distance and your toes pointing forward.
- Root your big toes and heels down to the ground.
- Engage your thigh muscles by lifting your kneecaps up and hugging your muscles to the bone.
- Roll your shoulders up, back, and down and keep your chest open and lifted.
- Relax your shoulders away from your ears.
- Relax your arms alongside your body and have your palms facing forward.
- Tuck your chin down slightly to your chest to keep the back of your neck long.
- Find a soft gaze and take 5 deep breaths.
Modification: To help you find the muscular engagement in your legs, place a yoga block between you upper thighs and squeeze.
Chair Pose
While this pose can be challenging for beginners, it helps to build strength and stability in your body. Start slowly and build up intensity by sitting deeper and staying for a few more deep breaths.

- Begin at the top of your mat in Mountain pose. Step your feet together and check that your big toes are touching with your heels slightly apart.
- Bend your knees and sit down low, as if you were sitting in a chair. Your fingertips should lightly graze the mat.
- Inhale and lift your arms up over your head while keeping your hips down low. Move your arms back slightly so that your biceps are by your ears.
- Take your palms to face each other and keep your arms and fingers energized. Lift your chest up, broaden your collar, and relax your shoulders away from your ears.
- Lean your upper body back slightly and draw your belly button in toward your spine to engage your core.
- Keep your body weight to your heels and squeeze your inner thighs together.
Modification: If it feels uncomfortable keeping your arms straight and as causing strain in your low back and shoulders, bring your arms into cactus arms or in prayer position at your chest.
Down Dog
A juicy pose that stretches and opens your entire body, Down Dog is a pose that you will likely do many times during your yoga practice. As a beginner, keep your knees bent and focus on finding length in your spine.
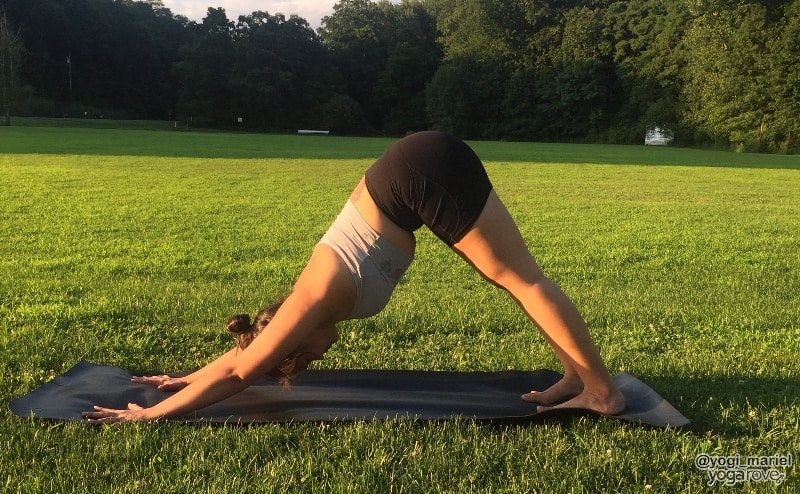
- From a tabletop position, walk your hands forward to the top of your mat.
- Spread your fingers wide and root down evenly throughout your hands, imagining the middle of your palm lifting like a suction cup. Curl your toes under and lift your knees off the mat,
- Lift your hips up toward the ceiling as you push the mat away from you with your hands. Find an upside down ‘V’ shape with your body. Bend your knees if you need to, but lift your hips up.
- Lengthen your spine as you push the mat away from you. Feel your shoulder blades squeeze slightly down your back and relax your shoulders away from your ears. Draw your belly button toward your spine and keep your core engaged. Gaze toward your belly button and keep the back of your neck long.
- If you have the flexibility, straighten your legs and root your heels down towards the mat.
- Slow down your breathing and stay for 5 deep breaths.
Modification: Keep a deep bend in your knees here as much as needed. Focus on length in your spine more than anything else!
Plank Pose
This pose fires up your core and your upper body, and allows you to build the strength that you need for Chaturanga, arm balances, and other advanced yoga poses. If it is too intense for you as a beginner, lower your knees down on the mat and focus on proper alignment.
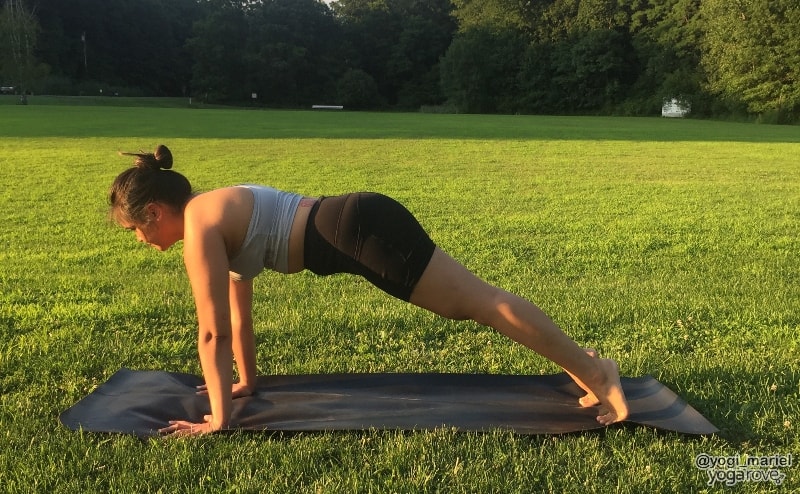
- Start on your hands and your knees with your hands under your shoulders and your knees under your hips. Spread your fingers wide on the mat and make sure that your hands are right underneath your shoulders
- Lift one knee up and straighten your leg back behind you. Do the same with the other leg. Stay on the balls of your feet and straighten both of your legs. Lift up through the backs of your knees and fire up you leg muscles.
- Draw your belly in and feel your belly button draw in toward your spine. Engage your core and keep your abs tight.
- Keep your hands under your shoulders and feel your shoulder blades squeeze slightly down your back. Scoop your tailbone slightly under.
- Look a few inches in front of you but make sure to keep the back of your neck long.
- Push the mat away from you and keep your entire body strong.
Modification: If it feels challenging to hold this pose, come onto your knees for a half Plank.
Baby Cobra
A great pose to practice before coming into a full Cobra pose or Upward Facing Dog, Baby Cobra is a backbend that builds strength in your back body.
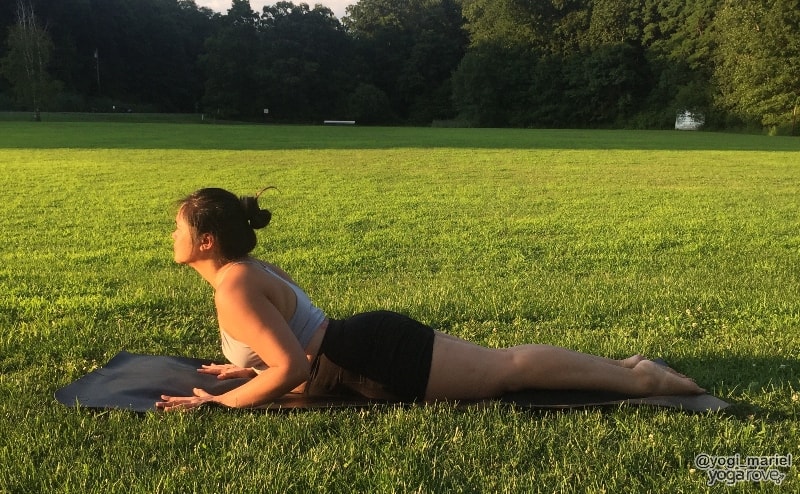
- Lie face down on your mat with your hands underneath your shoulders. Spread your fingers wide and root down through your hands. Keep your elbows in close to the sides of your body.
- Zip up your legs and squeeze your inner thighs together.
- On your inhale, lift your chest up, using only the strength of your spine. Roll your shoulders up, back, and down and broaden through your collar.
- Engage your legs and press the tops of your feet down to the mat.
- Keep your gaze soft and slightly forward in front of you.
- Come down on your exhale, slowly lowering.
Modification: Take your feet as wide as the mat if you feel a strain in your low back while practicing this pose.
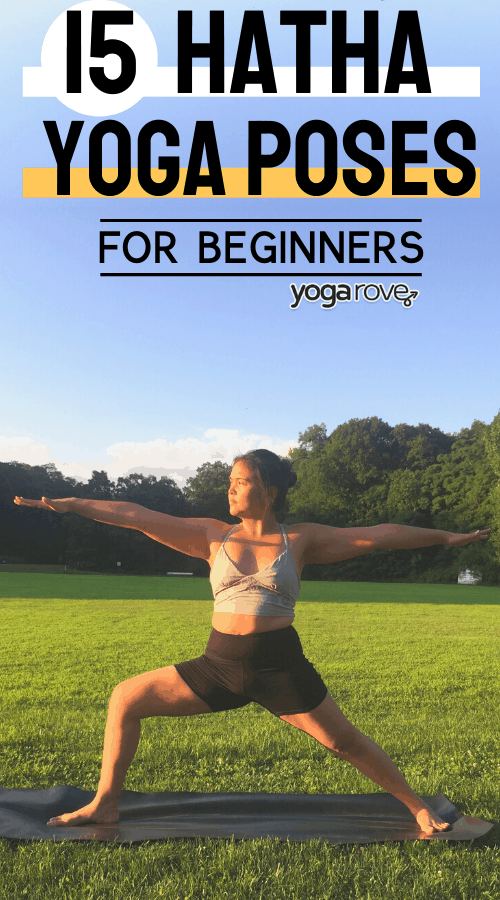
Warrior 1
Root down and find your center with Warrior 1. This pose allows you to feel grounding energy in your lower body and helps to build strength and stability in your entire body.
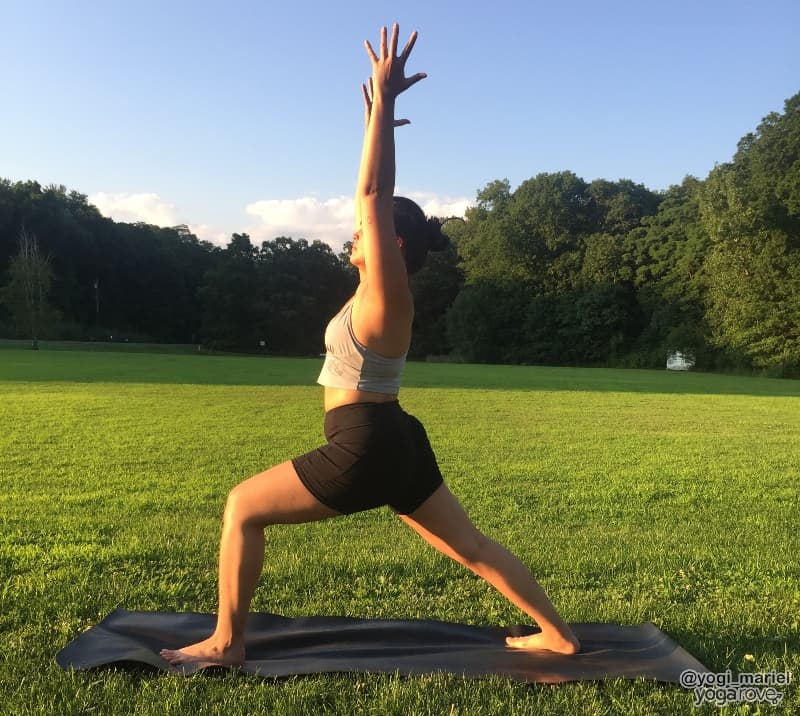
- From downward facing dog, step your right foot forward in between your hands. Root your left heel down to the floor with your toes pointing slightly outward at a 45 degree angle.
- Bend your right knee at a 90 degree angle. Make sure that your knee is not over your ankle.
- Lift your upper body up and take your arms up overhead. Roll your left hip slightly forward and your right hip slightly back.
- Stack your shoulders on top of your hips and lift your upper body out of your waist. Engage your arms and take your palms together or keep them facing each other. Lift your chest and relax your shoulders away from your ears.
- Root your feet down to the mat as you keep your legs strong and your upper body lifted.
- Gaze forward or look up toward your prayer hands. Stay for 5 breaths and repeat n the other side.
Modification: If you find a hard time squaring your hips here, bring your stance wider, as wide as the width of your mat. This will allow you more space in your hips to square them towards the front of the room.
Warrior 2
Warrior 2 opens up your hips and is a great pose to build stability in your lower body. Keep your gaze soft and practice slowing down your breathing while in the pose.

- Starting in downward facing dog, lift your right leg up and step your foot forward in between your hands. Root your left heel down the floor and keep your left leg straight.
- Rise up while keeping your right knee bent. Try to sink your hips so that your thigh is parallel to the floor. Make sure that your knee does not pass your ankle.
- Check the alignment of your lower body. Line your right heel up to your left arch and root down through both of your feet.
- Keep your arms strong and parallel to the floor. Your palms should face down to the mat, with energy shooting out of the fingertips.
- Check that your upper body is in the center and that your core is engaged. Gaze at your right fingertips.
- Relax your shoulders, keep your body strong, and stay for 5 deep breaths.
Modification: If you are unable to get your leg into a 90 degree bend, that’s completely okay! Just focus on engaging the legs and sinking into them as much as is comfortable to you.
Triangle
A beautiful side body stretch, Triangle pose requires you to engage your core and your legs. As a beginner, think of your energy reaching up toward the sky, instead of sinking down toward the floor.
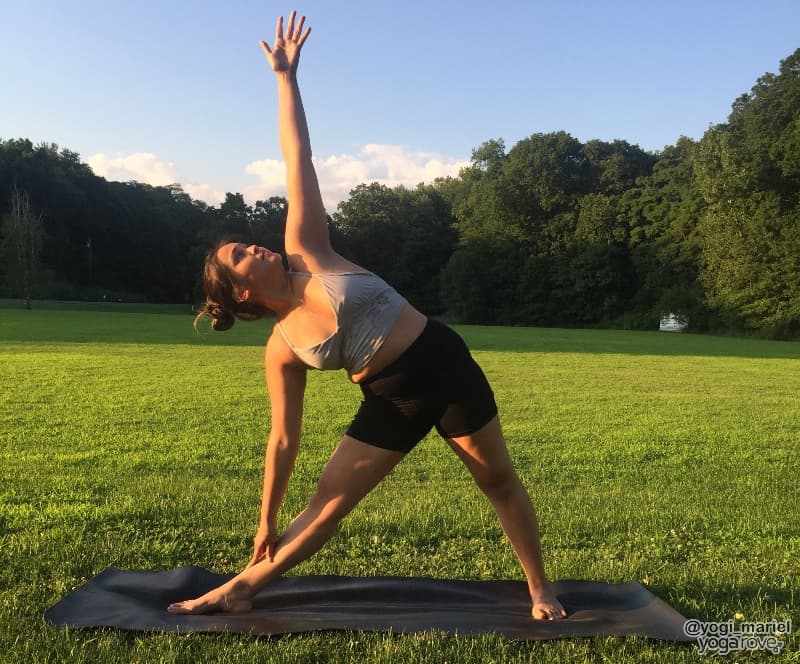
- Begin by standing in a straddle position, lengthwise on your mat with your feet about 4 feet apart. Straighten and engage your legs. Check that your toes are pointing forward.
- Take your arms out parallel to the mat with your palms facing down to the floor. To make sure that you have the right length, check that your ankles are right below your wrists.
- Turn your right toes to the right and turn your left toes slightly inward. Ground down through both heels.
- Keep your legs straight and strong and engage your thigh muscles by lifting your kneecaps up and hugging your thigh muscles to the bone.
- Stretch to your right and reach your right fingertips to your right toes. When you can’t stretch anymore, reach your fingertips down toward your right ankle.
- Rest your hand gently on your right ankle, shin, calf, or a block. Stretch your left arm up overhead and reach your fingertips up toward the sky. Roll your left shoulder open and scoop your right hip slightly forward.
- Stack your shoulders on top of each other as if you are creating one long line of energy from your left fingertips to your right fingertips. Keep your legs strong and turn your head to gaze at your left thumb.
- Take 5 deep breaths and repeat on the left side.
Modification: Place a yoga block under your bottom hand for lift and support in this posture to help you keep your chest open and avoid collapsing.
Tree Pose
One of the most iconic yoga poses, Tree pose requires concentration, strength, and flexibility. Take it slow and work your way up to taking your foot to your inner thigh.
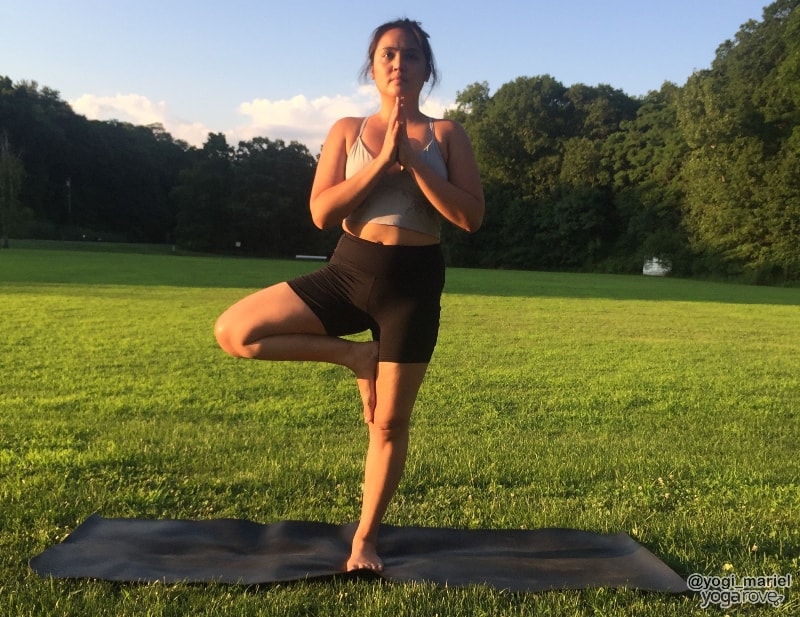
- Begin in Mountain pose at the top of your mat. Shift your weight to your right foot and lift your left foot off the floor. Engage your right leg and keep it straight and strong.
- Place your left hand on your left knee and open your knee to the left side of the room. With the help of your hand, gently place the left sole of your foot to your right inner thigh, calf, or ankle.
- Make sure that your foot is not directly on your knee joint, but above or below your knee.
- Stabilize your standing leg by lifting your kneecap up and engaging your thigh muscle. Keep pressing your right big toe and heel down onto the mat.
- Push your left foot into your right leg, and your right leg into your left foot. Hug everything toward the midline of your body.
- Place both of your palms together and take your thumbs to the center of your chest.
- Roll your shoulders up, back, and down, and keep your heart open and lifted.
- Gaze either at your fingertips or straight in front of you.
- Stay for 5 breaths and repeat on the left side.
Modification: Feel free to bring the lifted foot as low as your ankle here- this still requires a lot of concentration and balance!
Boat Pose
Boat pose tones your abdominals and builds your core strength. If you are new to yoga, keep you knees bent in the posture and focus on lifting your chest and lengthening your spine.
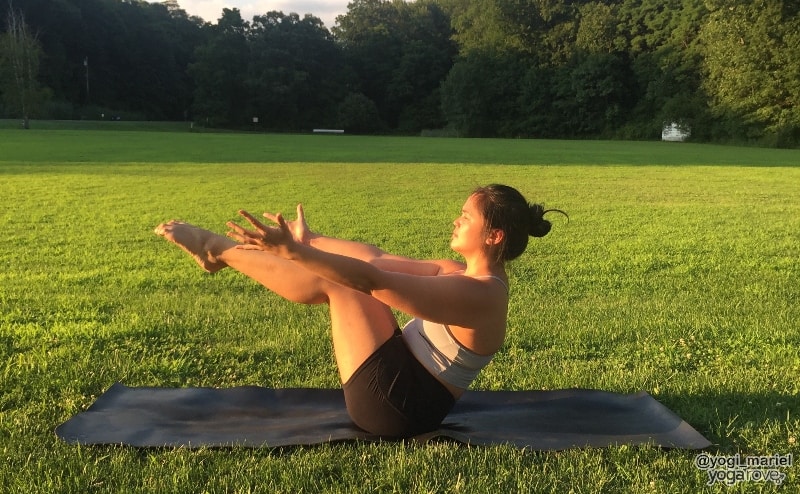
- Sit on your mat with your knees bent and your feet flat on the floor.
- Hold on to the backs of your knees and lean back slightly.
- Lift your feet off the mat and take your shins parallel to the floor.
- Point or flex your feet and keep your inner thighs hugging in toward each other.
- Roll your shoulders back and down, lift your chest, and engage your core.
- Keep your hands where they are or straighten your arms and reach your fingertips forward toward the top of your mat.
Modification: If you find your chest collapsing in this pose, place your hands behind both thighs to use as traction to keep yourself lifted and help you balance.
Bridge Pose
This backbend can be practiced with a block underneath your sacrum instead of interlacing your fingers behind your back. Bridge pose is a great pose to wind down your practice with, and is often practiced right before your final moments in practice.
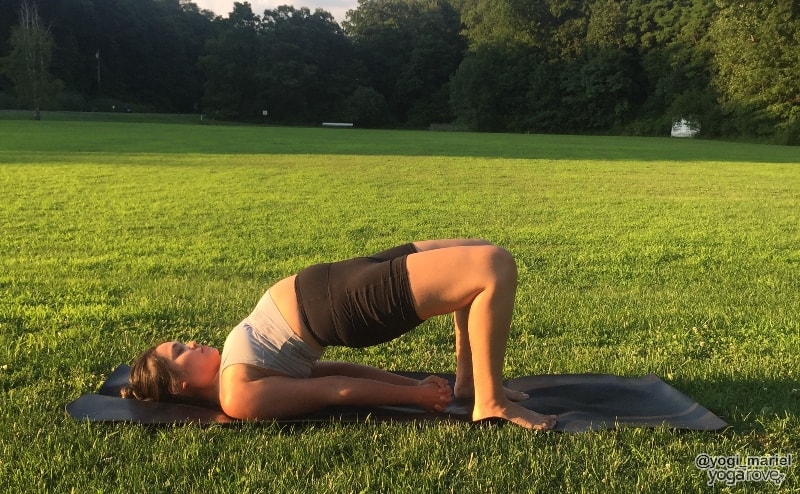
- Lie down on your back and bend your knees so that your feet rest flat on the mat. Your feet and knees should be hips width distance apart, and your toes should point straight forward.
- Walk your heels in so that your fingertips can graze your heels. Rest your palms flat on the floor and root down through your heels.
- As you inhale, lift your hips up. Begin to take your shoulder blades closer together and interlace your fingers at your lower back. Squeeze your palms together and puff your chest up toward the ceiling.
- Keep your legs strong and imagine squeezing a block in between your thighs. Refrain from moving your head and neck in this pose.
- Root down through your heels, lift your hips, and broaden through your collar.
- Stay for 5 deep breaths and slowly make your way down by releasing your hands and lowering your hips down to the mat.
Modification: To help you engage your legs here, squeeze a block in between your thighs to help avoid your knees splaying out.
Savasana
Every yoga practice ends with Savasana, or Corpse pose. After practicing, give yourself the time and space to completely relax, surrender, and release.
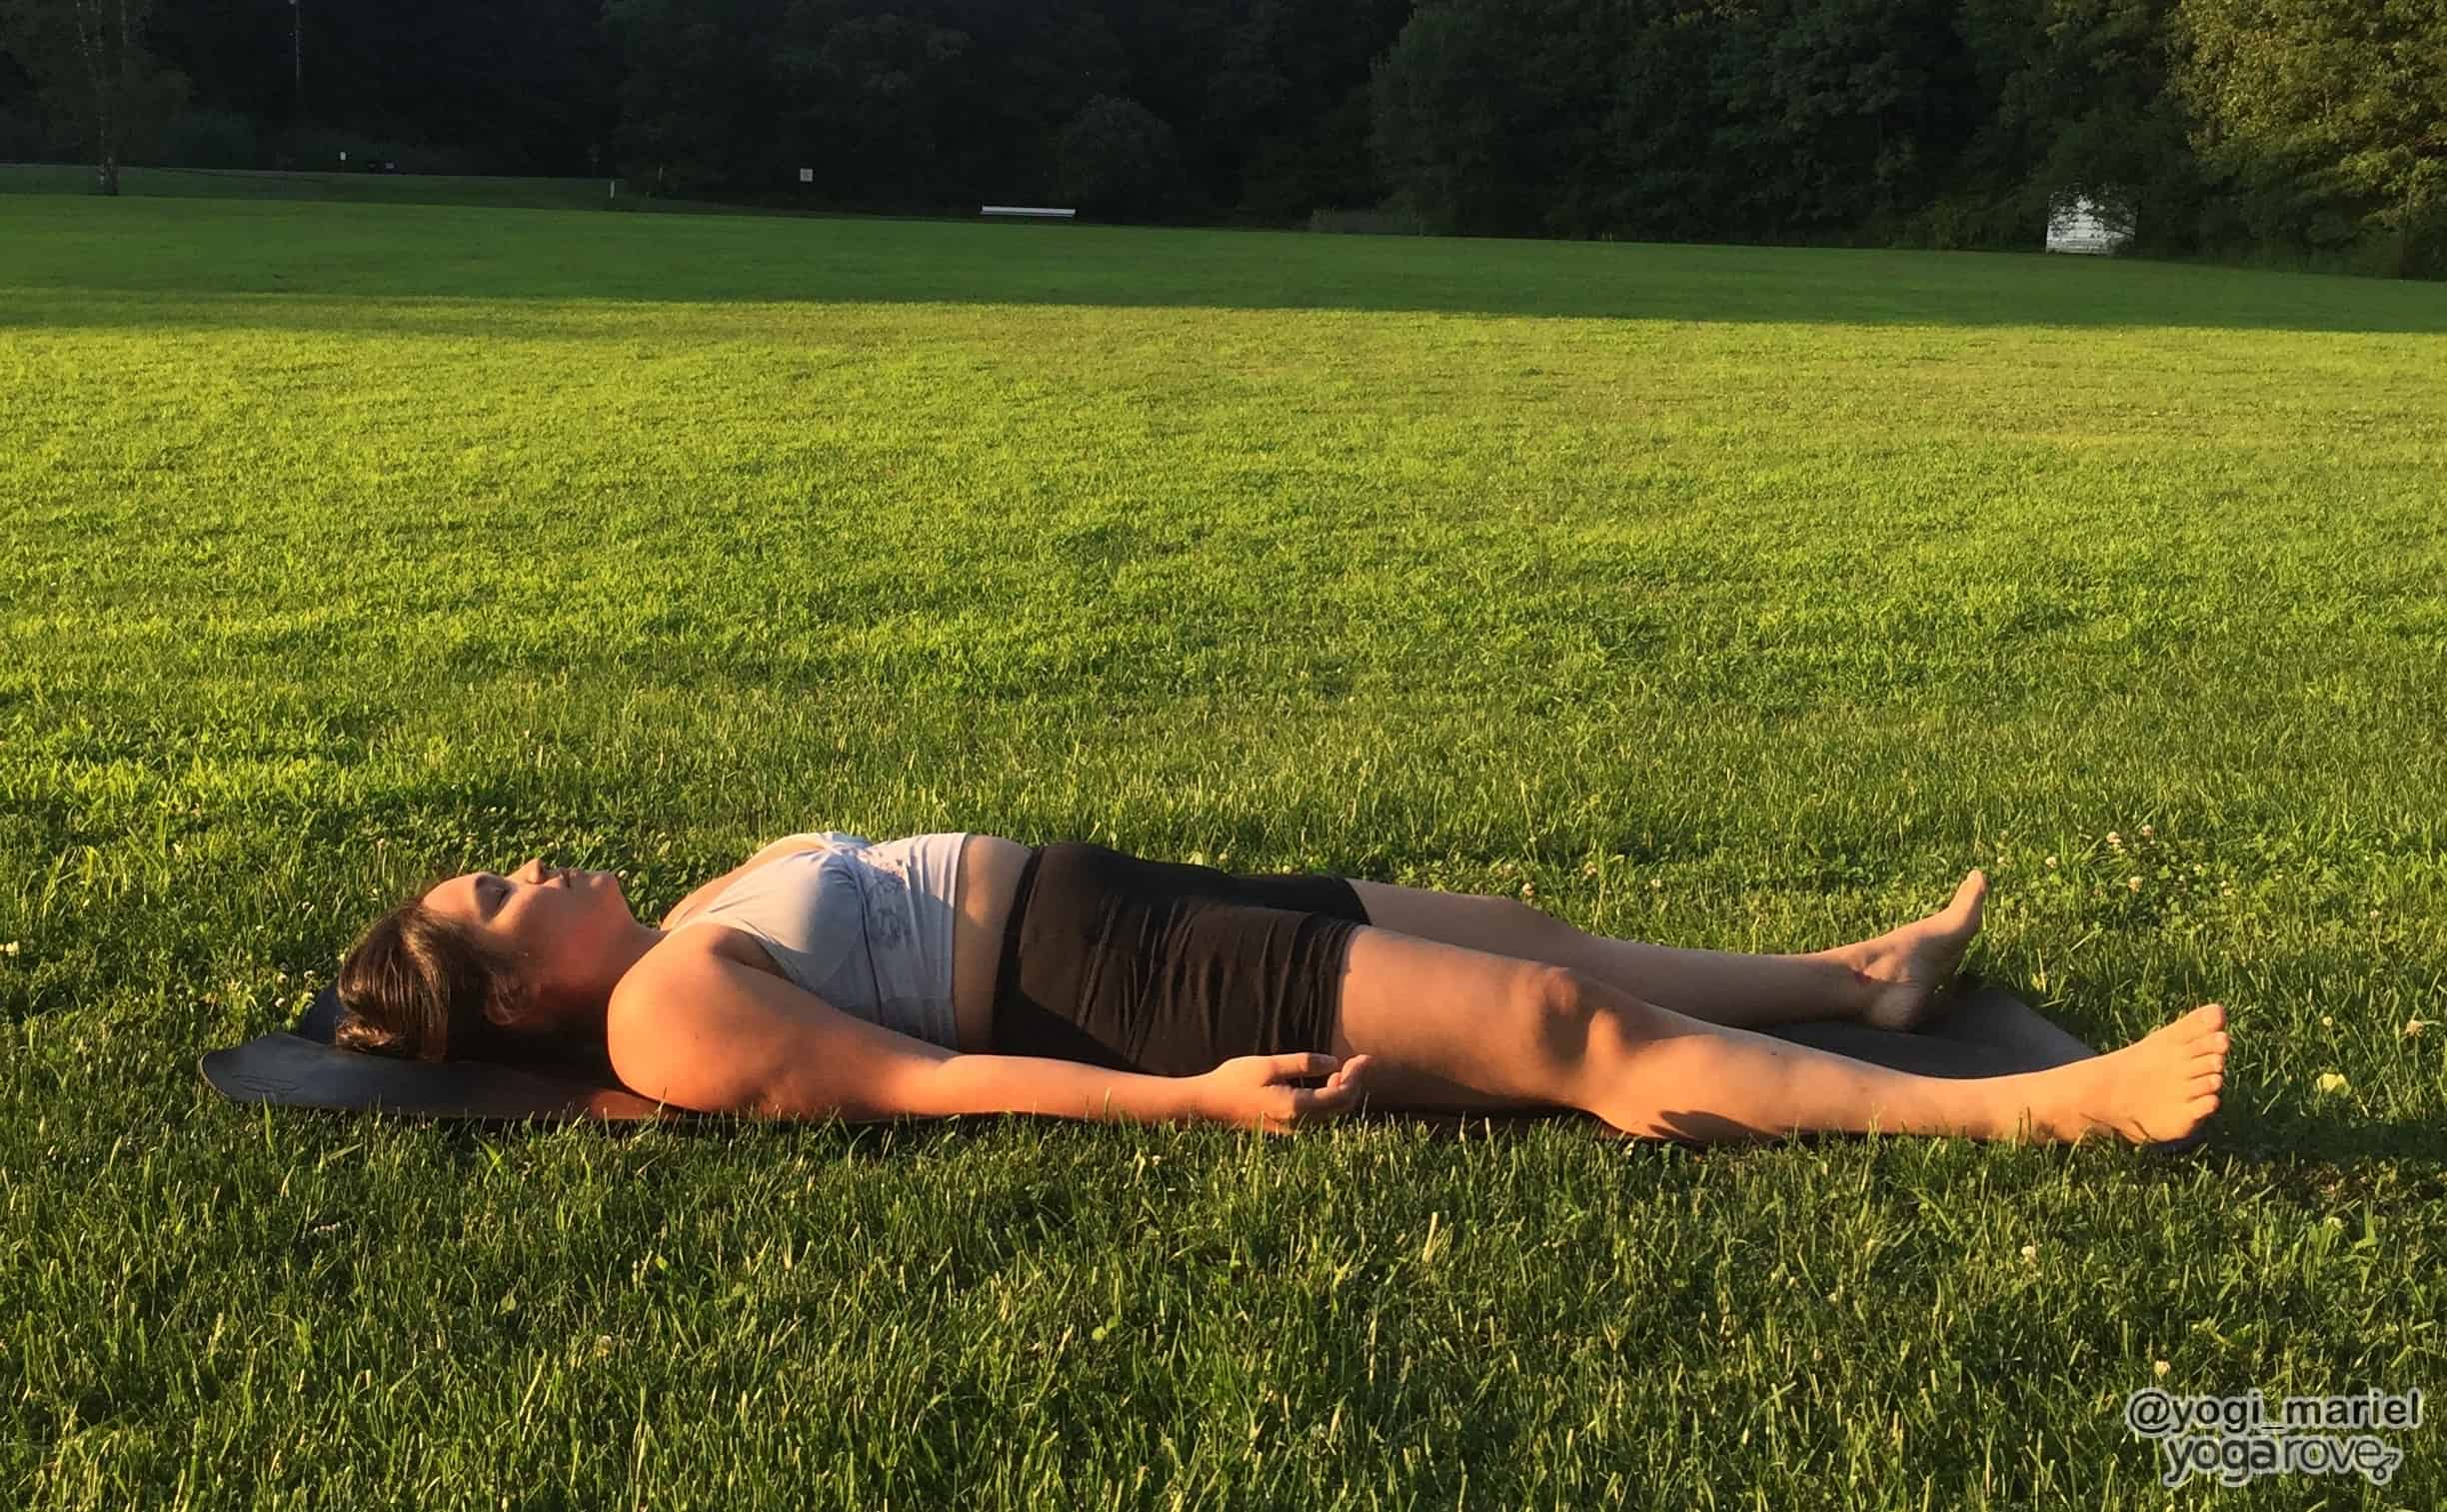
- Take yourself down to your mat and lay down on your back.
- Relax your legs and take the heels apart so there is no tension keeping your legs together.
- Allow your feet, ankles, and toes to relax.
- Take your arms out a few inches away from your body and allow your palms to face up toward the ceiling.
- Relax and soften every part of your body.
- Close your eyes and feel as if your entire body is melting on the mat.
- Stay for at least 3 minutes, or longer if you have the time.
Modification: Place a blanket under your head or a bolster under your knees for more comfort and support.
I hope you enjoyed this! There are so many different types of yoga and I think each has so much to offer! Which types of yoga do you find yourself practicing most often? I’d love to hear in the comments below!
Ally is a Registered Nurse, Registered Yoga Teacher, and Co-Founder of Yoga Rove with her husband Victor. She first started yoga over 7 years ago when she started her nursing career to combat the physical and mental strain, and now loves to teach and help others.
Thanks for the clarification! I’ve been doing Hatha yoga since I was 18, on and off. I’m 60 now and started yoga again last year when I discovered Yin. At this stage in my life I enjoy Yin, restorative and Hatha most. Vinyasa is okay but if it’s too fast paced, I end up feeling exhausted instead of rejuvenated. Power yoga is not for me.
Thanks so much for your informative articles!
I can totally relate to that Angelique 🙂 I have noticed that with myself that I go in phases. Sometimes I really enjoy fast paced vinyasa classes and other times I’ll go through a period where all I’ll really want to practice is Yin and slower paced practices. I love that yoga offers so much variety so there’s always something for everyone. So glad you enjoyed the article!
Very informative, thank you.
Glad you found it helpful Bruce!
Great article and explanation for the differences between Hatha and Vinyasa yoga. I have tried Vinyasa but always end up turning off the videos after a few minutes because I do not move as fast from one pose to the next as the video instructor expects, especially when they tell me to “jump my leg from downward dog to land in between my hands” Nope. Not gonna happen. Hatha not only lets me find the sweet spot for each pose, but also makes me work on my patience by taking 5 even breaths before moving to the next pose, helping me to calm my monkey-mind.
Totally agree Denise! I love that Hatha yoga reminds us to slow down and really promotes us to turn our focus inward 🙂 So glad you enjoyed the article!
Thanks….i needed the description of just how to hold the pose.
Glad you enjoyed the article Pamela!
Thank you so much. I love my yoga practice with your print outs. Like many others, I have found local classes to be fast paced and of limited value. I had almost given up. But now I own my yoga time. I take as much time as I want in each pose, breathing slowly, becoming one with my movement, some beautiful music in the background and a sweet smelling candle burning. It is heavenly! Thank you!
So happy to hear that Sally! That sounds amazing <3
I did restorative yoga for two years after a car accident. I stopped after recovery, but have lately regretted that and have been looking to develop a practice I can use when traveling or at home. I think this is the answer. Thanks for your article.
I am 66 and doing Hatha and some other yoga poses weekly
I do enjoy it. Trying to build balance and be flexible.
Enjoy and thank you.
So glad to hear that Ronald!
Thank you so much for the article. I have been practicing yoga for 1.5 years now and I feel the benefits of doing yoga.
For me, these poses are perfect for me although they are labeled “for beginners”. They are accessible 🙂 Again, thank you.
Namaste!
I’m so glad you enjoyed it! Yes love all of these poses 🙂
I’m 72 and just started Beginners Hatha Yoga a few weeks ago. Reviewing the poses with you allows me to pick up on what I did not hear clearly in class or just plain forgot. That way I am much better prepared and confident when I return for another in-person lesson. If it wasn’t for your perfect descriptions I might have quit. Thanks so much for this service to the wider community. Namaste.