

This post may contain affiliate links. Please read our disclosure for more info.
Yoga allows us to feel expansive and grounded at the same time. When you practice, there are certain postures that embody this feeling of grounding and expansion, and triangle, or Trikonasana in Sanskrit, is one of these poses.
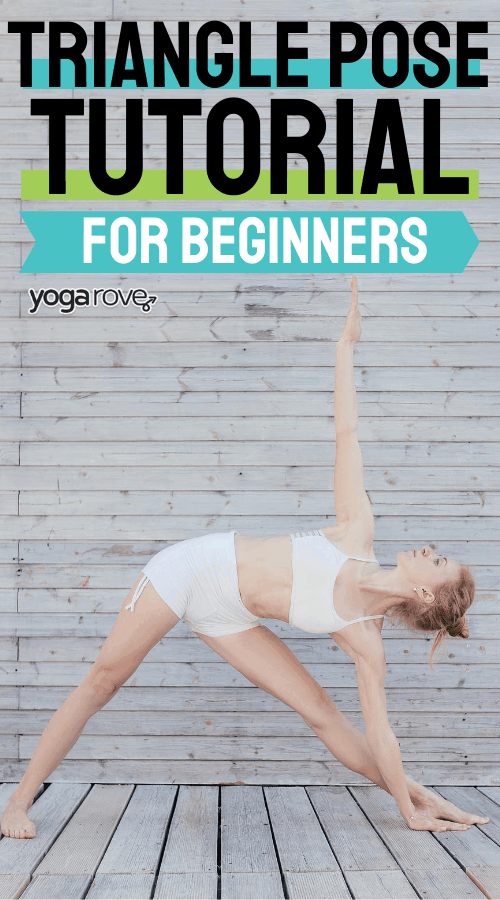
A strong, powerful, and open posture, triangle pose requires strength, flexibility and openness in the body. To practice the pose, you need a strong and grounded base, and open and expansive upper body. The pose can feel rooted and open at the same time and feels wonderful in the body.
Benefits of Triangle Pose
This powerful pose holds many benefits. Triangle pose:
- Lengthens the spine
- Increases flexibility in the hips, hamstrings, and side body
- Stimulates your digestive and abdominal organs
- Strengthens your joints
- Opens your shoulders and chest
- Helps to heal flat feet, neck pain, and sciatica
- Grounds your energy
Warming Up for Triangle Pose
Before you practice this posture, it is a good idea to warm up the body with a few rounds of Sun Salutations and preparatory postures. Prior to practicing Triangle, you can practice:
Wide Legged Forward Bend
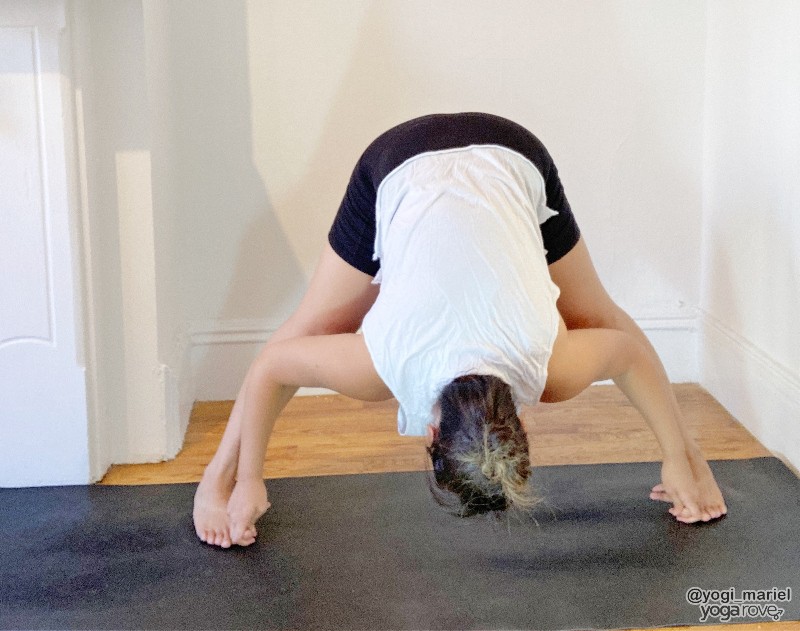
- Begin by standing lengthwise on your mat with your feet about 4 feet apart, toes pointing forward, and arms out parallel to your mat. Keep you legs strong and take in inhale to open the chest.
- As you exhale, fold forward with your legs straight and strong.
- Place your hands down on your mat or grab hold of your ankles or big toe.
- Fold forward and keep lengthening your spine down so that the crown of your head comes closer to your mat. Keep your legs strong, thigh muscles engaged, and weight moving forward to the balls of your feet.
- Stay for 5 deep breaths.
Warrior 2
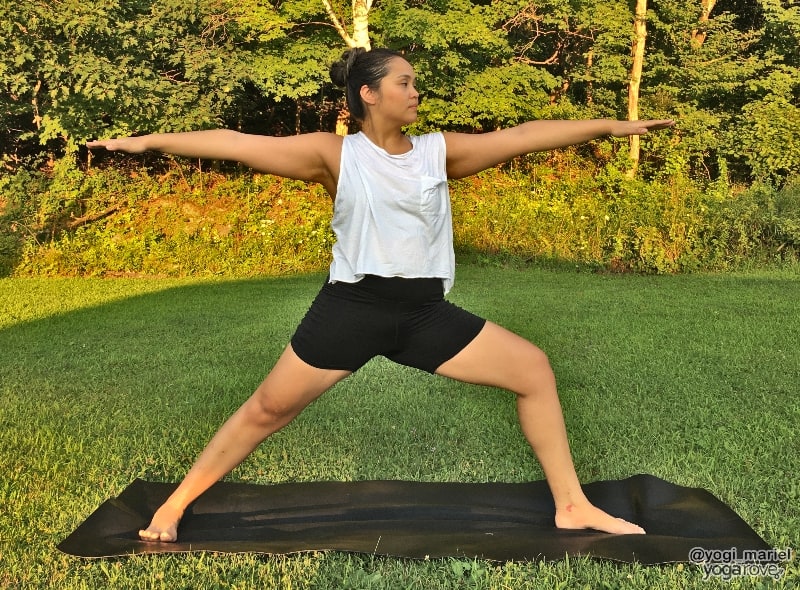
- Stay standing lengthwise on your mat with your toes pointing forward and arms out parallel.
- Turn your right toes to the right and check that your right heel is in line with your left arch.
- Bend your right knee so that your thigh is parallel to the floor.
- Keep your arms strong, shoulders relaxed, and lower body grounded as you gaze over your right fingertips.
- Stay for 5 breaths and repeat on the left side.
Extended Side Angle
- From Warrior 2 pose, reach your right hand forward and place your right palm or fingertips down on the mat to the inside of your right foot.
- Use your elbow to gently push your right knee back and stretch your left arm up overhead with your bicep by your ear.
- Roll your left shoulder open and lift your chest up toward the sky.
- Your left palm should be facing down to your mat and you can turn your head to gaze up to your fingertips.
- Stay for 5 breaths and repeat on the left side.
How to Practice Triangle Pose
Once you warm up you are all ready to practice Triangle Pose. Below is the step-by-step on how to do it.
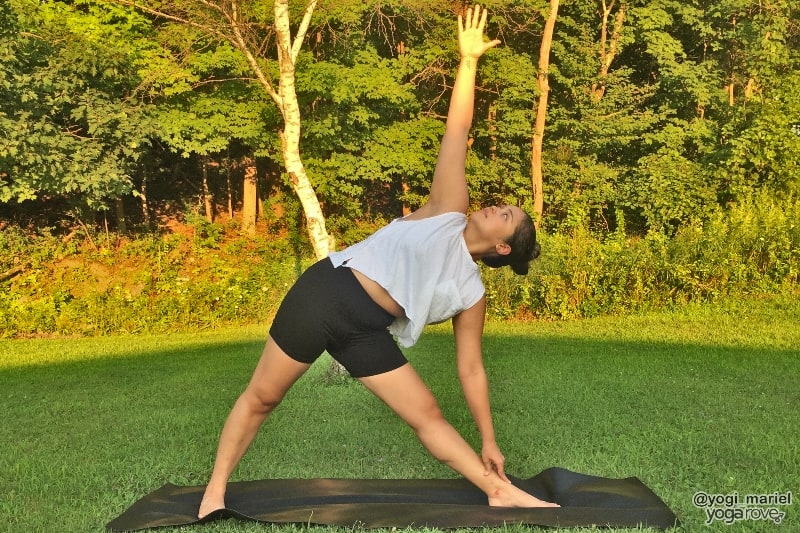
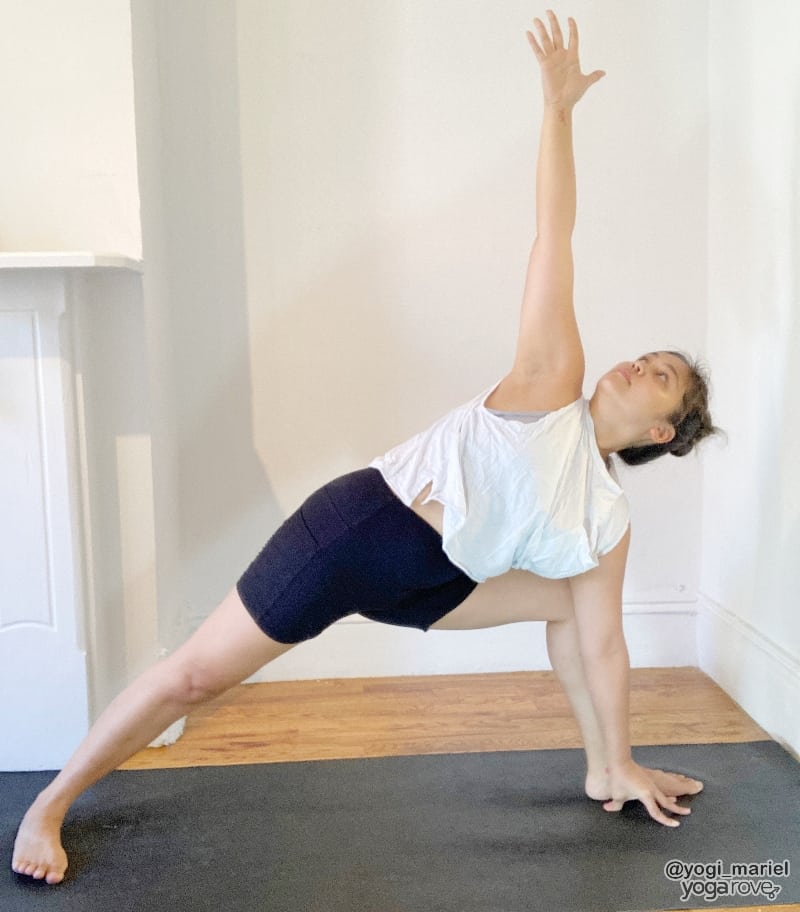
To practice Triangle Pose:
- Begin by standing lengthwise on your mat with your feet about 4 feet apart. Check that your toes are pointing forward
- Take your arms out parallel to the mat with your palms facing down to the floor. To make sure that you have the right length, check that your ankles are right below your wrists.
- Turn your right toes the right and turn your left toes slightly inward. Ground down through both heels.
- Keep your legs straight and strong and engage your thigh muscles by lifting your kneecaps up and hugging your thigh muscles to the bone.
- Reach your right fingertips to the right and when you can’t stretch anymore, begin to reach down toward your right ankle.
- Rest your hand gently on your right ankle, shin, calf, or even a block.
- Stretch your left arm up overhead and reach your fingertips up toward the sky.
- Roll your left shoulder open and scoop your right hip slightly forward.
- Stack your shoulders on top of each other as if you are creating one long line of energy from your left fingertips to your right fingertips.
- Keep your legs strong and turn your head to gaze at your left thumb.
- Breathe in your Triangle pose for 5 deep breaths and repeat on the left side.
Common Misalignments
It is so important to focus on practicing proper alignment to maintain safety in your yoga practice. Below we’ll cover the most common misalignments in Triangle Pose and how you can fix them.
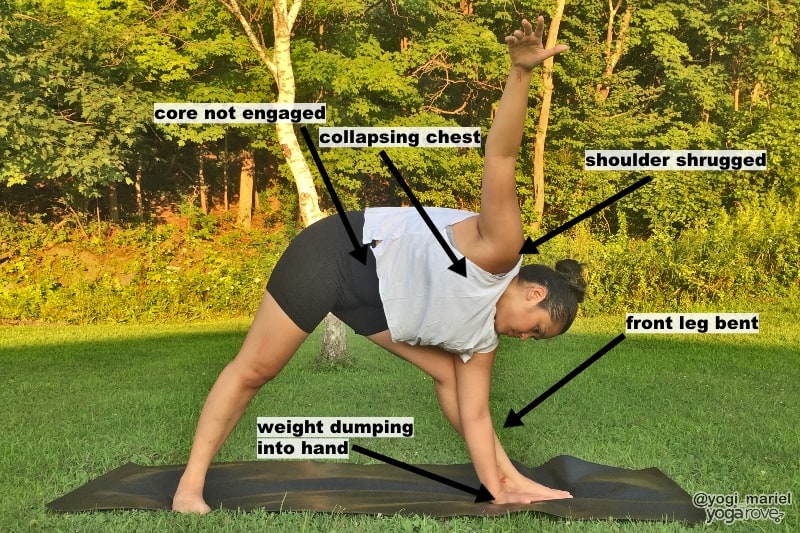
- Rounded spine: In Triangle pose, you want your spine to lengthen instead of round. Keep your collar broad and your chest open as you lengthen through the crown of your head. Your core should be engaged to support your upper body and your ribs in to find a long spine.
- Too much weight on your bottom hand: If you notice that you are collapsing and sinking down to the mat, you may have too much weight on your bottom hand. Lighten the weight and use your core and strong legs to support you or lift your hand up higher up toward your shin instead of placing it down toward the ankle.
- Hyperextension: It is common to push your knees back to hyperextension in this pose and rely on your flexibility instead of your strength. Micro bend your knees, lift up your kneecaps, and squeeze your thigh muscles to build strength and activate the correct muscles.
- Alignment of feet: Make sure that your front heel is in line with your back arch and that your front toes are pointing straight forward with your back toes turning slightly inward.
Modifications for Triangle Pose
If you find yourself struggling maintaining proper alignment Triangle Pose, try one of these simple modifications below:
Use a block: In triangle pose, you want to make sure that you feel supported and open. If it is challenging to place your bottom hand on your shin or further down toward your ankle, use a yoga block. Place your block to the inside of your foot, close to your big toe. The block can be at the highest, medium, or lowest height. Rest your hand on the block and try not to place too much weight on the block. Instead, keep your hand light and the energy moving upward.
Rest your hand up higher on your leg: If you would prefer to not use a block, rest your hand higher on your leg. You can place it on your shin or higher up toward your knee. Again, keep your hand light on the leg and use your strong legs and core to support you.
Gaze down: If you have any neck issues, it is a good idea to gaze down instead of gazing up to your thumb. Shift your gaze to your big toe, or a spot on your mat.
Tips for Beginners
- Use props: This pose requires open hamstrings and hips, so if you need to modify to build strength and flexibility, use a block to support your bottom hand.
- Ground your back heel: You can press your back heel against a wall to find grounding and stability in your back leg.
- Avoid hyperextension: If you are hyper-mobile, it can be very easy to hyperextend your joints in this posture. Make sure that you engage your thigh muscles and keep a slight micro bend in your knees in order to activate your leg muscles, instead of pushing your knees back to hyperextension.
- Use your core: Keep your core strong to support your upper body in triangle pose. Your lower body is your foundation and base, so keep the core tight and engaged to support your entire body.
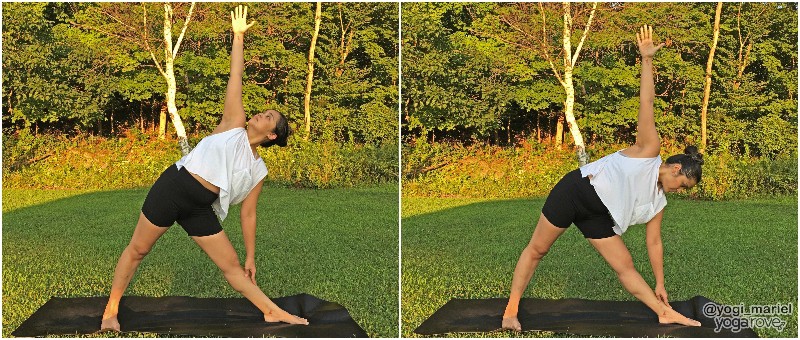
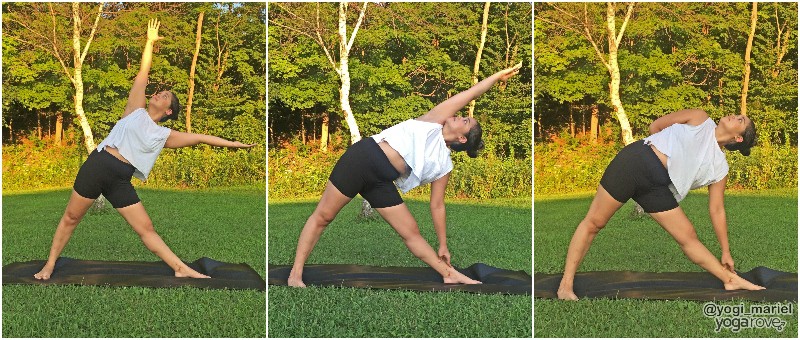
Variations in Triangle Pose
If you feel like you’ve got Triangle pose down and are comfortable practicing it, try practicing one of these fun variations next:
Extend your top arm parallel to the floor: Instead of reaching the fingertips to the sky, take your top bicep by your ear to stretch your side body. Similar to Extended Side Angle pose, roll the top shoulder back and open your chest to feel the stretch and opening in your side and front body.
Find a half bind:Take your top arm behind you and reach for your opposite hip or inner thigh. Continue to open the chest and roll your top shoulder back as you spin your chest up toward the sky.
Lift your bottom arm and extend it parallel to the floor: To activate your core and legs, lift your bottom hand up and extend your arm parallel to the floor. Reach your fingertips to the side wall as you roll your shoulders back and make an ‘L’ shape with your arms. Make sure that you are not hyper extending your legs, and keep your core activated and strong.
Find a yogi toe lock: If you have the flexibility, grab onto your big toe with your peace fingers for a yogi toe lock. Keep your other arm extending upward and straighten both of your arms.
Contraindications
- If you have high or low blood pressure, you can practice Triangle pose with the help of a chair or against the wall.
- If you have neck issues or injuries, keep your gaze down to the mat instead of looking up toward the top hand.
- If you are recovering from any injuries in your body, such as a hip or ankle issue, take caution when practicing Triangle. You can always ask your yoga teacher for specific modifications according to your body.
I hope this was helpful to you in understanding Triangle Pose and helps you better integrate it into your practice! Let us know you favorite modification or variation by commenting below 🙂
Ally is a Registered Nurse, Registered Yoga Teacher, and Co-Founder of Yoga Rove with her husband Victor. She first started yoga over 7 years ago when she started her nursing career to combat the physical and mental strain, and now loves to teach and help others.
Thank you very much for the sequence of steps of each asana. It’s a great help having it all one one page instead of having to flip pages between each step.
Another great feature is the common misalignment section sometimes it’s so easy to just follow action without keeping in mind the small actions I.e. straighten the spine, use the core.
Be blessed for all your efforts!
Jiwani
You’re very welcome Jiwani! Glad you found it helpful 🙂
Wonderful article. I like the way you break down the poses. Your pose descriptions are so helpful and I especially like your intro postures. Thank you for great information!
Absolutely Michelle! Glad you found it helpful 🙂
Thank you so much, this is very helpful
Happy to help!
You have broken this down and made it easy to understand and practice, thank you
Glad you found it helpful Josephine 🙂
Thank you for this very clear and concise demonstration of this pose and its variations.
You’re so welcome George! Glad you found it helpful 🙂
Great article with great yoga ideas for beginners. Thank you Mariel
I love your website, guides, and printables SO MUCH. Would you guys consider eventually doing colorful summary printables of the blog posts (you have SO many already and I love them – I find myself wanting ones for the pages that don’t have that summary lol). They are nice to have in addition to the printables because it helps me remember the blog posts better. 🙂
Not at the moment but that is a great idea! I will add that to our list 🙂