

This post may contain affiliate links. Please read our disclosure for more info.
Twists are very prevalent in yoga, and you may have done a few without even noticing it! There is such a variety of twists in yoga that provide so many benefits to you both physically and mentally- but it’s important you know how to practice them safely! We’ll go over how to practice 11 spinal twists correctly so you can reap the benefits in your practice.
3 Benefits of Spinal Twists
Twists are common in yoga for a reason- they provide SO many benefits. Let’s go over 3 key ways twists can positively effect you in your practice.
1. Spinal Health.
A happy spine = a happy (and healthy!) life.
Every cell, tissue, organ, and muscle in your body is controlled by your nervous system – which your spine literally protects; in fact, your spinal cord (which your spine encases) is one-third of your central nervous system, which consists of the brain, spinal cord, and nerves. Your body’s ability to perform simple tasks all trace back to the link among the three components – which is why it’s so important to make sure your spine is taken care of!
So what’s in the spine? 24 vertebrae, spaced by discs that act as shock absorbers. Think of your spinal cord as an information highway between your brain and the nerves throughout your body – you don’t want any traffic jams that will lead to discomfort, pain, and frustration.
Basically, you want that highway free of roadblocks.
Think of it this way- what happens when you have a 5-car pile up on the highway? Lots of frustration. Now what happens if that 5-car pile up was never cleared or addressed, and traffic simply slowed down indefinitely– then eventually additional car wrecks occur along the highway, with no roadside crew cleaning up? What a mess! That’s what happens to your spine and spinal cord if you don’t address your spine’s health– it’s what leads to complications such as fibromyalgia, sciatica, blood pressure issues, diabetes, and countless more health problems.
2. Improved Digestion & Detoxification
You may often hear a teacher say to “twist the toxins out,” but this is kind of an oversimplification. Your liver and lymphatic system are what are responsible for flushing toxins out of the body– which are helped just as much by any movement, not just twists (it’s actually best helped by inversion).
How twists do digestion and detoxification: twists are better explained as a massage for your internal organs; a twist stimulates motility (movement within an organ) and mobility (movement of organs in relation to each other). Because twists target the main organ of digestion– the intestine– they’re highly beneficial for getting things, well, moving.
3. Stress & Anxiety Reduction
A good twist is like a good massage– you’ll release physical, emotional, and mental tension. Generally, all twists encompass some sort of chest expansion as well which opens the heart space for gratitude. Double the benefits of your twists with rhythmic breathing, always remembering to lengthen upward on the inhale and twist deeper on the exhale.
Who shouldn’t practice yoga twists?
Twists can be extremely restorative and relieving, but due to the delicate nature of the back, they can also be associated with spine injury, herniated discs, and discomfort. You should not practice twists if:
- You are in your 3rd trimester of pregnancy (the gentle twists in the first section below are perfectly OK for first and second trimester, but never practice deep twists).
- You have a spinal injury
- You have herniated disc issues or a slipped disc
- You have chronic digestive issues (unless recommended by a doctor to practice twists)
Note: if you’re a beginner or de-conditioned, stay with the gentle, restorative twists until you feel comfortable progressing to the deeper twists.
Tips for practicing twists correctly
- Always visualize twisting from the base of the spine (unless you’re pregnant).
- Inhale as you lengthen up, exhale as you twist deeper.
- Keep the abdominals engaged in standing twists to prevent injury and improve stability.
- Don’t turn the eyes/gaze if it strains the neck– keep the gaze forward/straight instead.
- Ensure you’re properly aligned in the base pose (example: easy seat, lunge, etc.) prior to initiating a twist.
Ready to get twisted?
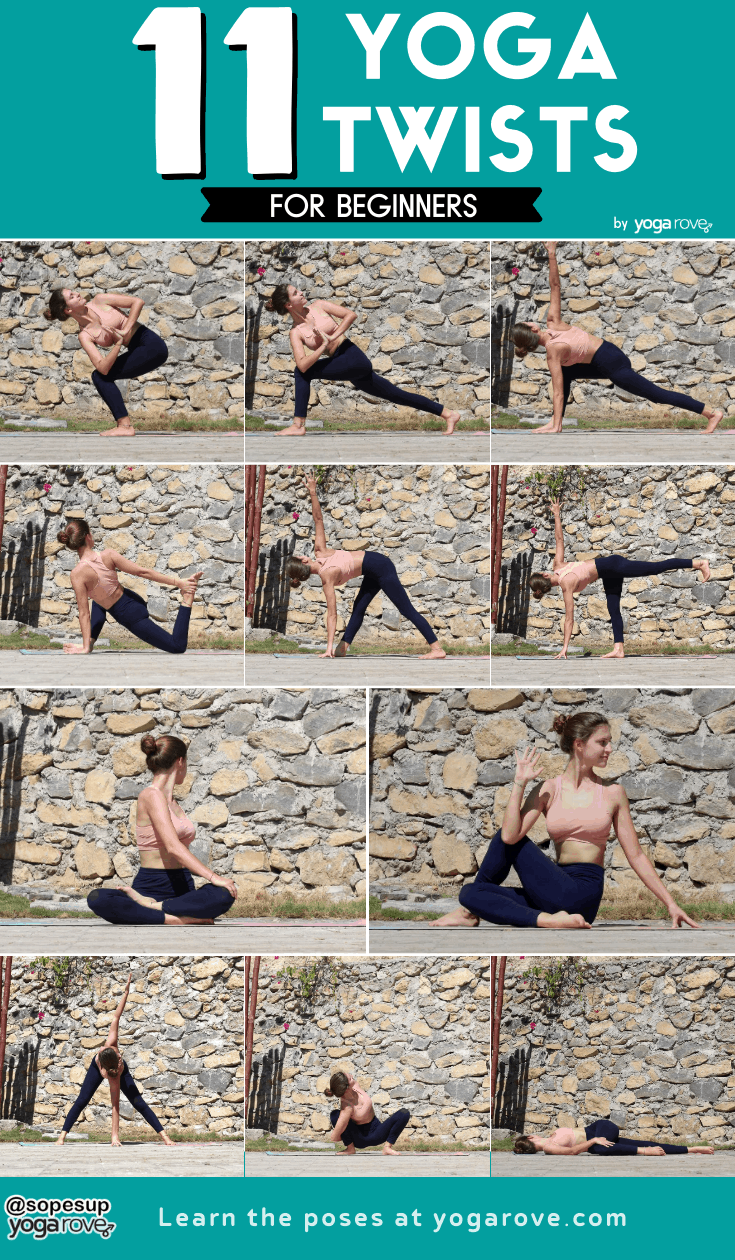
11 Spinal Twists
I’ve broken this into three types of twists: gentle, moderate/restorative, and active twists. Each type has it’s own benefits, but find which one’s work for you and serves its place in your practice.
Gentle Twists
These are generally considered safe for pregnancy and recovery (as long as confirmed by your doctor).
1. Wide-Legged Forward Fold with Twist
- Begin: wide-legged stance facing the long edge of your mat, feet as far apart as your wrists when your arms are extended out to the sides at shoulder height.
- Place the hands on the hips and hinge forward with a flat back until your spine is parallel to the floor. Once there, bring your palms to meet the mat (or a block, if you don’t reach).
- Place your right palm in the center directly in line with your nose in front of your face, as you remove your left hand to place it on your left hip.
- Rotate from the base of your spine toward the left, using your left hand on your hip as a guide to keep your hips as square as possible, ensuring rotating from the spine without shifting of the hips.
- Extend the left arm to the sky, palm facing away from you. Gaze toward the left fingertips.
- Gently return to center, replace the right palm on the mat with the left, and repeat on second side.
Modification: Instead of bringing your fingertips or palms to the ground, keep them on blocks to help you maintain length through your spine.
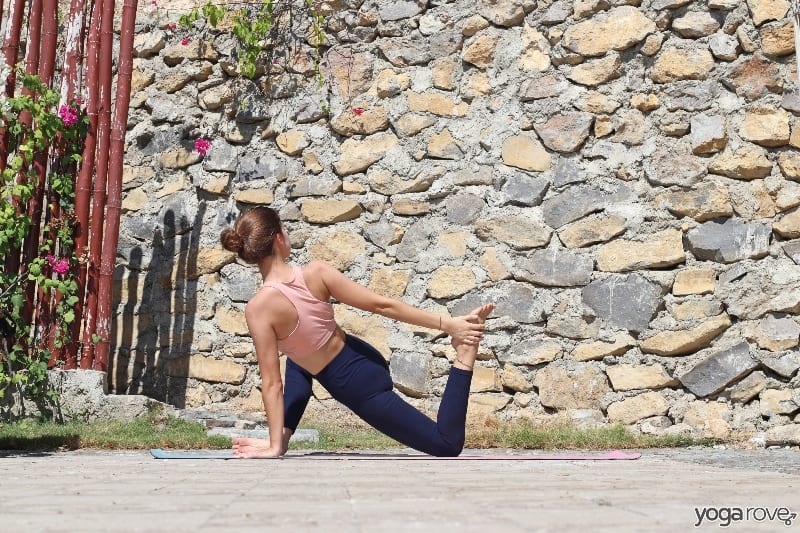
2. Easy Seated Twist

-
- Begin: seated in Easy Pose (on a block or blanket if necessary).
- Inhale as you extend your arms up to the sky, and on an exhale twist toward the right wall.
- If you’re pregnant: focus on twisting from the ribcage, shoulders, and neck– leaving the belly facing forward.
- If you’re not pregnant, just taking it easy- twist from the base of the spine.
- Gently untwist back to center. Switch the cross of the legs and repeat on second side.
Modification: If you find yourself dumping into your palm that is placed behind you, place it on a block instead to help you maintain length.
Moderate/Restorative Twists
These are best as gentle detoxifiers, or while you’re warming up/cooling down your practice.
3. Supine Spinal Twist
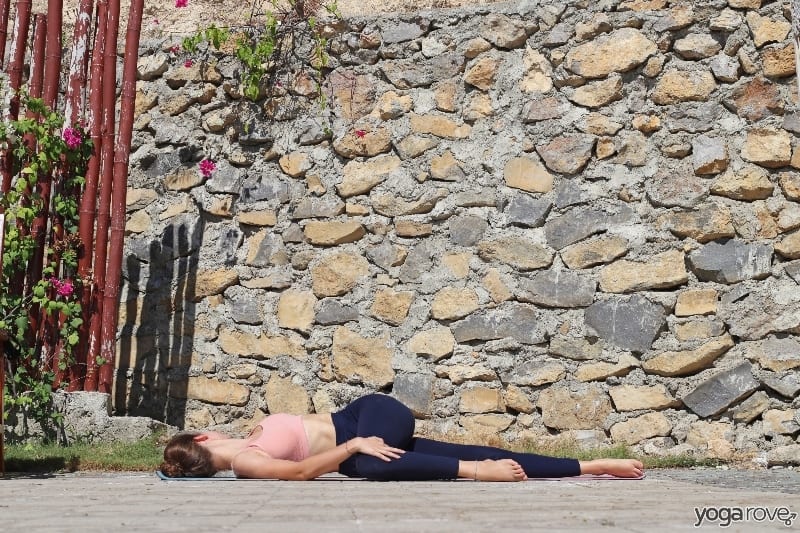
-
- Begin: lying flat on the mat.
- Pull the left knee into the chest, keeping the head, neck, and shoulders on the mat.
- Extend your left arm out to your side, shoulder height, palm face up.
- Use the right hand on the left knee to gently guide the knee to your right side as you gaze toward your left palm.
- Try to keep your left shoulder on the mat; if it pops off, place a block/pillow underneath your left knee on your right side.
- Gently guide the left knee back to center, switch sides, and repeat on second side.
Modification: Feel free to keep both legs bent if you find keeping one leg straight too intense, and allow your knee to rest on a block or blanket.
4. Half Lord of the Fishes

-
- Begin: seated on the mat in Staff Pose, legs extended long in front of you.
- Cross the right foot outside of the left knee, placing the sole of the foot directly outside of the left knee.
- Bend at the left knee so that your left foot lies outside of your right hip (this is optional – if you have tight hips, keep the left leg straight).
- On an inhale, extend the left arm to the sky and place the right palm on the mat directly behind the tailbone.
- On an exhale, twist to the right as you “hook” the left elbow outside of the right quad, near the knee.
- Actively press into the mat with your right palm to lengthen the spine upward, but do not allow doing so to bring the shoulder up to the ear.
- On an exhale, unhook the left elbow from the right knee, twist back to center, switch the leg cross, and repeat on second side.
Modification: If you find yourself dumping into your palm that is placed behind you, place it on a block instead to help you maintain length.
5. Twisted Low Lunge
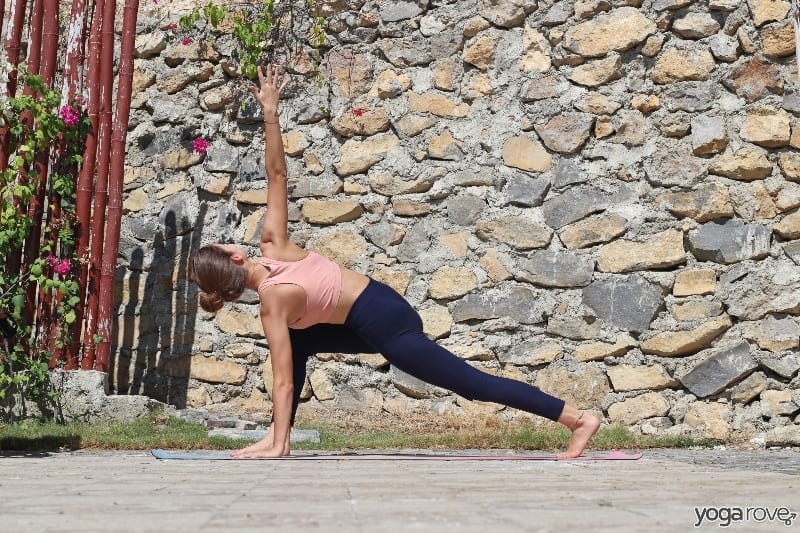
-
- Begin: in low lunge, right foot front, both palms on the mat. Your right knee is forming a 90-degree angle with the knee stacked directly over the right ankle. Your left leg is active (knee off the mat), toes tucked, heels lifted, leg straight.
- Look down to make sure your left palm is directly under the left shoulder (if it’s not, move it there)
- Remove the right hand from the mat as you twist the torso toward the right, extending the right fingertips to the sky; gaze at the right fingertips.
- Actively press into the left hand to lift away from the mat (but don’t sink into the left wrist). Optional: bring the right hand to the top of the right quad to gently facilitate a deeper twist by pressing into/away from the quad.
- Bring the right hand back to the mat, returning to center. Switch the lunge, and repeat twisting to the left.
Modification: Instead of keeping your hand on the mat, use a yoga block instead. Also, feel free to drop your back knee.
6. Galaxy
-
- Begin: in low lunge, right foot front, both palms on the mat: your right knee is forming a 90-degree angle with the knee stacked directly over the right ankle. Your left knee is on the mat, toes untucked so the top of the foot presses into the mat.
- Look down to make sure your left palm is directly under the left shoulder (if it’s not, move it there).
- Remove the right hand from the mat as you twist the torso toward the right and reach the right fingertips behind you.
- Bend the left leg so that you can take hold of the left ankle with the right hand.
- Continue to press away from the mat (no dumping in the wrists!) with the left hand. Press into your right hand with the top of your left foot to deepen the stretch.
- Release the left foot back to the mat, as you bring the right hand back to the mat, returning to center. Switch the lunge, and repeat twisting to the left.
Modification: If you are unable to reach your back foot, use a yoga strap to help you lengthen, or keep the leg straight.
Active Twists
These are best for firing up digestion and/or both strengthening and lengthening the muscles while twisting.
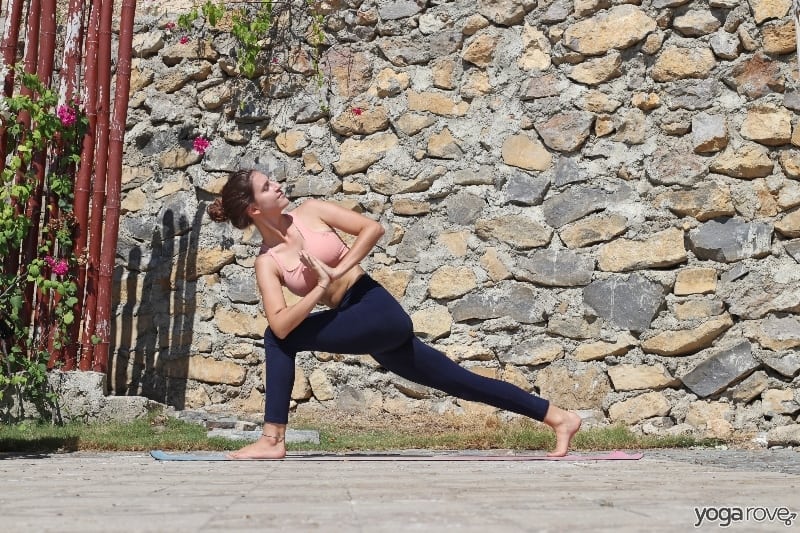
7. Prayer Twist Crescent Lunge
-
- Begin: in Crescent Lunge right foot front, with hands at heart’s center. Your right knee is forming a 90-degree angle with the knee stacked directly over the right ankle. Your left leg is active, toes tucked, knee off the mat.
- On an inhale, lengthen the spine upward. On the exhale, twist the torso toward the right, hinging slightly forward so that the left elbow hooks outside of the right quad.
- Though you’ve twisted, the prayer should stay at the center of your chest: actively press away from your quad with your left elbow to keep the centered alignment. Visualize pressing backward into the left (back) heel to keep the left leg active, stabilizing the posture.
- On an inhale, unhook the left elbow from the quad and gently untwist back to center. Switch the lunge, and repeat on second side.
Modification: If you have a hard time balancing in this pose or keeping the back leg lifted is too much, feel free to keep the back knee on the mat for a twisted low crescent lunge.
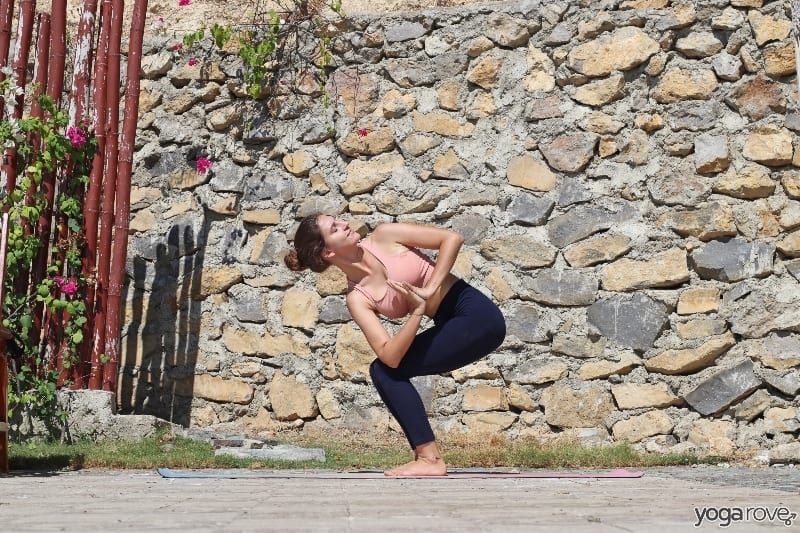
8. Prayer Twist Chair
-
- Begin: in Chair Pose, feet together (toes touching, heels 1-2” part) so that the thighs are squeezing together. Your weight should be predominantly in the heels so that you are able to lift the toes off the mat. Engage the core to keep a slight tuck in the pelvis, generating a neutral spine (very important to be twisting from a neutral spine, not an arched spine!).
- Bring the hands to Prayer at heart’s center on an inhale. On the exhale, twist the torso toward the right so that the left elbow hooks outside of the right quad.
- Though you’ve twisted, the prayer should stay at the center of your chest: actively press away from your quad with your left elbow to keep the centered alignment. Take a look downward at your knees – is one (in this case, usually the left) trying to slide forward? Bring the knees to be in the same line.
- On an inhale, unhook the left elbow from the quad and gently untwist back to center. Fold forward before switching sides if you need a break.
Modification: If the prayer twist is too much, keep your arms open, pointing your fingertips at opposite sides of the room.
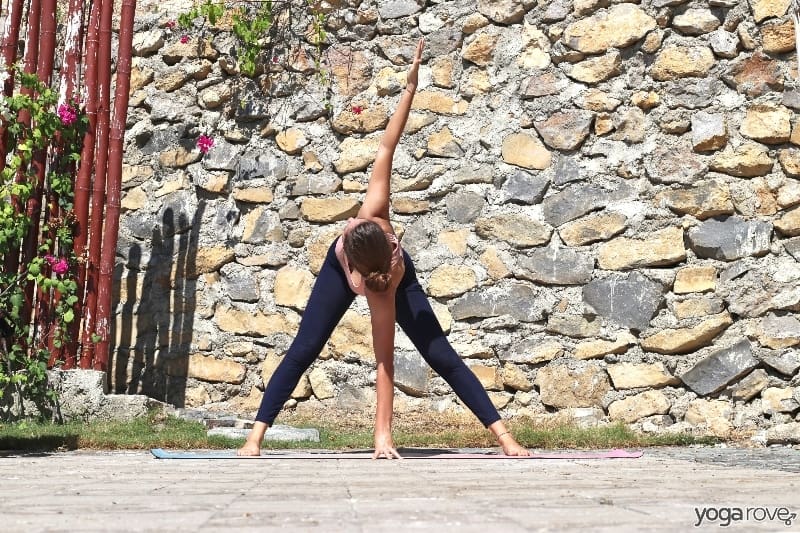
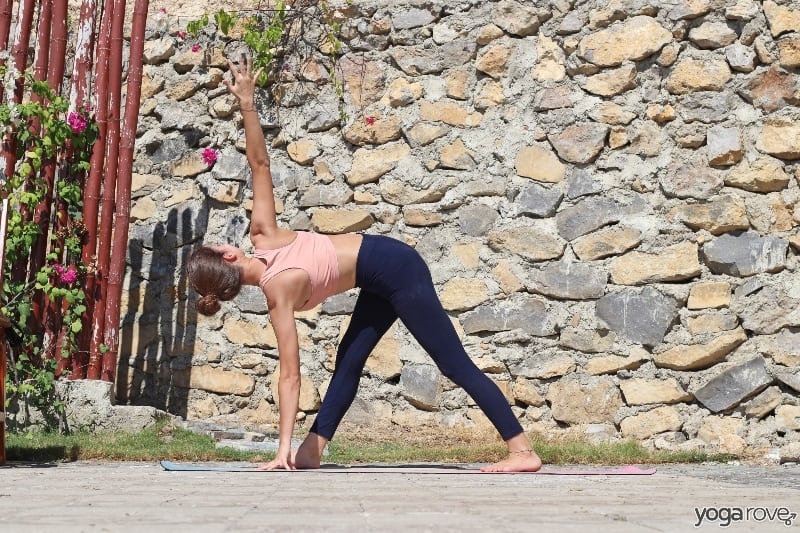
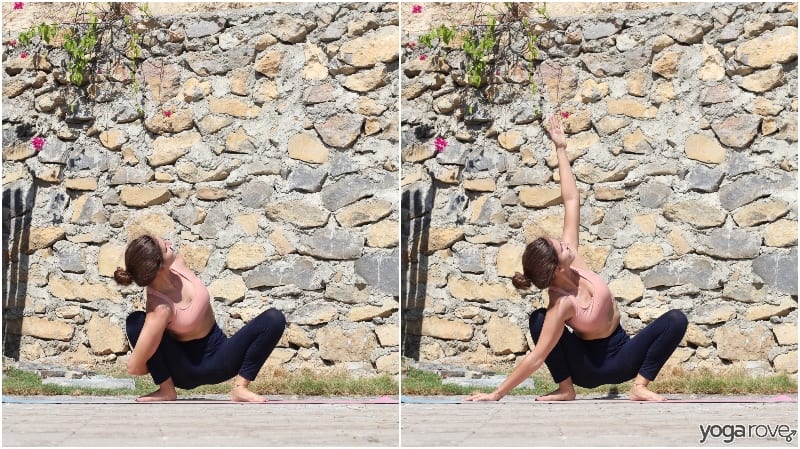
9. Revolved Pyramid
-
- Begin: in Pyramid Pose with the right foot front: your feet are hip-width apart, right foot toes pointing to the front of the room, left foot angled so that your left toes point toward the top left corner of your mat. Your hands are on the mat shoulder-width apart (or on a block if palms don’t reach the mat), and the hips are square in space – your right hip is not pulling forward.
- Bring the right hand to the right hip as you bring the left palm on the mat (or block) directly in front of the nose.
- Twist the torso toward the right, then, if available to you, extend the right fingertips to the sky, palm facing away from you.
- Gently untwist back to center. Switch legs and repeat on second side.
Modification: If you cannot maintain a flat back with the palm on the mat, place a yoga block under the left palm.
10. Half-Bound Wide Squat
-
- Begin: in Garland (Yogi Squat)- your feet are hip-width (or wider), heels on the mat, knees tracking directly over the middle of each foot.
- Bring the right palm to the mat outside of the right shin – I twill be about 6-8” outside of your right shin.
- Extend the left arm to the sky as you twist to the left and gaze upward toward the left hand.
- Stay here, or progress: reach the left arm behind the back so that the forearm pressed into the lower back, palm away from you. Remove the right palm from the mat and rotate the arm so the right palm faces away from you. Bend the right arm to wrap the arm around the front of the right leg and behind you, aiming to reach for the left wrist. If this isn’t accessible, use a towel or strap.
- To release the bind: bring the right palm back to the mat, extend the left arm back to the sky, then gently return to center. Repeat on second side.
Modification: Place a block under your seat to help you feel supported if you have tighter hips.
11. Revolved Half Moon
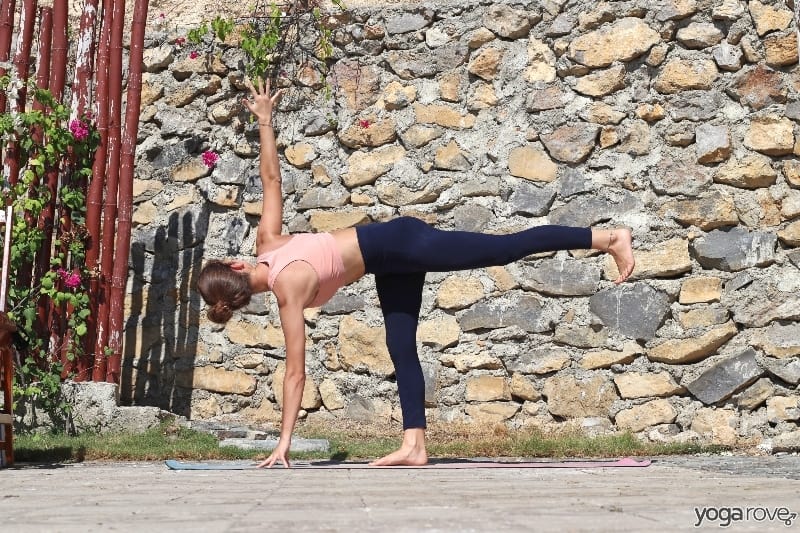
-
- Begin: in Warrior III with the right foot standing, left leg extended behind you at hip height. Your left knee and toes are pointing toward the ground, foot flexed as if you’re pressing into a wall behind you.
- Bring your right hand to your right hip and place the left palm on the mat (or a block) in front of you, directly in front on the left shoulder.
- On an exhale, rotate the torso to the right. Keep your right hand on your right hip to maintain awareness in space, reminding you to keep both hips square to the mat.
- If available, extend the right fingertips to the sky, palm facing away from you. Gaze toward the fingertips.
- On an exhale, return the right hand to the mat. Step the left foot to meet the right, then repeat on second side.
Modification: If you cannot maintain a flat back with the palm on the mat, place a yoga block under the left palm.
Whether you incorporate one, a few, or all of these twists in your practice, you’ll start to notice a stronger trunk and healthier spine, in addition to better digestion and elimination regularity.
Let us know if you plan on incorporating any of these poses into your practice by commenting below 🙂

Ally is a Registered Nurse, Registered Yoga Teacher, and Co-Founder of Yoga Rove with her husband Victor. She first started yoga over 7 years ago when she started her nursing career to combat the physical and mental strain, and now loves to teach and help others.

I love twist! I include them in my sequencing and classes every time I teach. Twists are great for detoxing and keeping the spin flexible and mobile.
Totally agree!