

This post may contain affiliate links. Please read our disclosure for more info.
Are you experiencing knee pain in your yoga classes (or just in general)? Or perhaps you think you can’t do yoga because you have “bad knees?” We’re here to tell you that not only can you do yoga, you should do yoga.

When practiced properly, yoga has proven to reduce knee pain. In a study conducted on patients age 35-80, nearly all participants experienced improved joint pain and reduced stiffness.
Don’t let your knee pain get in the way of enjoying yoga – just follow these guidelines for bad knees to practice safely and pain-free, whether your knee pain is from recent surgery, arthritis, or weak muscles that simply aren’t strong enough to support the knee joint.
Yoga Poses to Avoid if You Have Bad Knees (and alternatives to replace them with)
- Fire Log→Easy Pose, seated on a bolster, block, or cushion
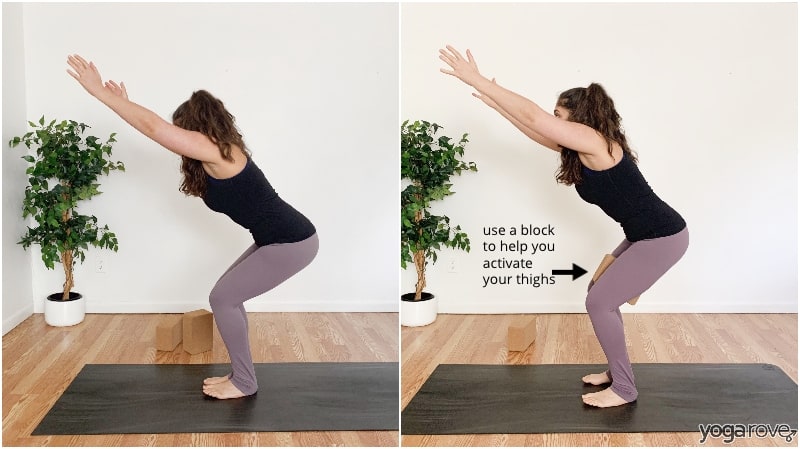
- Garland (Yogi Squat) → place 1-2 blocks underneath your seat so that your weight is on the block, so there is no strain on your knee
- Hero → modify by placing a block or bolster underneath your seat
- Child’s Pose → use a bolster (or 2 thick pillows) under your torso + a bolster (or thick cushion) underneath your seat; you will be extended in Child’s, but heavily bolstered. If this still hurts your knees, simply take upright Hero with cushioned modifications.
- Lotus → Easy Pose, seated on a bolster, block, or cushion
- Reclining Hero → upright Hero, seated on a bolster, block, or cushion
- Pigeon → reclined Figure-Four
- Warrior I → High Lunge
- Cow-Face Pose → you can practice the arm portion of Cow Face, but not the lower body portion; instead kneel or sit in elevated Easy Pose (using a block or bolster for elevation), and only practice the arms.
- Eagle → like Cow-Face, you can practice the arm portion, but not the lower body portion; instead take regular Chair.
- Fire Log → reclined Figure-Four
- Camel → Reverse Table Top or Reverse Plank
- Galaxy → Low Lunge without reaching back for the foot
The modifications can be used in, and applied to, any yoga class you take – so that you can enjoy the benefits of yoga without any pain, because in yoga, we do not believe in the old adage of “no pain, no gain!”
Yoga Modifications to Reduce Knee Pain
Besides modifying yoga poses, there are also a few key things to keep in mind to apply to your practice to protect your knees and avoid any injury or discomfort.
1. Move slowly.
Transition slowly to prevent re-injury, and do not let your ego get in the way when you see everyone around you moving faster.
Anti-bruising-your-ego tip: wear a knee brace or bandage to class – it’s a clear sign that you’re working with an injury if you’re concerned about how you look compared to everyone around you (though the only person you should be worrying about is yourself…but hey, we get it!)
2. Keep a micro-bend in all straight-leg postures.
What’s a micro-bend? It’s an ever-so-slight bend at your knee that ensures you’re not hyper-extending, causing weight to bear on the joint instead of the muscles of the leg.
Doing so activates the hamstrings, glutes, calves, and surrounding tendons and ligaments of the kneecap – so you’re strengthening the exact tissues that will help to improve your bad knees!
A micro-bend is barely visible – think of it has something someone would notice if you were 1-2 feet away, but not if he/she was any further away from you.
You’ll micro-bend in:
- Standing Forward Fold
- Seated Forward Fold
- Triangle
- Pyramid
- Wide-Legged Forward Fold
- Seated Wide-Legged Forward Fold
- Warrior III
- Downward Dog
- Half Moon
- Tree
- …countless more!
*Tip: for seated poses, place a folded towel underneath your knees to force a micro-bend if you find yourself forgetting to do so– or if you want to gain a better understanding of what the micro-bend is.
3. Use all the props
Blocks, bolsters, pillows, cushions, towels, blankets – the more the merrier! Try using yoga props in these modifications:
-
- Child’s pose propped modification: use a bolster (or 2 thick pillows) under your torso + a bolster (or thick cushion) underneath your seat; you will be extended in Child’s, but heavily bolstered
- Hero pose propped modification: place a block underneath your tailbone and roll a blanket (or another yoga mat) tightly, placing it between your thighs and calves.
- Bolsters and blocks as props to alleviate in knee pain in seated positions: if your knees come up above the hips in postures such as Easy Pose, Half Lotus, Staff, Seated Forward Bend, put a yoga block or bolster under your bum!
**Always keep the knees in line with, or lower than, the hips, to prevent undue strain on the hip joints that will travel to straining the knee joints – this goes for everyone, not just yogis with bad knees. - Standing pose modifications for knees using blocks: in standing poses where your hands should reach the floor, use blocks to bring the floor to you so that you’re not (in the case of straight-legged positions such as Forward Fold) hyperextending the joints or (in the case of strengthening positions such as side lunge) causing the legs to work too hard, stressing the knee joint.
- In Bridge, Chair, Mountain, and other knees-hips-width-apart poses: keep a block squeezed between the thighs to ensure you are pulling your knees into the midline, so that they cannot splay outward, as this will create wrong muscle memory.
- In Low Lunge: pad the knee that’s on the mat heavily with a folded towel, blanket, or additional mat. Never place the kneecap directly on the ground – instead, visualize pulling the quadricep forward and up, so the top of your knee (about 2” from the center of your kneecap) is on the mat.
Yoga Poses to Strengthen Knees
Because one of the most common culprits (other than injury) of knee pain is weak quads and/or hamstrings, practicing certain poses in yoga can actually alleviate the problem because they strengthen all the muscles, tendons, and ligaments around the knee.
Regular practice of these postures with mindful intention regarding placement and alignment will also train your musculoskeletal memory as to where correct alignment is, which will prevent injury and/or additional joint stress that results from improper placement.
Keep in mind the modifications and cues we just discussed above when practicing the posture; SparkNotes version here:
- Knee points over middle of foot
- Keep a micro-bend in knee
- If it hurts, back off!
- Transition slowly
1. Chair
Do not allow the knees to go past your toes; instead, bring your weight back into your heels. You may also find it helpful to keep your hands in prayer position at your chest instead of extending overhead so that everything is closer to the center of gravity.
Tip: squeeze a block between the thighs to ensure your quads fire up and reduce knee pressure.
2. High Lunge
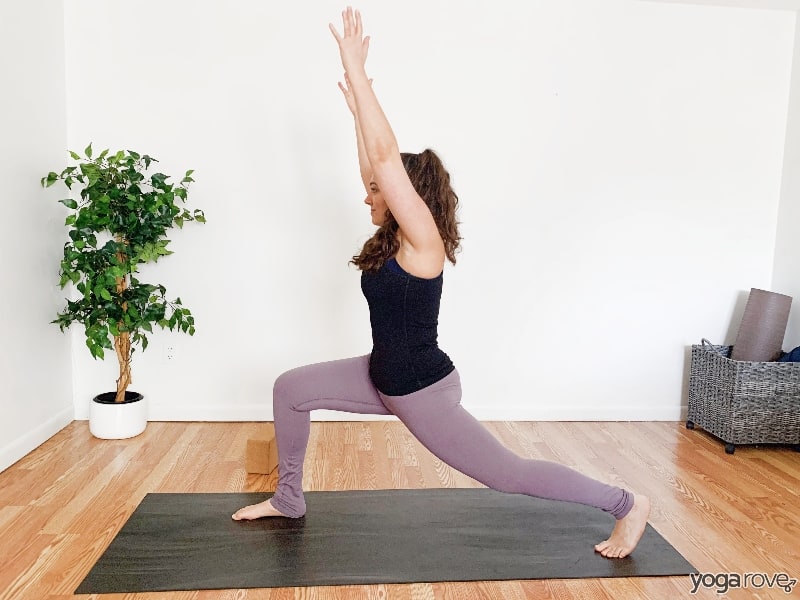
The best alternative to Warrior I, since the back leg tends to get a little wonky and cause knee pain in Warrior I (great alternative if you have hip pain as well). Instead, keep the hips square and the back knee pointing straight to the mat as you keep a 90-degree bend in the front leg. Fire up the standing leg and abs to strengthen and “lift” the body weight upward, releasing stress from the front knee.
3. Warrior II
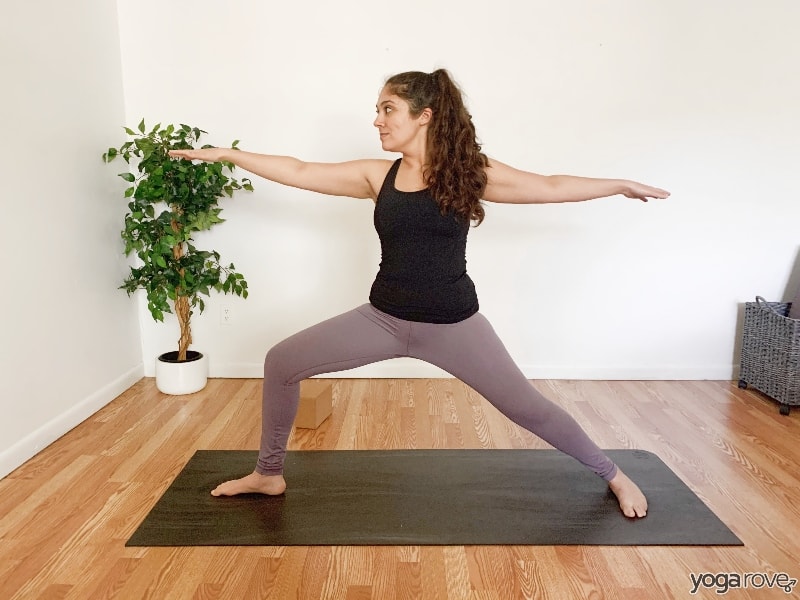
Just like High Lunge, the front knee stays at a 90-degree angle. Make sure the ankle of your front foot lines up with the middle of your back foot, which is turned to be parallel to the small edge of the mat.
4. Goddess
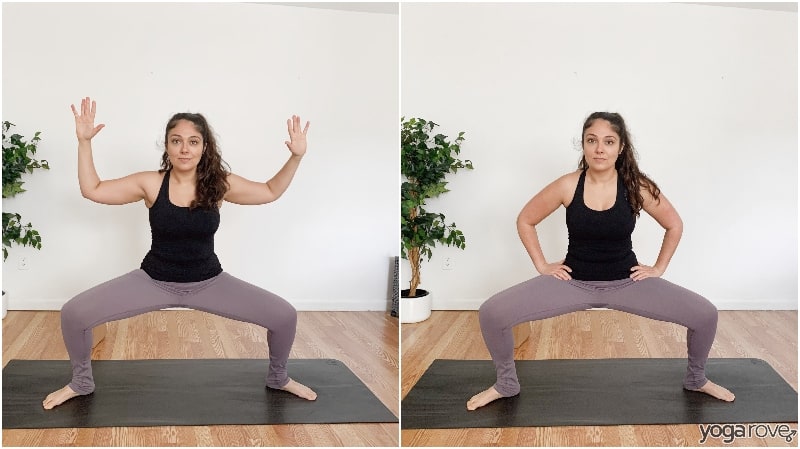
In this strong squatting position, take a peek down at your feet – your knees should be tracking directly over the middle of each foot. It’s fine if you don’t go deep – go as far as you can without straining your knees.
5. Reclined Big Toe to Hand
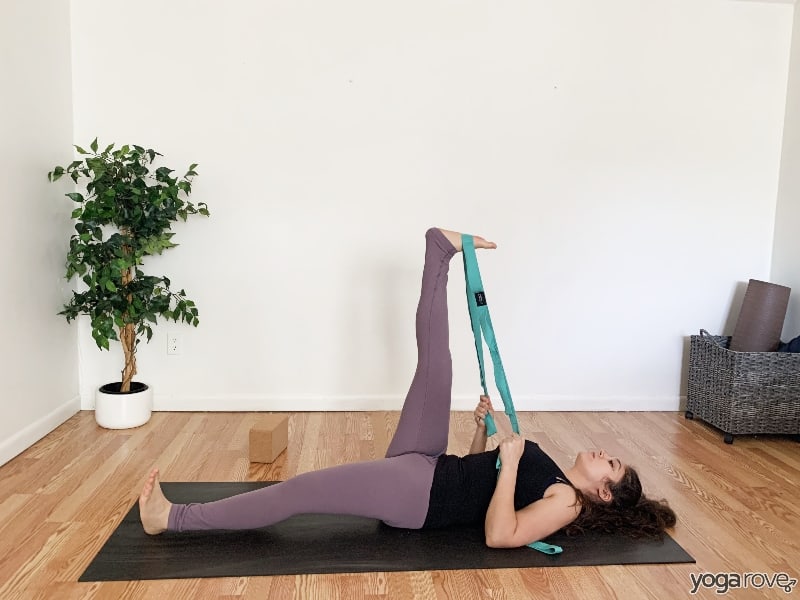
Use a strap and keep a micro-bend in the extended leg; make sure your knees and toes are facing the right direction (training the proper alignment of the bones and muscles!)
Dealing with Bad Knees in Yoga Studios
If you’ve had a major knee injury or surgery, do not attempt to practice any yoga without clearance from your doctor. If you suffer from joint paint and/or arthritis, make sure you’ve received clearance from your doctor to practice as well.
When you are practicing in a yoga studio, teachers will generally ask at the start of class if anyone is working with injuries, but if you would prefer to not announce it in front of the class (and just to be safe, in case the teacher doesn’t remember to ask), always let the teacher know a few minutes before class starts that you’re working with knee issues (and any other issues, if applicable).
Above all else, listen to YOUR body.
Nobody knows your body like you – you’re the only that lives in it! If something feels wrong, stop immediately. If you have trouble discerning between what a “good burn” (your muscle firing up) and a “bad burn” (stressing a ligament or joint), communicate with your yoga teacher and/or doctor after class.
Have you tried any of these postures for strengthening your knees, or any of the modifications to relieve pressure on the joint? We’d love to hear what has and hasn’t worked for you – and if there are any other tips or modifications we may have missed! Let us know in the comments.
Previously a dancer, Ashley has been practicing yoga for over 15 years and teaching for 5.
She balances an executive-level “corporate” position during the day with healthy, mindful wellness practices in her free time to stay grounded; she lives on celery juice and cold brew, and can’t live without her dark chocolate!
Excellent commentary. I needed this and it was a great reminder and added some new things that I wasn’t aware of. I liked the repetition with pictures. Do you have some info on wrists?
Glad you found it helpful Randy! The wrists is another topic on our list to cover soon 🙂
This was great. I always use a blanket when doing hero. I will start using the block for chair just to make sure I’m not sending my knees to far out and over. I try to really keep my knees in line because I don’t want to hurt them so I really appreciate this. Thank you.
So glad you found it helpful Janette! I love using a block or blanket in Hero as well 🙂
Hello, thank you for these great articles. I am a yoga teacher and have just broken my ankle in two places so I am teaching in a wheel chair for the next 8 weeks or more. Would love more chair yoga printable if available or other ideas.
Thanking you ☯️🕉
Hoping you have/had a safe, speedy recovery Dea! Will definitely look into adding more chair yoga!
I would really like a DVD for an easy yoga routine I have bursitis, bad back I do not sleep very well
Hi Veronica! We will be coming out with a beginner video course very soon 🙂 You might find this article helpful to practice before you go to sleep: https://yogarove.com/yoga-for-sleep/
Thank you for sharing this information. I needed guidance for the placement of my block. Child’s pose just is so hard for me so I will be concentrating on building my quads. A lot to absorb but thanks again
You’re very welcome 🙂
Thank you for these modifications. I had bilateral knee replacements and can NOT put any pressure on knees (feels like crushed glass inside my knee caps-even with padding).