

This post may contain affiliate links. Please read our disclosure for more info.
Are you just getting started with yoga and looking for inspiration on which poses to practice or how to integrate more seated yoga poses into your practice? We’ve created a list with descriptions and alignment cues to help you practice poses correctly and safely.
You don’t need to have a yoga practice filled with high lunges and chaturangas to be a yogi. If you’re new to yoga, or even if you’re not and looking for modifications or alternatives to your practice, practicing seated yoga poses on the floor or in a chair is a great option.
Beginner Seated Yoga Poses
There are an endless number of yoga poses you can practice on the floor. Below are a few of the many options you have to give you an idea of how diverse of a practice you can have just on the floor.
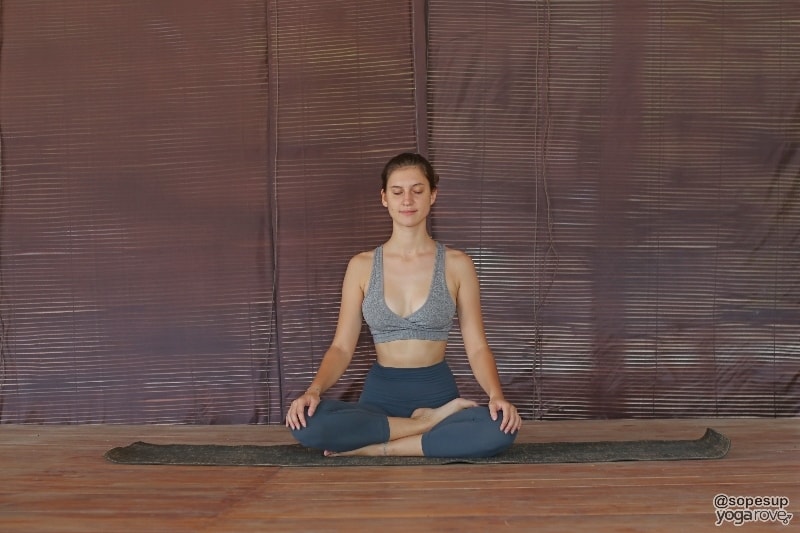
Easy Pose/ Sukhasana
This pose might actually be not so easy if you’re spending a lot of time sitting in chairs. Most yoga classes start in this pose, so it is worth getting comfortable in this.
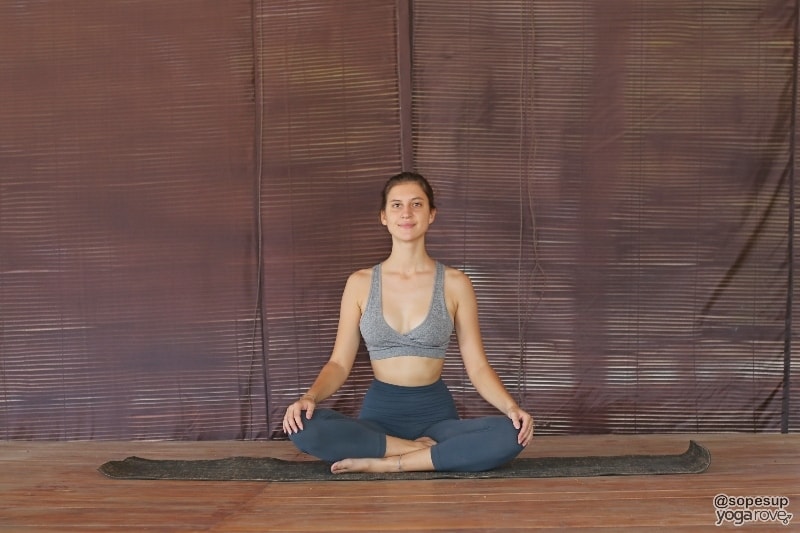
- Bend both knees to come into a cross-legged position. If your knees don’t touch the floor you can place a blanket under your seat to make your hips slightly higher than your legs, making it easier to sit up straight and comfortable.
- Place your hands on your knees, the palms can either face up or down. Close your eyes and picture a string pulling you up from the crown of your head, helping you lengthen through the spine.
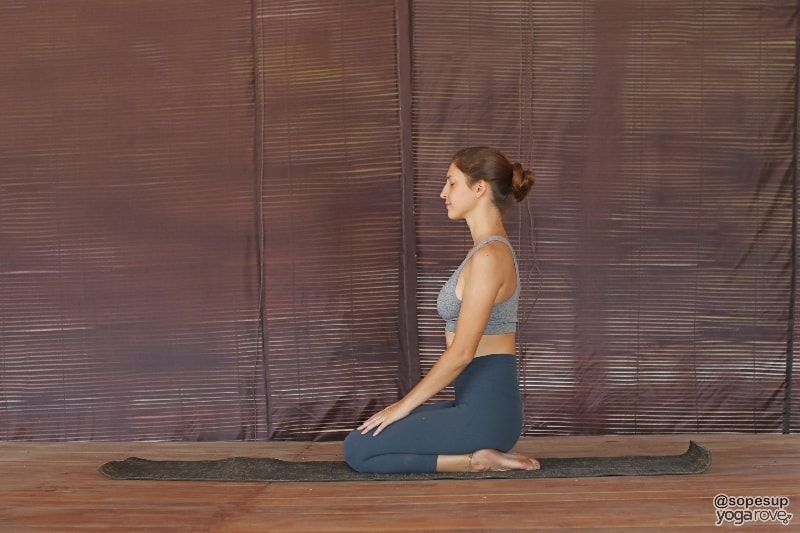
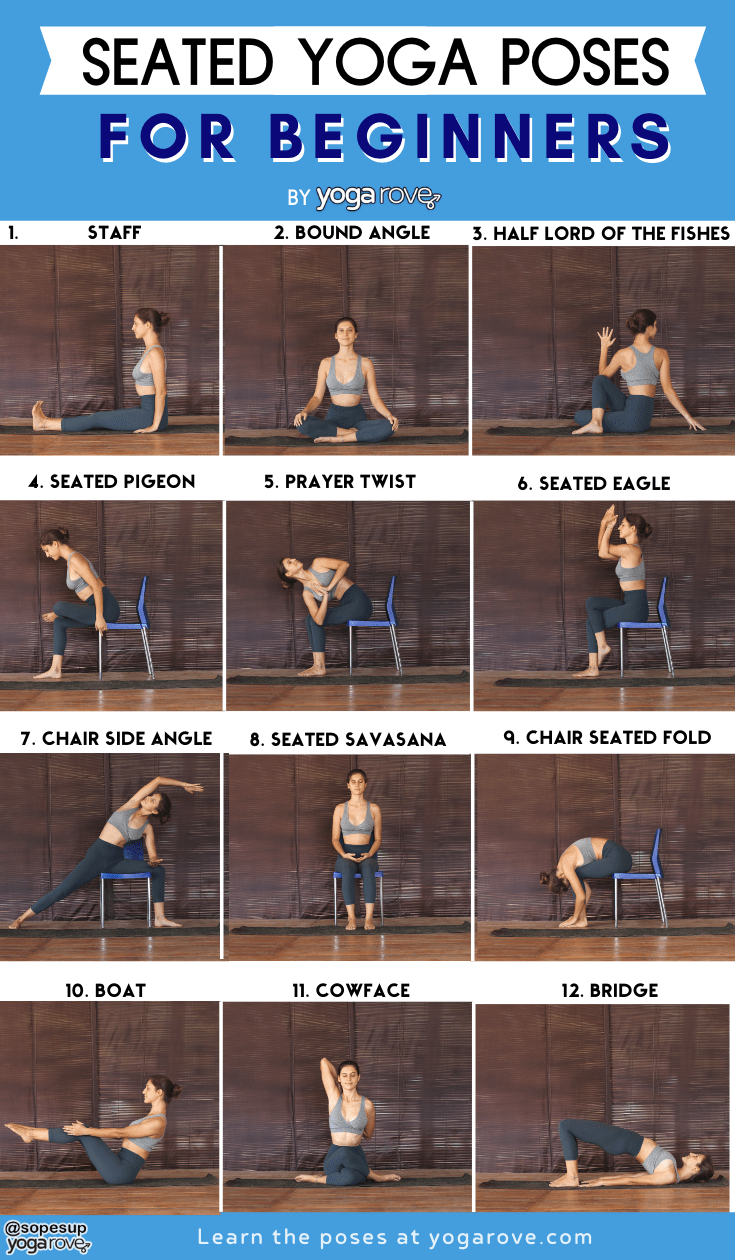
Staff Pose/Dandasana
“We’ll start in Dandasana” is a phrase you might hear often in a yoga class. Staff Pose is often a starting position for poses like Forward Bends or Heron Pose. It may look simple, but sitting with your legs straight with a tall spine can actually be quite challenging on the core.
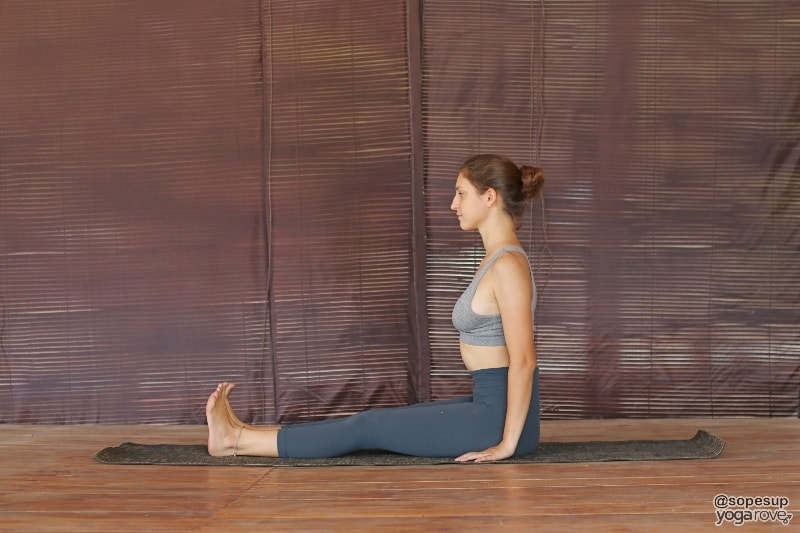
- Start with your legs together and out in front of you.
- Flex your feet and press out through your heels – the soles of your feet should ideally be flat as if they are pressing against a wall. Pull your toes back towards your body.
- Place your hands next to your hips, pressing into the floor and straightening the spine.
- If your spine rounds to compensate for tight hamstrings, sit up on a blanket or a yoga block or slightly bend your knees.
Seated Forward Bend/Paschimottanasana
Seated Forward Bend is a classic seated posture that is great for stretching tight hamstrings. It is commonly taught at the end of classes as you near Savasana.
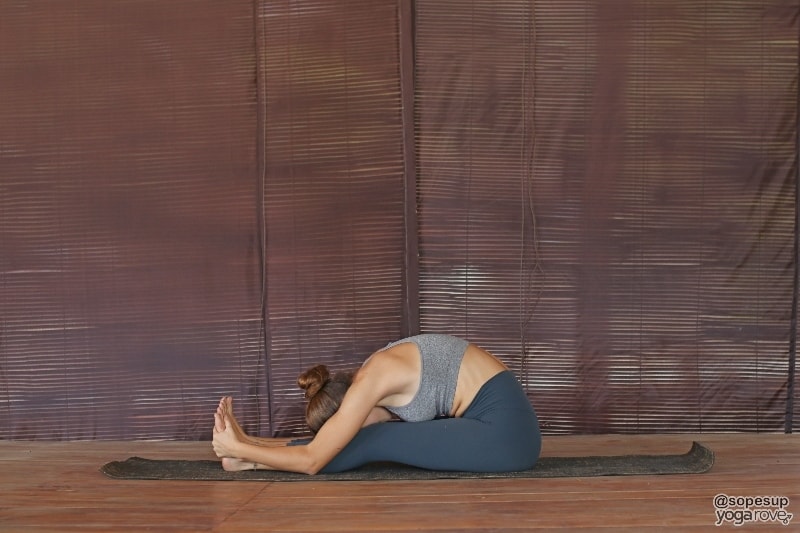
- Start seated in Staff Pose with your spine straight and your legs out in front of you, your feet are flexed.
- On an inhale, lift your arms over your head, and on an exhale fold forward with your spine straight. Try to picture your belly coming to touch your thighs.
- Your hands can rest on your knees, shins or maybe one day even your feet, but don’t compromise the length in your back for a deeper fold.
Bound Angle/Baddha Konasana
Bound Angle Pose is an amazing hip opener and is common in many restorative yoga practices.
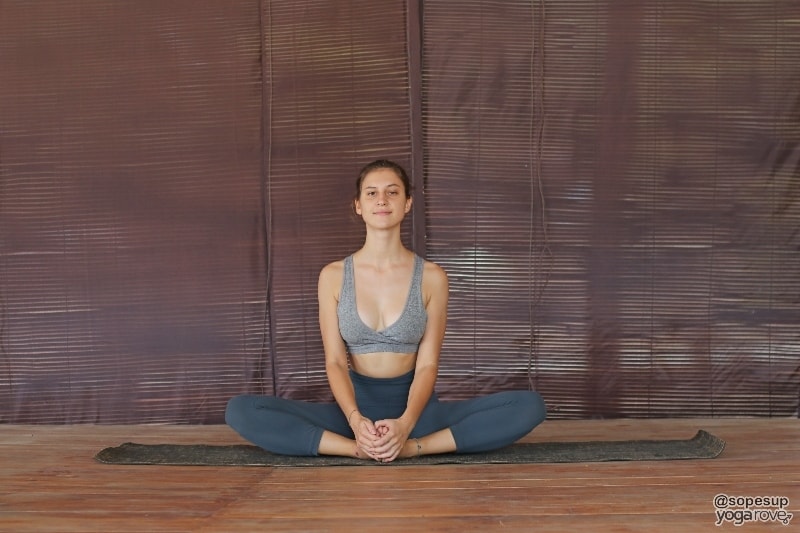
- Bring the soles of your feet together and as close to your groin as is comfortable for you.
- Hold on to your feet with your hands and sit up tall on an inhale, on an exhale fold forward with a straight spine.
- You might be surprised how hard it is to fold forward in this pose – don’t worry if you don’t get very far, or if you can’t fold forward at all. If you feel a stretch in your hips, you’re doing it right!
*Another version of this stretch would be to bring your feet further away from your groin to create a diamond shape with your legs. Hold on to your feet once again and fold forward on an exhale. This time your spine can round a lot and your head might even touch the feet. This stretch targets a different area of your hips but is just as beneficial.
Cow Face/Gomukhasana
There are two Cow Face Pose variations: Half Cow Face and Full Cow Face. The full version is an intense shoulder and hip opener, if that feels like too much at once I recommend starting with Half Cow Face.
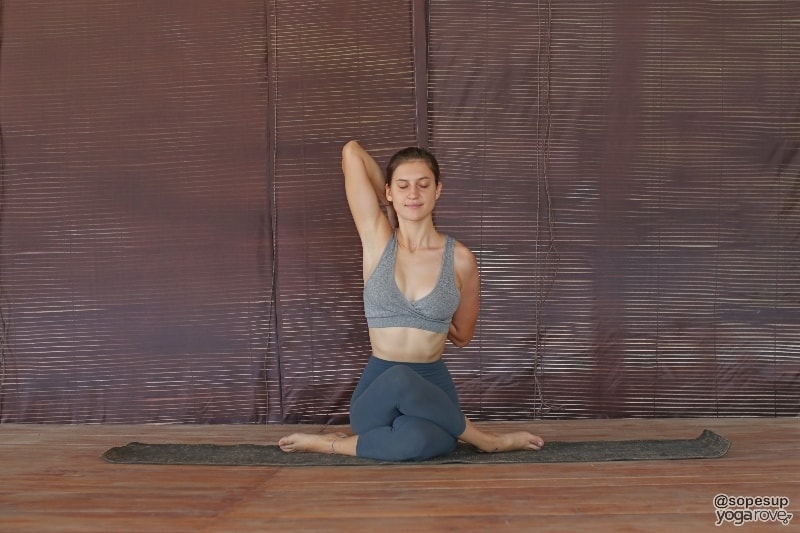
- Sit in a comfortable cross-legged position and raise your right arm to the sky, your left arm is by your left side.
- Bend your right arm down your back and your left arm up your back. If you have very open shoulders your hands might meet. If not just take a yoga strap/towel/shirt and hold onto it with your right and left hand to create a connection between both arms. Repeat the stretch on the other side.
If you feel like intensifying the stretch, you can add the leg stretch:
- From your cross-legged position bring your left foot to the outside of your right hip and your left knee to the floor. It is important to keep the left sit bone grounded to the floor here.
- Then bring your right knee over your left knee and your right foot to the outside of your left foot. This might feel like a lot, so don’t try to push it.
If you’re comfortable with both stretches sit up tall and take five deep breaths, then repeat the stretches on the other side (your left arm down your back, your right arm up your back and your right knee on the floor and your left knee on top of your right knee).
Hero/Virasana
Hero Pose is commonly used as a mediation posture, and also provides a great stretch in the thighs. It may seem simple, but can be very uncomfortable for people with sensitive knees, so please use props as needed!
- Sit on the floor kneeling with your knees touching. You may want to place a blanket underneath your knees for comfort. Start sliding your feet apart until you’re sitting on the floor instead of the soles of your feet.
- You should feel a stretch in the thighs, knees and ankles, but if you’re experiencing any discomfort come out of the pose or place a blanket/yoga block under your seat to make the stretch less intense.
- If you can stay here comfortably place your hands on your knees (the palms can either face up or down. It is said that turning the palms down is more introspective, turning the palms up means you’re open to receive from your surroundings – do whatever feels more natural to you).
Firelog/Agnistambhasana
Firelog pose is a great stretch for the outer hips. This pose can feel intense to many people, so I definitely suggest utilizing props here as well!

- Start in a seated position with your legs straight, then bend the right leg to create a 90°-angle. Your shin is parallel to the short side of your mat, your right foot is flexed. Then bend your left leg over your right. Your left foot should be slightly hanging over your right knee.
- You should feel quite a deep stretch in your hips here, and your top knee might not touch your right ankle because your hips might not be open enough yet – that is completely fine, you can just place a yoga block or a blanket in the gap so that your upper leg can rest comfortably.
- Stay here for five breaths, then repeat the stretch on the other side (one side is usually tighter than the other, so don’t worry if this stretch feels a lot harder/easier on the other side).
Wide Angle Seated Forward Bend/Upavistha Konasana
This pose can be frustrating for beginners, but the only way to get “better” at it (which really isn’t the goal in yoga, it’s about feeling good in stretches, not how far you can go) is to keep on practicing it.
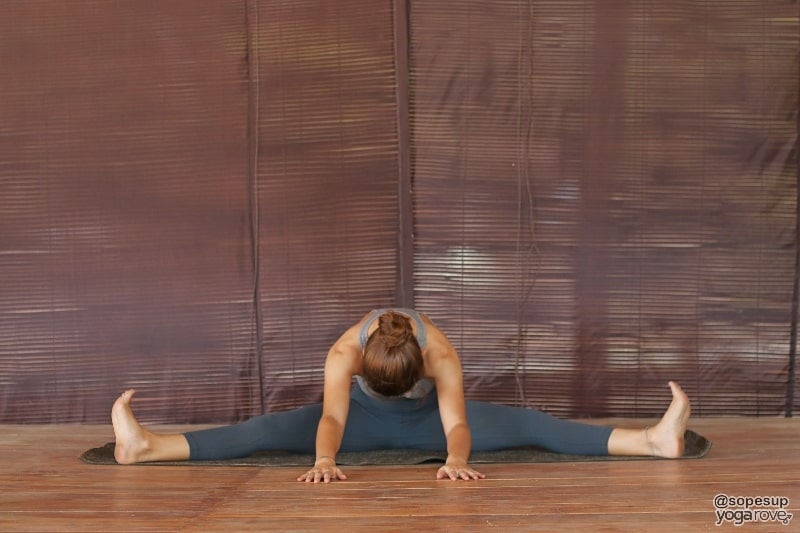
- Sit facing the long side of your mat.
- Open your legs as wide as feels comfortable. The right leg is pointing to the front corner of your mat, then left foot is pointing to the back corner. Both feet are flexed to protect the knees.
- Inhale to sit up straight, exhale to fold forward with your spine straight.
- You might not get very far in the stretch, but you can place a blanket under your buttocks to elevate the hips and make the fold easier or place a yoga block under your head for you to rest comfortably in this pose.
Heron/Krounchasana
This pose is probably the most advanced out of all the seated yoga poses on this list, and an intense hamstring stretch! I recommend keeping a strap nearby.
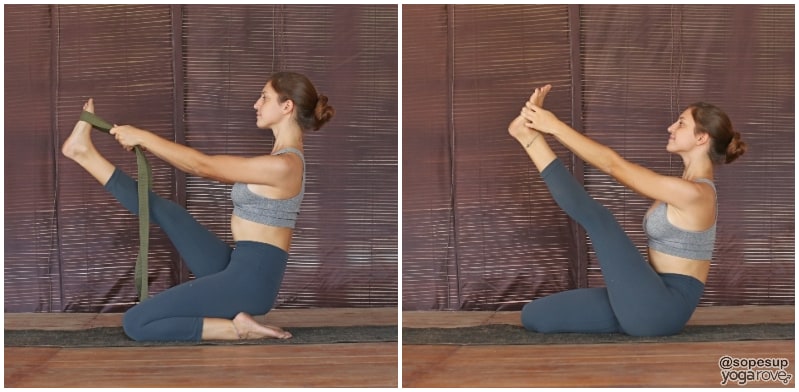
- Start in Staff Pose with your spine straight, your legs out in front and your hands next to your hips.
- Bend your right leg and bring the top of your right foot to the floor next to your right sit bone (like in Hero Pose, but only on one side).
- If this hurts your knee you can elevate your seat by sliding a blanket under your sit bones.
- Bend your left knee, bringing the left foot close to the chest and interlacing your hands around your left foot.
- Keeping the spine straight, start extending your left leg up. Ideally your foot should be eye-level when your leg is fully extended.
- If you notice a rounding in your spine take your strap and loop it around your left foot, or keep your left leg bent – keeping your back straight should be a priority.
- Hold this pose for five breaths, then repeat the stretch on the other side (left leg bent, right leg straight).
Half Lord of the Fishes/Ardha Matsyendrasana
Twists are great for digestion, and this one specifically is practiced on the floor. Half Lord of the Fishes Pose is also great for opening the chest and releasing tension in the back.
- Start in a seated position with your legs straight.
- Bend your right knee and bring your right foot to the outside of your left hip, the sole of your right foot should be on the floor.
- Then bend your left knee and bring your left foot close to your right buttock, your left knee is resting on the floor and pointing forwards.
- Inhale and lift you left arm up to the sky, then as you exhale hook your left elbow on the outside of your right knee. With every inhale, lengthen, and with every exhale, twist deeper if it feels comfortable to you.
- Stay for five deep breaths, then repeat the pose on the other side (left foot to the outside of your right hip, right knee close to left buttock, right arm lifts up, twist to the left)
Head to Knee Forward Bend/Janu Sirsasana
This is a variation of the traditional Seated Forward Bend, and is can feel much more comfortable for those with tight hamstrings or hips.

- Start in Staff Pose with your legs out in front, your feet flexed and your spine straight.
- Bend your left leg and bring the sole of your left foot to the inside you’re your right inner thigh close to your groin.
- Lift your arms up over head with an inhale, rotating your torso so your belly button lines up with your right leg, then fold over your right leg with a straight spine.
- Don’t worry too much about touching your right foot here, it’s a lot more important that you’re not rounding your spine. (You can loop a strap around your right foot and hold onto the strap if you want to deepen the stretch)
- Stay in the stretch for five breaths, then come back up and repeat on the left side.
Revolved Head to Knee/Parivrtta Janu Sirsasana
This is a great seated side stretch to practice to release tension and tightness in the side body. The feeling is similar to that in Extended Side Angle Pose with the arm extended.
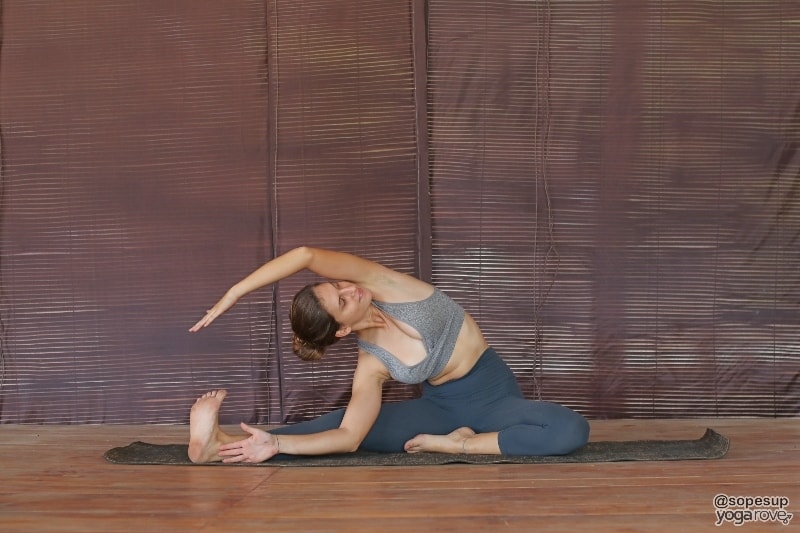
- Start as you would start to get into Head to Knee, bending your left knee and bringing the sole of your left foot to the inside of your right upper thigh.
- On an inhale lift your left arm, exhale stretch it overhead along your ear line and towards your right foot, bringing your right arm to rest on the inside of your right shin or a block.
- If possible, bring both hands to touch your right toes (this is usually only available to those that are very flexible). The left hand from below, the right hand from above.
- If you can’t reach your right foot with your right hand, just keep on stretching your arm into the direction of your foot. It is a lot more important in this pose to keep your chest open and turned towards the sky than to touch the feet with both hands.
- Hold for five breaths and repeat on the other side (lean to the left, left arm is on the inside of your left leg, your right arm reaches over to the left).
Half Lotus/Ardha Padmasana
Technically this is considered a beginner’s pose because it is a preparatory pose for Full Lotus Pose, but even the beginner’s version can be very intense, which is why I would never recommend attempting this pose before warming up your hips with hip-opening poses like Firelog Pose, Cow Face Pose and Bound Angle Pose. Do not attempt this pose if you have chronic knee or hip pain, and see how you feel in Easy Pose first. If you can feel a deep stretch in your hips in Easy Pose I do not recommend trying Half Lotus Pose just yet.
- If you feel warmed up and want to try taking your first step towards Lotus Pose, start in Easy Pose with your legs crossed, your left leg on top of your right.
- Lift your bent left leg and bring it to the chest with your spine straight.
- Cradle your leg and move it gently from left to right.
- See how you feel here: Do you feel a pleasant stretch? If you experience any pinching or painful sensations, you might not be ready for Half Lotus Pose yet.
- If you feel comfortable, bring your left ankle to the crease of your right hip, the sole of your left foot points up.
- Bring your hands next to your hips or on your knees, sit up tall and take five deep breaths. Then repeat the pose on the other side.
Beginner Yoga Poses to Practice in a Chair
Practicing yoga in a chair is a great choice for those who having sensitive knees, difficulty getting up from the floor, or if you’re at work and only have a few moments to get some yoga in!
Chair Cat & Cow
This is a modified version of the traditional Cat-Cow stretch that is usually performed on all fours, but you might get funny looks from your colleagues if you decide to drop on your hands and knees next to your desk :). Instead, you can practice this with your hands on your knees and achieve the same stretch.
- Sit upright with your spine straight and your feet on the ground (with your knees and feet in one line).
- Place your hands on your knees and push your chest forward. Roll your shoulders down your back and look up on an inhale for Cow position.
- On an exhale, round your spine and tuck your chin to your chest for Cat pose.
- Repeat this cycle at least five times, following the inhales and exhales of your breath.
Seated Pigeon
This is an excellent yoga pose to practice for those who suffer from sciatica or back pain. This feeling is similar to Reclined Pigeon, but most people find sitting in a chair actually helps provide more relief and a deeper stretch in the hips.
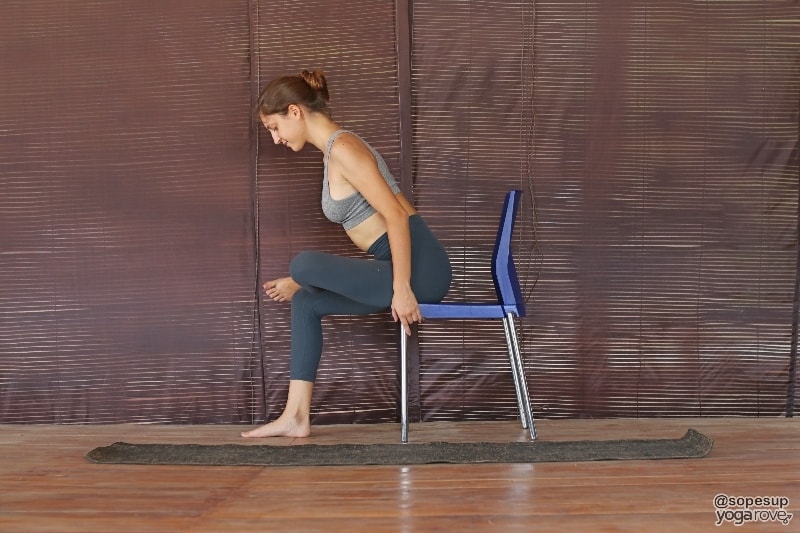
- Start by sitting up straight in a chair with your feet flat on the floor and about hips distance apart.
- Ground your left foot firmly on the floor and bring your right ankle to rest on your left thigh. If you’d like to intensify the stretch, gently push the right knee down .
- To get an even deeper stretch, you can also fold forward over your right leg as you exhale.
- Repeat the pose on the other side.
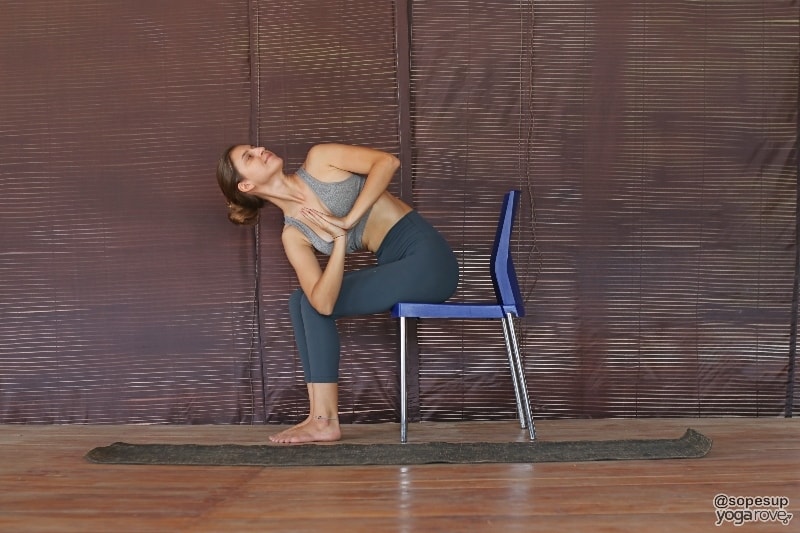
Seated Eagle
Eagle pose is traditionally a balancing pose that works on stretching the shoulders. In this variation, the balancing portion is taken out and you are better able to focus on stretching the shoulders and wrapping the legs.
- Starting seated in neutral in a chair, wrap your right thigh over your left thigh– you can hook your right foot around your left calf if it feels good.
- Stretch your arms out straight in front of you, then cross your left arm over your right arm, bend both arms at the elbow to bring your hands to touch if possible (but don’t push!).
- Roll the shoulders back and down while keeping your spine straight – you should feel a stretch in between your shoulder blades
- Repeat with the left thigh over your right and the right arm over your left.
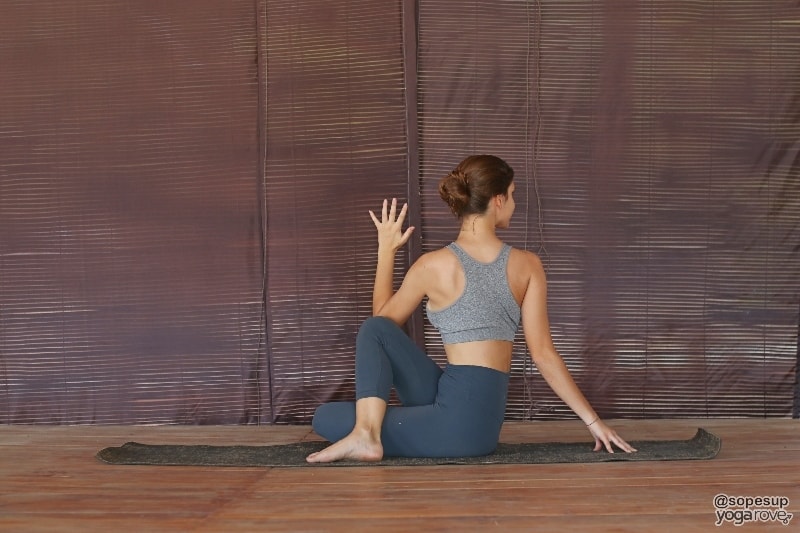
Chair Easy Spinal Twist
This is a variation of Seated Easy Twist on the ground, except it’s in a chair! This is a great variation to practice at the office when you feel you need a break or you feel tension in your back.
- Sit sideways on your chair (your feet should point to the right side of the room instead of the front), hold on to the back of the chair and lengthen up through your spine on an inhale.
- On your next exhale, twist your upper body towards the back of the chair.
- Repeat the pose on the other side by switching sides (your feet pointing to the left side), holding the back of the chair and twisting your upper body into the other direction.
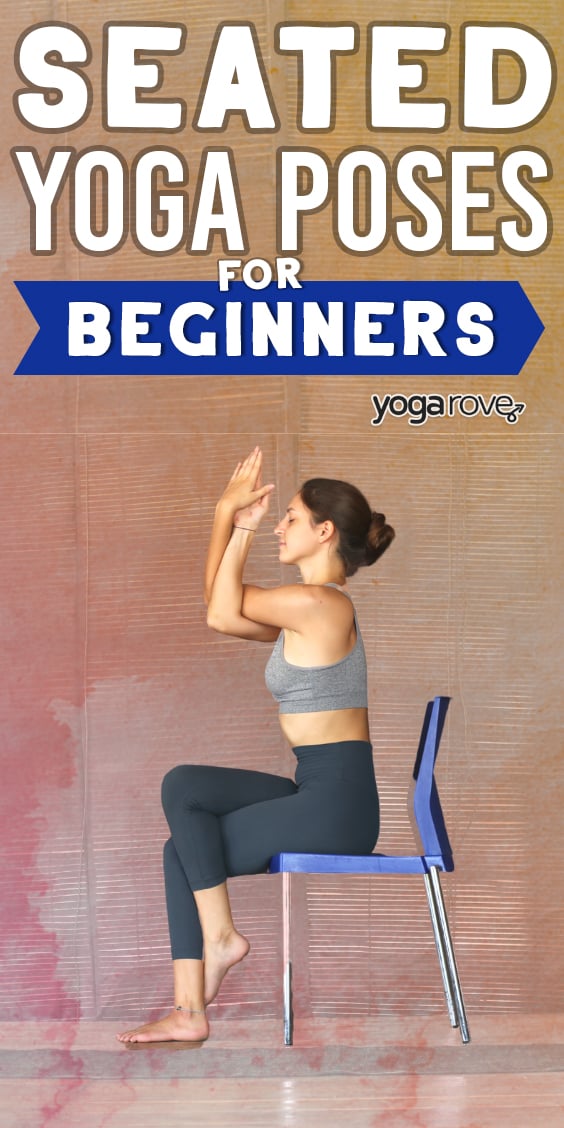
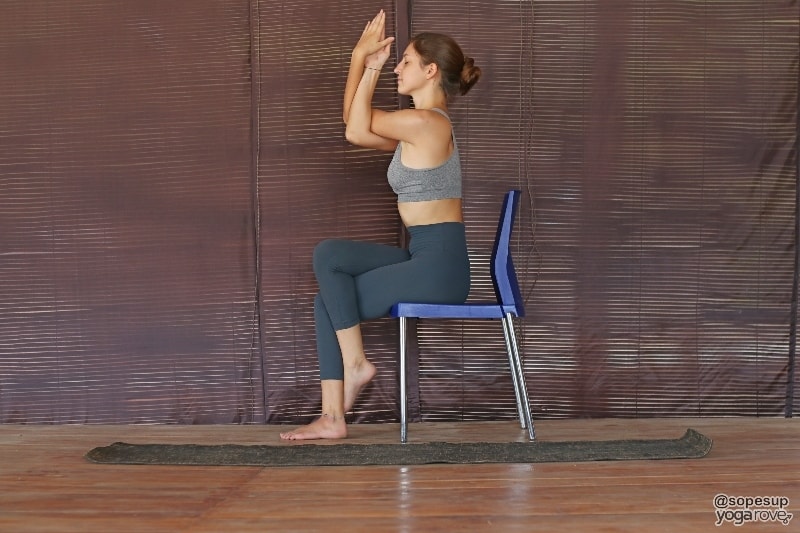
Chair Prayer Twist
Traditional Chair Prayer Twist can be challenging for beginners to practice with proper alignment. Practicing it in a chair allows you to have more control while still obtaining all of the benefits of twists.
- Sit up tall in a chair with your arms by your sides.
- As you inhale, lift your arms up overhead as you use your core to twist to your right.
- On your exhale, bring your hands together at prayer at the center of your chest and hook your left elbow onto the outside of your left knee. Lengthen through your spine.
- Try to lengthen your spine a bit more with every inhale and twist a bit deeper with every exhale.
- Hold for five breaths, then come back to the center and repeat the twist on the other side.
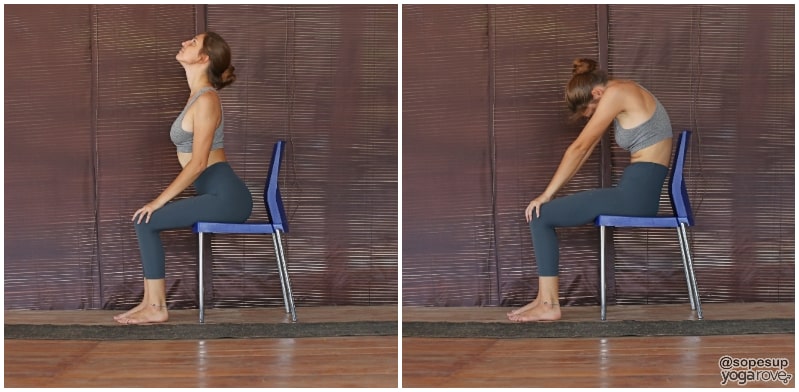
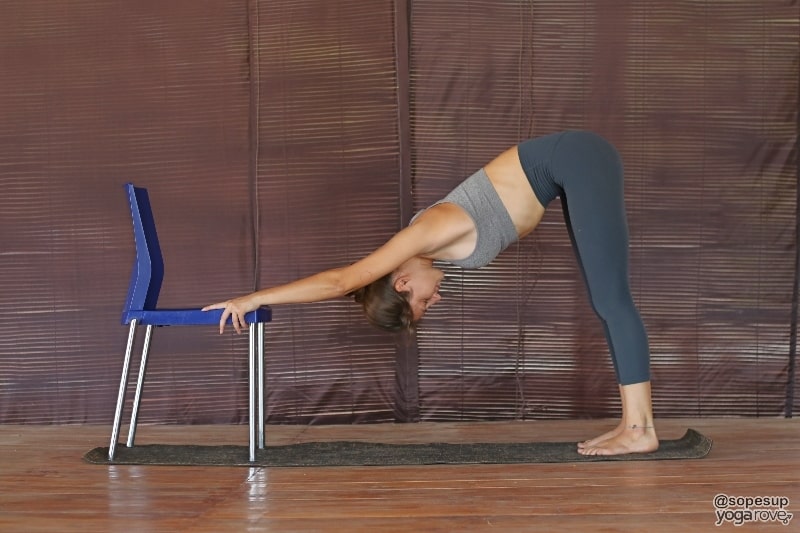
Seated Forward Bend
Forward bends can easily be performed sitting in a chair and are great relaxing postures to practice to release tension and tightness in the neck and shoulders.
- Sit tall in a chair with your spine straight and your feet grounded with legs hip distance apart.
- On an inhale lift your arms over your head, and on your exhale bend forward at your hips as you bring your fingertips towards the floor.
- Let your belly rest on your thighs and let your head hang, releasing any tension.
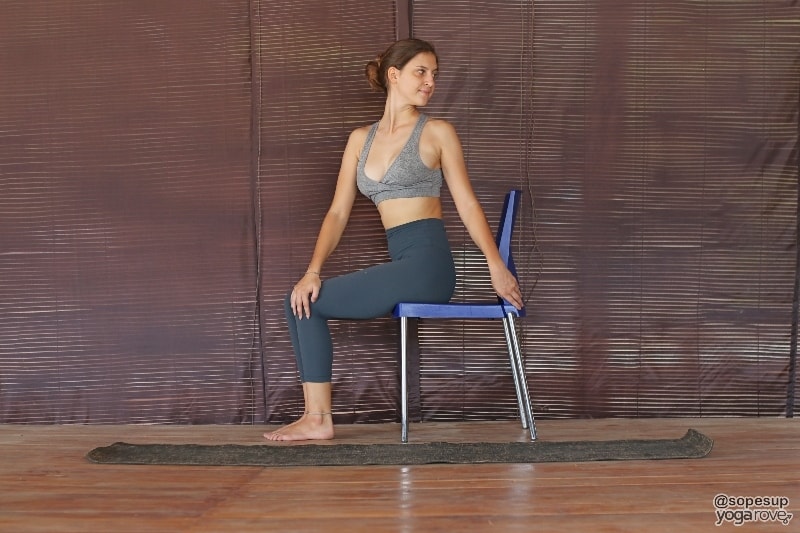
Extended Side Angle
Extended Side Angle is a powerful pose that works the legs while providing a deep stretch in the side body. This is a great variation to practice to obtain a great side body stretch while having more support for your legs.
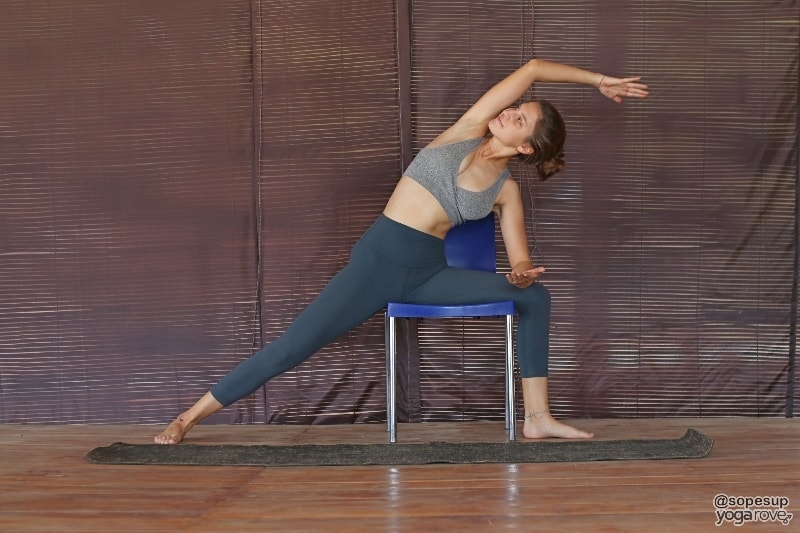
- Start seated in a chair facing forward. Open your hips as you pivot your left leg to the left side of the chair, bringing the foot to face towards the left wall.
- Extend your right leg towards the right side of the room, bringing your hips inline with each other on the chair, facing towards the fron of the room. Ground your right foot on an angle with your toes facing towards the front of the room. At this point, your left toes should be facing to the left, and your right toes should be facing to the right.
- Engage your core as your lift your arms up overhead, then bend to your left as you bring your left forearm to rest on your left thigh. Extend your right arm overhead towards the left side of the room, initiating a deep side stretch in your right side body.
- You can choose to face forward, or look up towards your right arm.
- Repeat this on the other side.
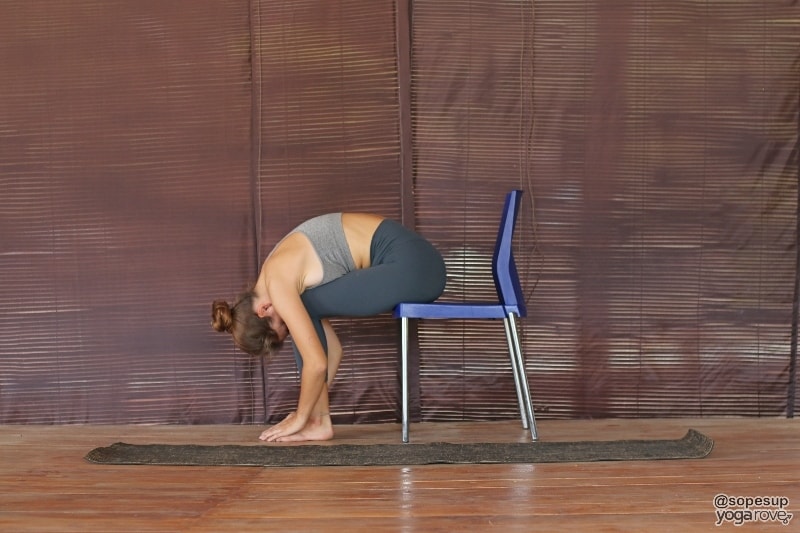
Chair Downward Dog
If you have trouble with traditional Downward Dog due to weak wrists or would just rather not practice on the floor, this is a great variation to try.
- Start by standing in front of the seat part of your chair with your hands grasping the chair and your arms straight. You can stand with bent knees or bring your knees to the floor.
- Slowly walk your feet backwards until both legs are straight. If your knees were on the ground, push your hips up and back as you would in traditional Downward Dog.
- Expand your chest towards both thighs and keep your shoulders away form your ears. Adjust your stance until you are comfortable.
Seated Savasana
I’m a firm believer that you should never skip Savasana– and conveniently you don’t have to only practice it lying down, you can practice in a chair!
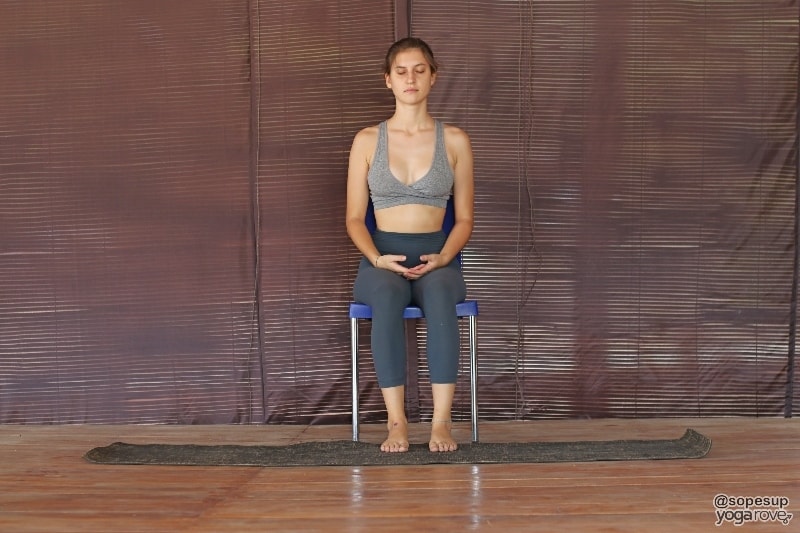
- Sit down in your chair with your arms resting by your sides, your spine straight and your body relaxed. It might be helpful to either sit on the edge of your chair or sit with your back against your chair.
- Star to bring awareness to your breath, noticing the lengths of your inhales and exhales. If you’d like, begin scanning your body, noticing how every part of your body feels, and releasing tension on every exhale.
Seated Yoga Poses for Weight Loss
Many people automatically think that you can’t lose weight with seated poses because they think they can’t be as challenging as standing poses, but I guess they haven’t tried holding Boat Pose for a minute straight.
If you are looking to lose weight or tone but have a difficult time getting up from the ground or are a beginner yogi, try practicing these poses.
Boat/Navasana
Want abs without standing up? Look no further. Boat Pose builds (and requires) core strength. There are different variations of the pose for every level.
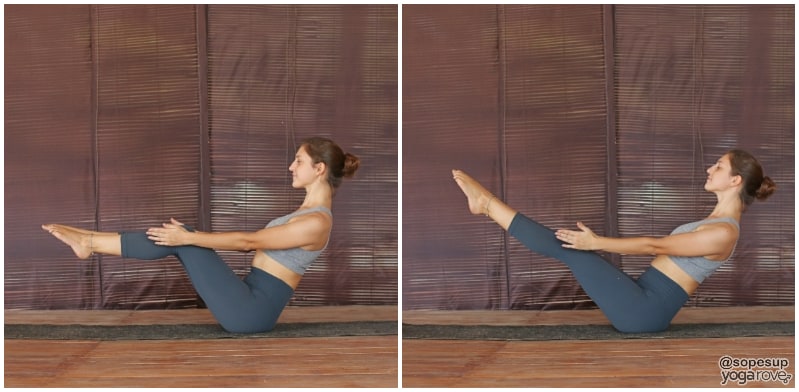
- Start sitting with your legs out in front of you with your knees bent and feet flat on the floor.
- Begin by shifting your weight slightly back on your sitting bones and bring your upper body back while keeping the spine straight. Your hands can hold onto the backs of the thighs to help with balance.
- If your legs won’t come off the floor, just keep your toes down on your mat while keeping the core engaged.
- If you feel like you have enough strength, you can hover the feet off the floor and straighten the arms forward.
- If you want to take the pose further, start straightening your legs until they’re at about eye level. Be very mindful of what’s happening in your lower back: if you’re starting to round your back to straighten your legs you might not have the necessary strength yet. Keep on practicing the first variation until you can comfortably straighten your legs without rounding the spine.
Bird-Dog/Parsva Balasana
Balancing poses aren’t only for standing postures! Bird-Dog is a great balancing pose that is practiced on the floor, and also focuses strongly on the core to maintain level hips.
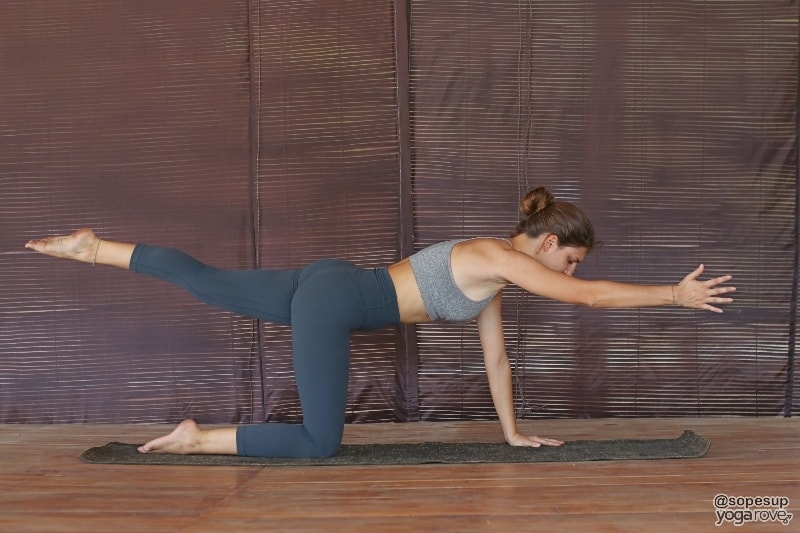
- Start in Tabletop with your knees on the ground and hip distance apart and your hands inline with your shoulders.
- On your inhale, lift your right arm straight out in front of you, keeping your left hand grounded. Extend your fingertips forwards.
- On your next inhale, extend the opposite (left) leg out behind you, keeping your right knee grounded. Make sure to keep your hips even and engage your core to prevent your back from arching.
- Hold here, then repeat on the other side.
Bridge/Setu Bandha Sarvangasana
Bridge Pose works the thighs, gluts, and abdominals when practiced properly. Tip: placing a yoga block between the thighs is a great way to make sure you are using your thighs and core to lift up!
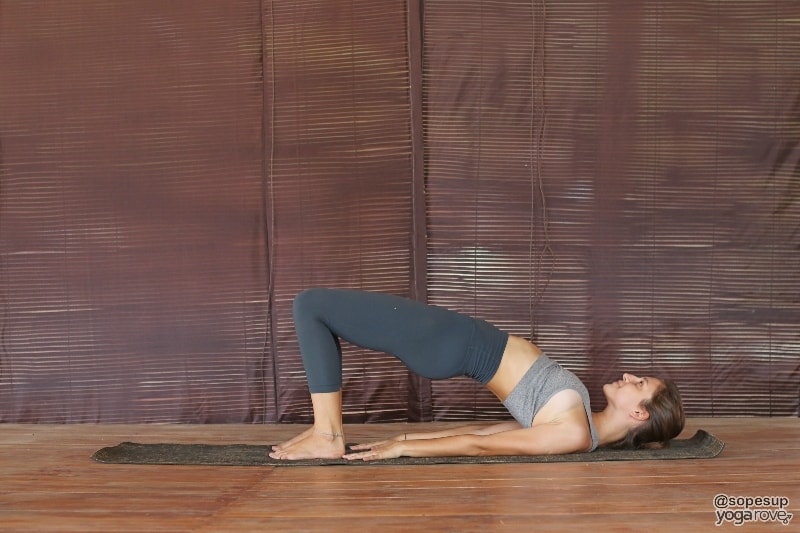
- Start by lying on the ground with your feet flat on the floor and knees hip distance apart. Your arms should be by your sides with your hands flat on the ground.
- Lift up just enough to shimmy your shoulder blades underneath you to bring them closer to your heels.
- On your next inhale, engage your thighs to and core to lift your hips up towards the sky. Keep your chin slightly tucked.
- Hold her, then come out of the pose by rolling down one vertebrae at a time.
I hope this compilation of poses has shown you that absolutely can have a 100% seated practice, either on the floor or in a chair, and a very fulfilling one at that! Let us know what your favorite poses are in the comments!
After completing her teacher training in India, Franziska started writing about and teaching yoga while traveling. Having her mat with her always makes her feel more at home, no matter where she is. Yoga has improved her life in many ways, and she’d like to share the numerous benefits of yoga with others.
Thanks so much for this!😊 Awesome, easy applicable read.
So glad you found it helpful 🙂
nice yoga poses
Glad you enjoyed it Uday!
At last a full set of poses that do not rely on standing. As a 60 something with lower leg amputation I had found it harder to keep up my yoga as the years go by but this really helps and I feel I can get back to it. Thank you
So glad you found it helpful Paula!
Thank you so much. I just love yoga.
Of course Valerie, glad you enjoyed the post!