

This post may contain affiliate links. Please read our disclosure for more info.
One of the biggest misconceptions about yoga is that people believe it is only used to relax your mind and gain flexibility. I was one of those people and after joining my first yoga class over 10 years ago my beliefs about yoga and weight loss changed completely.
At the time I was 40 pounds overweight and thought yoga would be easy. I was very wrong!
I couldn’t believe how holding a pose would create this burning sensation in my muscles and would leave me so sore the next day.
Over time I got used to doing the different poses and started losing weight and gaining lean muscle.
Before getting into yoga I thought that the only way to gain muscle was by lifting weights. Those first three months of doing yoga really changed the way on how I viewed developing my body to lose weight.
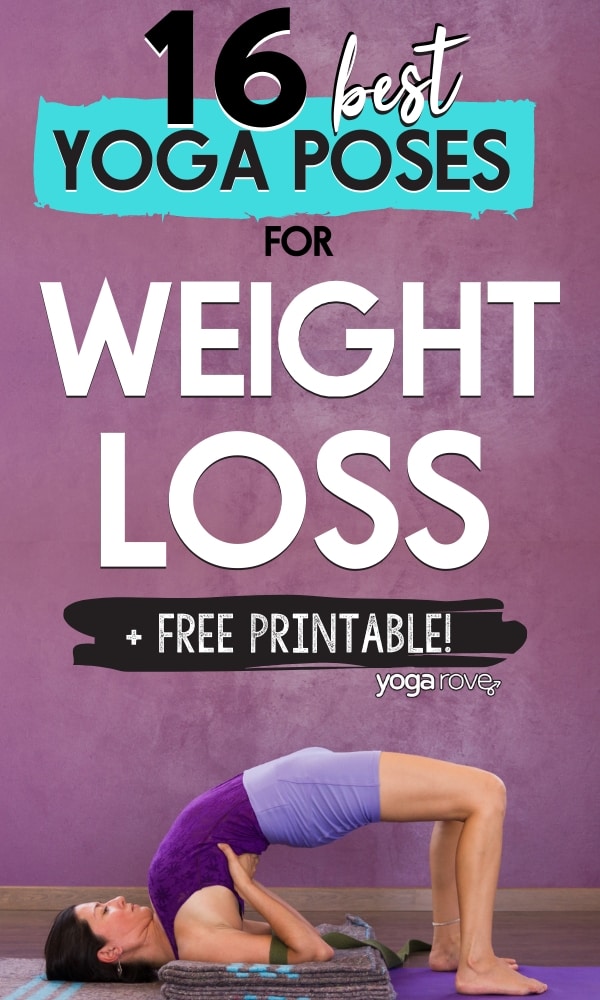
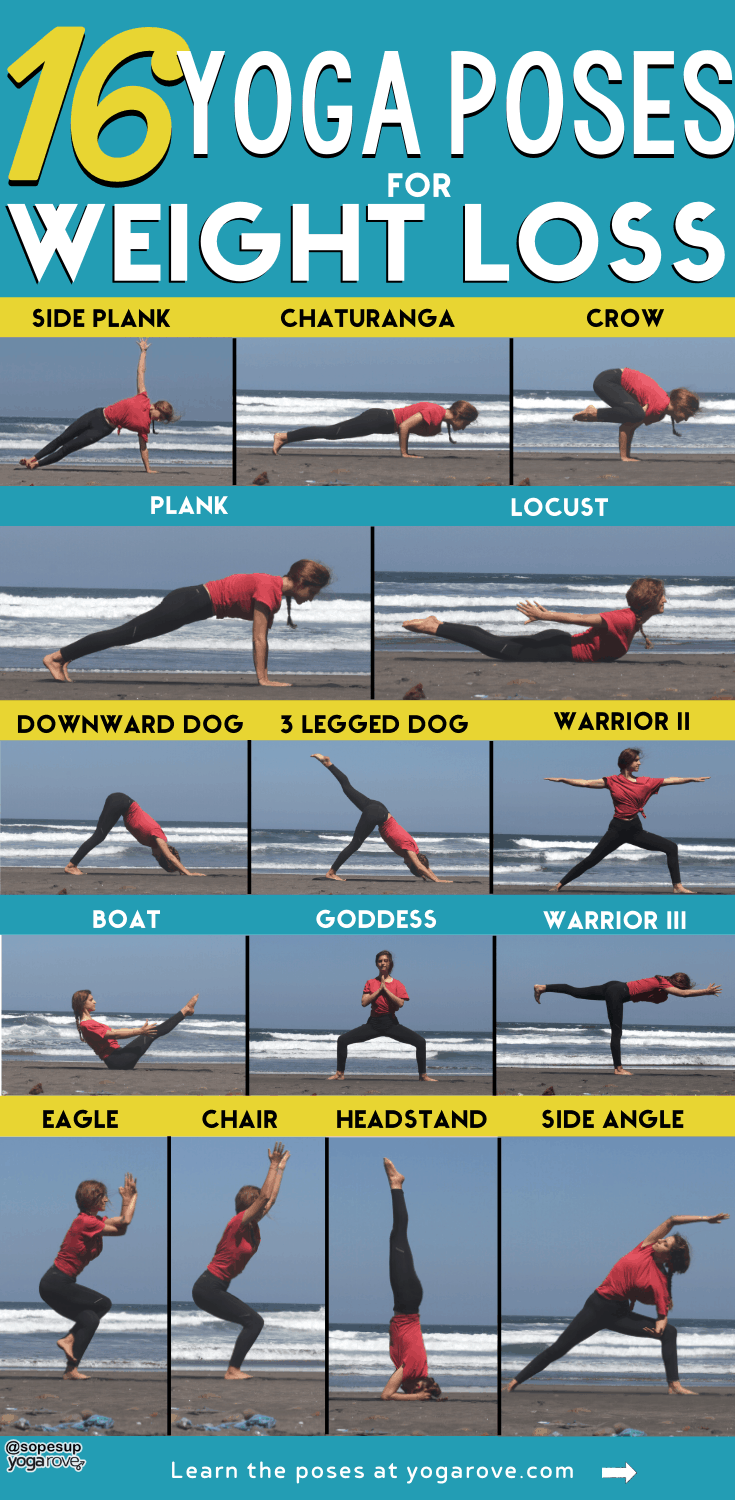
Out of everything I learned over the past 10 years, I believe these are the 16 best yoga poses for weight loss:
- Side Plank
- Chaturanga
- Crow Pose
- Downward Facing Dog
- Plank Pose
- Boat Pose
- Headstand
- Three Legged Dog
- Locust
- Warrior II
- Chair
- Eagle
- Bridge
- Warrior III
- Goddess
- Extended Side Angle
If you are just starting out don’t be discouraged if you can’t hold some of these poses for 10 seconds. Take your time and build up your endurance and strength.
Is it Possible to Lose Weight With Yoga?
Yoga is one of the best ways to lose weight if you are a beginner, especially if you are practicing intermittent fasting. This is why we recommend yoga being the best intermittent fasting morning workout.
At first it may seem intimidating if you are in a class with people that can balance on their heads with ease. Take your time and find your own path.
To read more about how yoga can help you lose weight, check out this article here: How Yoga Can Help You Lose Weight Quickly and Effectively
Every pose you are about to learn on this yoga for weight loss list has modifications. If you are just starting out focus on the modifications and go at your own pace. Practice working on these poses for at least 15 to 20 minutes three times a week to develop your strength.
The Best Yoga Poses for Weight Loss
Below I’ve listed the best yoga poses for weight loss by problem category: arms, stomach, thighs, and glutes. Although there is no such thing as spot treatment for weight loss, practicing these poses isolated and in yoga sequences will help target that area to gain lean muscle mass, resulting in overall weight loss and leaving that area looking more toned.
Arms & Shoulders
Getting rid of stubborn arm fat can seem like a difficult task, but really you just need to do the right exercises and target the correct muscle groups. These following poses focus mainly on you shoulders and arms, and will give you kick up your heart rate while doing them!
1. Side Plank
Although this pose is also great for your abs, it really works your arms and shoulders as well due to balancing your body weight on one side.
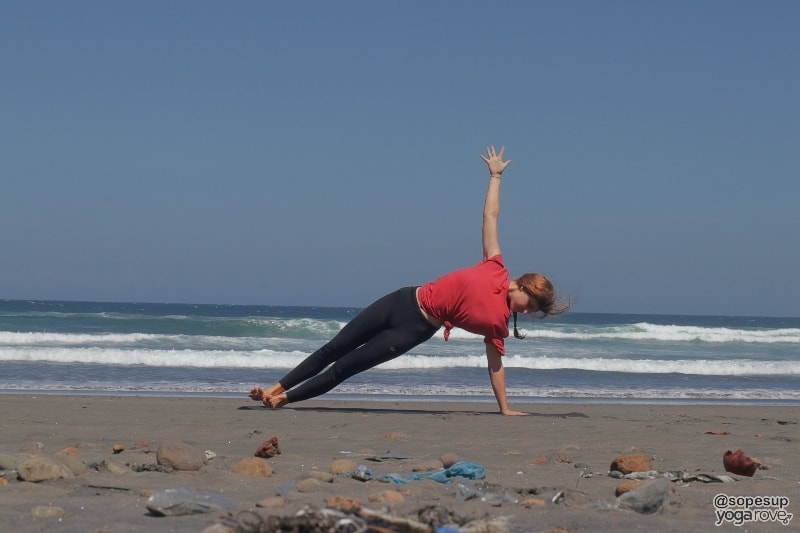
To do Side Plank:
- Start in a tabletop position with your toes tucked. Make sure your hands are directly under your shoulders.
- Engage you core and step one foot back into a time, coming into traditional plank.
- Engage your arms, core, and legs, extending through your heels to gain stability.
- Slowly reaching up with your left hand as you pivot on your right and bring you left foot off the ground to rest on your right, twist your body to open towards the left.
- Ground through your bottom hand and engage your arm, being sure not to collapse into your shoulders. Lift through your chest and reach your left fingers towards the sky.
Modification:
Instead of stacking both feet on one another take the top foot and place it flat on the ground in front of you with a bent knee to gain more stability.
Benefits:
- Strengthens arms and wrist
- Engages oblique muscles
- Increases balance
Challenge: Try grabbing a lightweight dumbbell and using it to give your free arm a workout as well! With your lifted arm, hold the weight and, keeping the arm straight, lowering the weight you are holding it out in front of you, then lift back up to starting position. This will work your abs a great deal too!
2. Chaturanga
Chaturanga is one of the best poses to develop upper body strength. Imagine a push-up, but with your elbows tucked in and hovering in the “down” position.
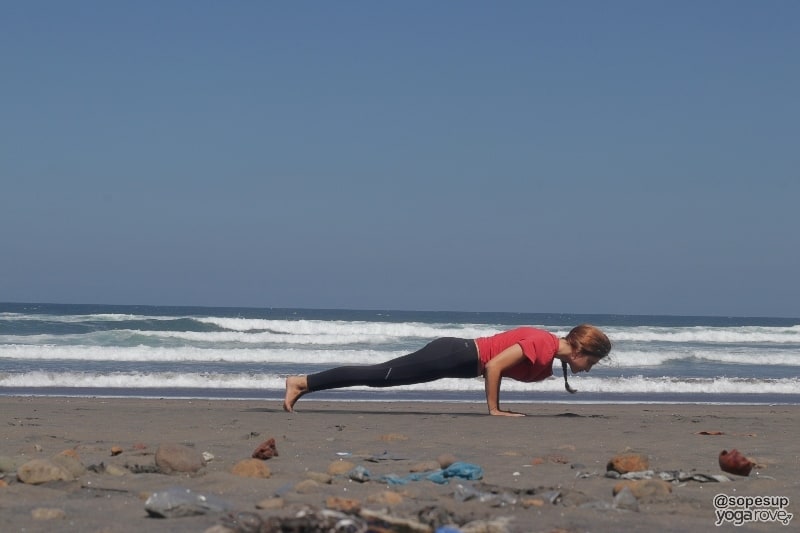
To do Chaturanga:
- Start in a tabletop position with hands directly under shoulders and toes tucked.
- Engage your core and step your feet back one at a time to come into traditional plank pose.
- Once you’re in plank, squeeze your elbows into your sides. Shift your bodyweight slightly forward and begin to lower yourself until your arms come to bend at a 90 degree angle. Remember to keep squeezing your elbows in towards your sides.
- Keep your core and thighs engaged and lifting through your chest throughout the pose to maintain proper alignment.
- To come out of the pose, try lifting back up to regular plank position, moving through a flow into upward facing dog and downward facing dog, or simply lowering yourself to the ground.
Modifications:
Chaturanga can feel very challenging in the beginning when you don’t have upper body strength yet. There are multiple variations of chaturanga, such as keeping your knees on the ground for a half-chaturanga, using yoga blocks under your shoulders, or using a yoga strap to keep your elbows hugged in to avoid misalignment. Check out our chaturanga for beginners article and how to use yoga blocks article to learn how to properly assist and prepare yourself for the pose.
Benefits:
- Builds upper body strength
- Tones arms, abs, and back
- Improves posture
Challenge: Try doing a few “yogi pushups” by coming back up and lowering back into your chaturanga. These are much more challenging than traditional pushups!
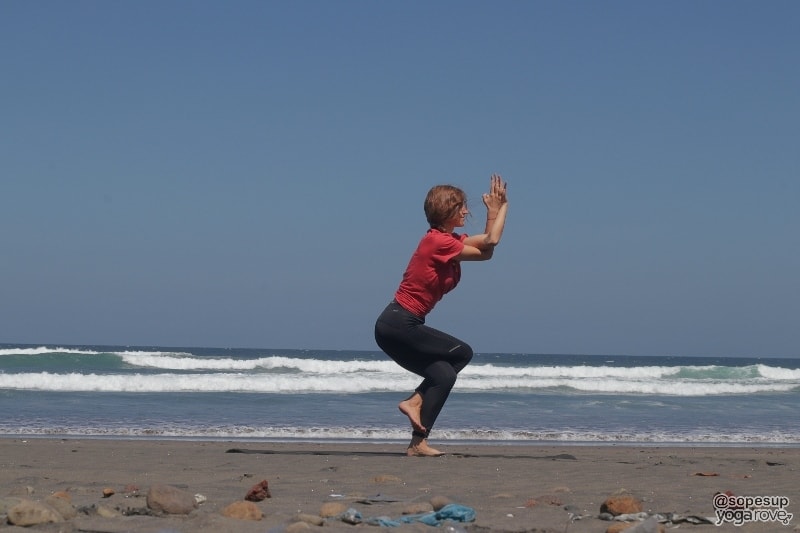
3. Crow Pose
This pose takes time to build up to, but even just prepping for crow pose helps you build arm strength. Don’t be discouraged if it takes you a couple of weeks/months to fully get into this pose. The goal is to slowly build up to more advanced poses and always choose proper alignment over forcing your body into a pose.
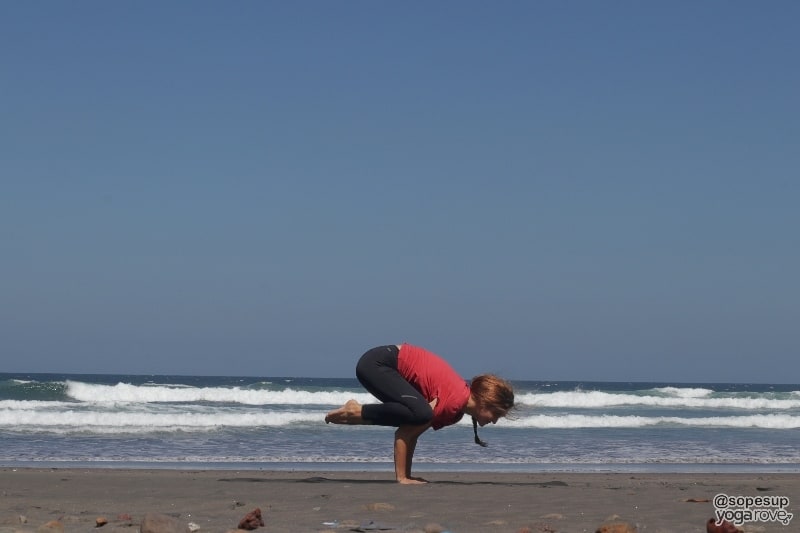
To do Crow Pose:
- Start in Mountain Pose, and step your feet about a little bit wider than hip distance apart.
- Ground your feet, and sink your seat all the way down to come into a yogi squat, or malasana pose. Keep your chest lifted and posture upright.
- Spread your thighs so they are wider than your torso, keeping your feet as close together as you can. You can place a blanket or folded yoga mat under your heels if they lift. You can also spread your feet a bit wider if that feels more comfortable to your body.
- Bring your hands to the ground inside your knees, spreading your fingers and keeping them about shoulder width apart.
- Begin to shift your weight forward as you lift one foot off of the ground at a time, engaging your core to help you lift.
- Start to play with your balance and lift both feet into the air, squeezing your knees in tightly towards your arms. Another variation is to allow your knees to rest on your arms.
- Begin to straighten your arms, still hugging legs in towards them.
Modifications:
Place yoga blocks under your feet for extra support when you are trying to lift your feet off the ground. Another method you can focus on is just trying to lift one foot off the ground and get used to that pose until it feels comfortable.
Benefits:
- Improves full body coordination
- Develops forearm, wrist, and shoulder strength
- Strengthens core muscles
Challenge: You can choose to go through a mini-flow from crow pose to chaturanga to upward facing dog to malasana, and then repeat the cycle. This is a great way to work different muscle groups in your arms while also adding in a little cardio too!
4. Downward Facing Dog
Downward Facing Dog is one of the most well known yoga poses, but it’s ability to completely scorch your biceps and shoulders is completely personable to only those that actually try it. This is an all around strengthening and stretching pose, but for those of you that really want to work your arms, this is a great pose to start with.
To do Downward Facing Dog:
- Start in a tabletop position with hands under shoulders and toes tucked.
- On your exhale, push your hips up and back and straighten your legs, sending your heels toward the ground.
- Engage and lift through your arms and shoulders. Engage your core and legs to help balance your body weight. Squeeze your belly button in towards your spine and keep sending your hips back as you ground through your heels.
Modifications:
If you feel too inflexible to do downward dog, don’t worry, you’re not alone. Try pedaling out your feet if your hamstrings feel tight by bending one at a time. You can also try using yoga blocks under your hands if you feel too much pressure on your arms and shoulders.
Benefits:
- Strengthens and tones your arms, abs and legs
- Stretches your hamstrings and shoulders
- Builds endurance and patience
Challenge: To give your arms an extra challenge, roll from downward dog to plank, and then back. Go through a cycle, going into plank on your inhale, and down dog on your exhale.
Stomach
The belly is one of the main areas people want to target to lose fat. Although there are a majority of yoga poses that target the core, these following poses have been proven to be super effective and are easily modifiable to all levels.
5. Plank Pose
Plank pose is the perfect pose for developing upper body and core strength, which is why we include it as one of the first poses in our upper body yoga workout and 15 minute weight loss yoga workout.
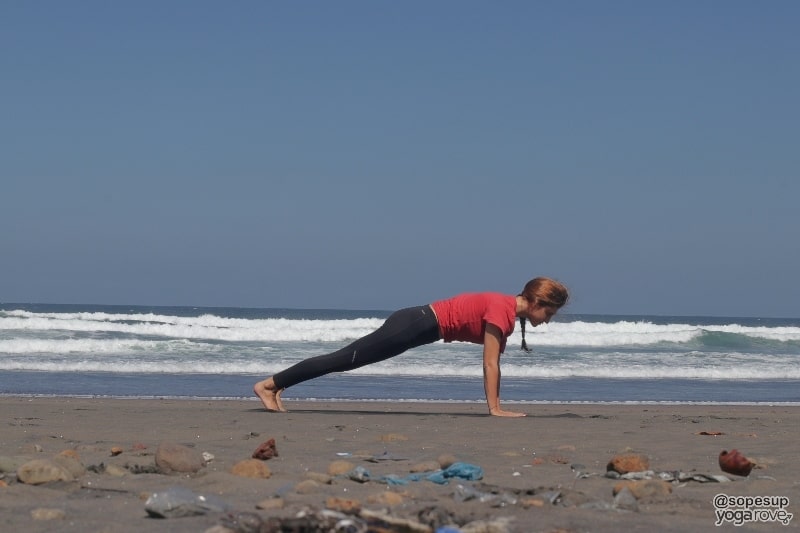
To do Plank Pose:
- Start on all fours in tabletop position with hands directly under shoulders.
- Step one foot back at a time to come into plank pose.
- Engage your core and draw your belly button in towards your spine, creating a straight line with your body.
- Engage your arms and stay lifted through your chest.
- Bring your gaze slightly forward between your hands.
Modification:
Practice plank pose on your knees if you cannot hold a full plank for more than a couple seconds. Start off slow and build your time. Also try doing pushups on your knees to develop the necessary upper body strength for the plank pose.
Benefits:
- Strengthens core muscles
- Strengthens muscles around the spine to improve posture
- Prepares you for more advanced arm balancing poses
Challenge: Try doing plank dips by dipping your hips from side to side or moving your weight forward and back. You will really feel the burn!
6. Boat
When I first started getting into yoga this was my least favorite pose because it tested my core strength. Every time I did this pose it made me realize how weak my core was. Take the time to practice this pose because strengthening your core is essential for losing weight in your abdominal area.
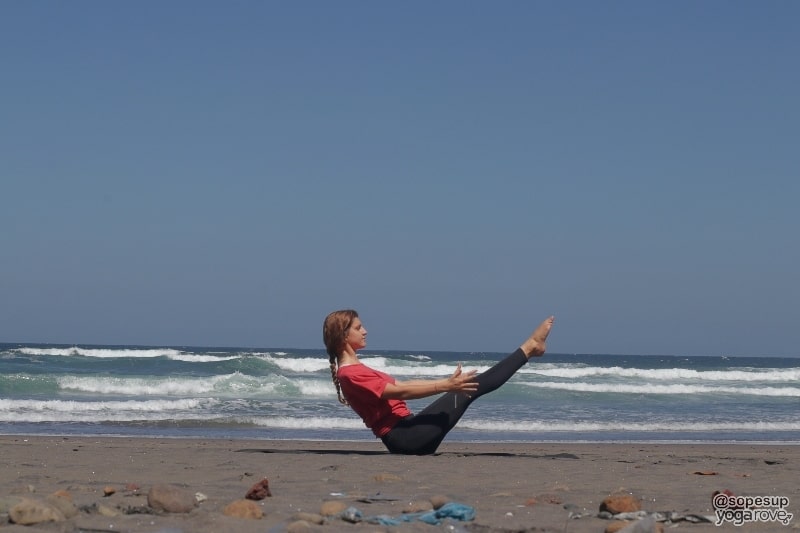
To do Boat Pose:
- Start in a seated position with knees bent and feet flat on the ground in front of you.
- Sit up tall and place your hands slightly behind your hips.
- Engage you core tight. One at a time, begin to lift each foot off the ground as you slightly lean backwards, balancing on your sits bones. Remember to keep a straight back and lift through your chest.
- Once both feet are off the ground, bring them up into the air until your knees are bent at 90 degree angles. If possible, straighten your legs completely into the air and point through your toes.
- Bring your hands straight out along your sides and look forward.
Modification:
Instead of keeping your legs straight, bend your knees when you hold the pose. If that is still hard you could keep your feet on the ground and slightly lift your feet off the ground one at a time to slowly build strength.
Benefits:
- Melts belly fat
- Strengthens core to reduce back pain
- Improves digestion
Challenge: Try doing boat crunches for an extra burn! From full boat or half boat, straighten your legs and lower them a few inches above the ground as you lean back, not completely resting on the ground- then come back into your boat pose.
7. Headstand/ Headstand Prep
You don’t realize how much of your core you need for headstand until you actually attempt the pose. The is pose is great for strengthening your core and improving your balance. You DON’T need to get into the full pose in order to obtain the effects on your core- you will get this just by working up to the pose! The most important thing in headstand is to move slow and protect your neck.
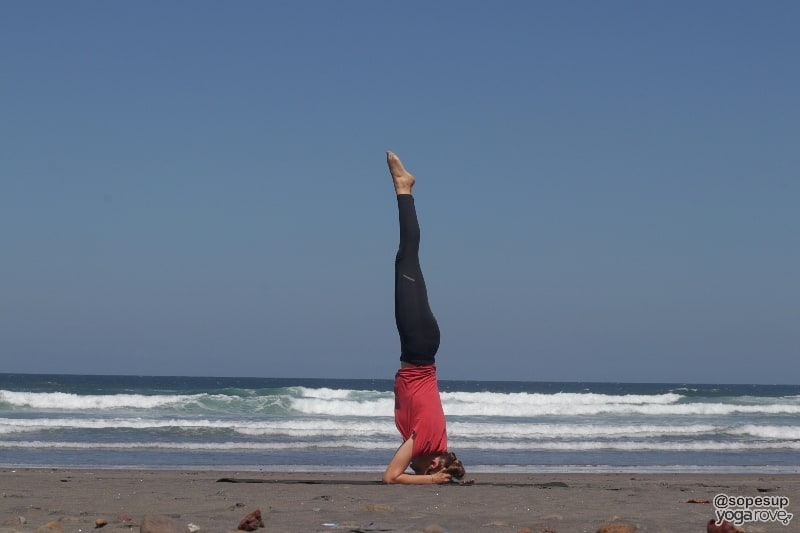
To do Headstand Pose:
*First things first, if you have never tried this pose before, I suggest doing it in front of a wall for support and NOT attempting to push up into the full pose until you have done the prep work a few times.*
- Start on all fours in a table top position with toes tucked. Bring your hands together, forming a triangle with your arms, and cup one hand in the other or interlace your fingers. Place your hands on the ground with palms facing up.
- Push your hips up and back as you would in downward facing dog. Push you heels towards the ground, activate your core, and bring the top of your head to rest on your hands. You should be in a modified version of dolphin pose now.
- Make sure not to let your arms or shoulders collapse, keep them both activated along with your core.
- Begin to walk your feet in towards your body, coming onto your tip toes.
- You can stay here as I’m sure you are already feeling your core, or you can choose to bend one knee into the air, now only balancing on one of your feet.
- Ground through the foundation of your forearms, head, and hands, and then bend the other knee into the air. As you get to this point, become aware of your core. You will need to activate it a great amount to stay balanced in the air. This is another great place to stay to work on balance and target your core.
- If you feel ready, begin to squeeze your legs together and lift them simultaneously into the air, forming a straight line with your body. Point through your toes.
- To come down, re-bend the knees and bring them slowly back towards the ground into your dolphin pose variation, coming back into table top.
Modification:
Getting into this pose with a wall in front of you will provide you a lot of support. Not only will it minimize your chances of getting injured, but it will mentally help you prepare for this pose. You can also try placing a pillow/towel under your head if you find yourself with too much pressure on your head.
Benefits:
- Improves posture
- Increases overall upper body and core strength
- Improves concentration and balance
Challenge: If you want to work your core even more, try doing a cycle of your dolphin variations into headstand. Do this by slowly walking your feet forward and back and then slowly coming into headstand, and slowly coming back down, using your core the entire time. I guarantee after a couple rounds, your abs will be on fire!
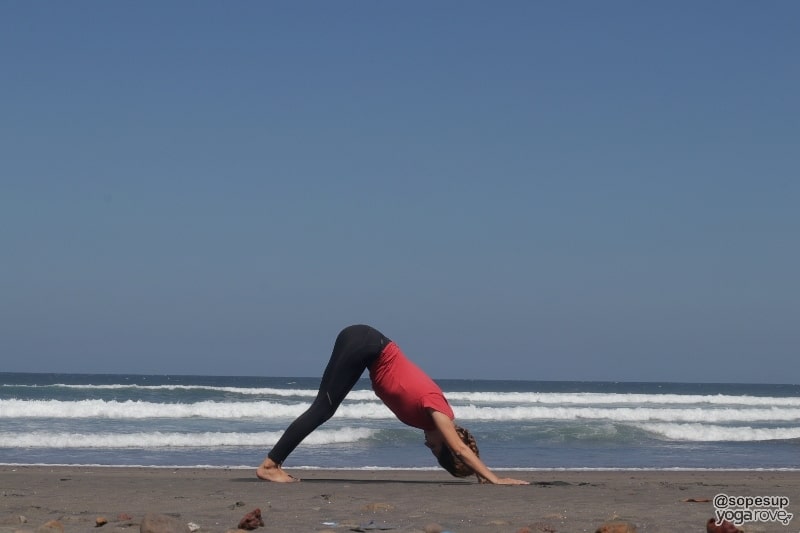
8. Three Legged Dog
This is a nice variation of downward facing dog that requires more strength and concentration. What I really love about this pose is how it opens up your hips and energizes your body. It almost (almost) makes you forget about the burning sensation in your core.
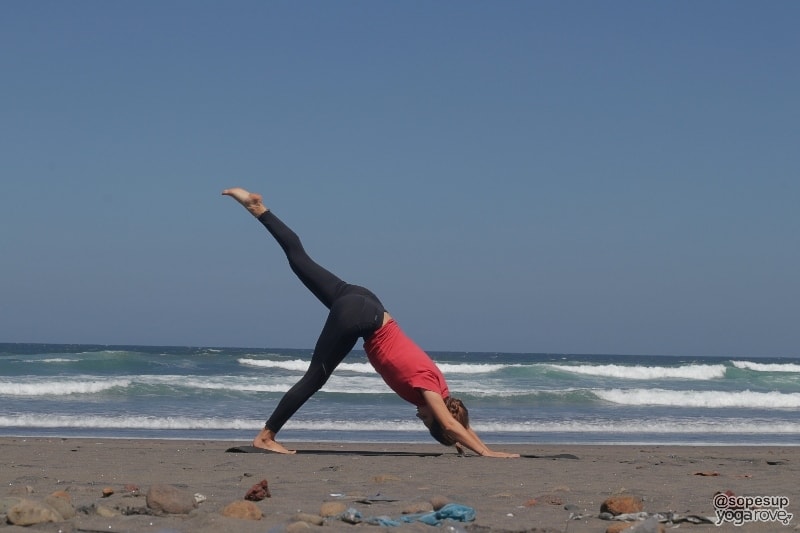
To do Three Legged Dog Pose:
- Start on all fours in tabletop position with your toes tucked. Make sure your hands are under your shoulders.
- Push your hips up and back to come into downward facing dog. Engage your core, your arms, and your legs. Push through your heels as you send your hips higher into the air.
- Make sure your feet feel completely grounded into the floor (your heels do not need to completely touch the ground to do this). Engage your core and use it to lift one of your legs into the air as high as you can, pointing through your toes.
- Make sure to keep your alignment intact. Your hands should be grounded and your shoulders even with each other. You stomach should still be facing your thighs. Don’t let your body lift towards one side- use your core to maintain balance.
Modifications:
If you can only get into downward facing dog focus on getting used to that pose before attempting three legged dog. Once you are able to hold downward dog for at least 30 seconds you should be able to attempt three legged dog.
Benefits:
- Opens hips
- Strengthens core and arms
- Full body stretch
Challenge: To get your heart rate up and get in more core work, alternate between three legged dog and knee-to-chest plank. Come into your variation of plank on your inhale and three legged dog on your exhale. This is not only great for burning calories, but the crunching action in the plank is great for targeting belly fat.
Thighs
The following poses will leave your legs on FIRE, in a good way! But seriously…you will feel it after doing these a few times.
9. Locust Pose
Locust pose is one of those poses that doesn’t necessarily look hard, but once you get into it, you immediately feel it. This pose is great for toning and tightening your thighs, and at the same time is prepping you for backbends!
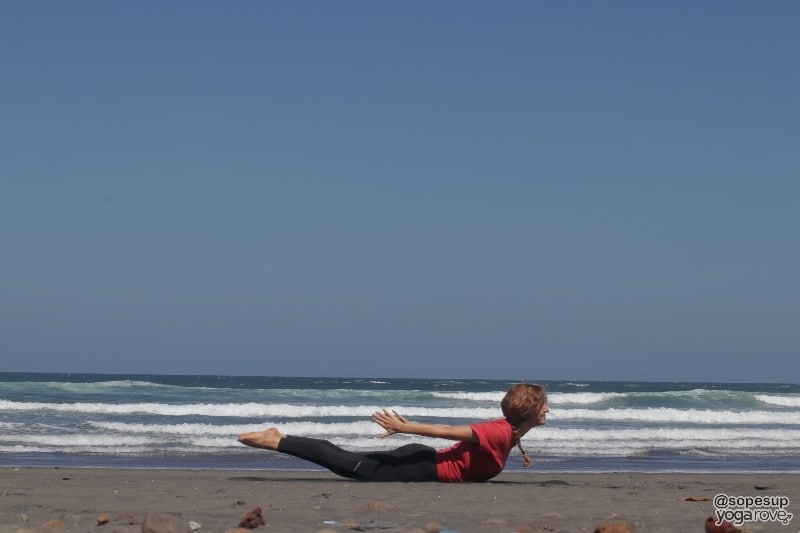
- To do Locust Pose:
- Start by lying on your stomach face down towards the ground. Let your hands rest on either side with your palms facing up. Your legs should be about hip distance apart.
- Take a deep inhale, then on your next exhale, lift your head, chest, arms, and legs off the ground as much as you can. Engage your core to help you lift.
- To come out of the pose, exhale and slowly release to the ground.
Modification:
Place your palms on the ground for extra support if you find it difficult to lift you entire body off the ground.
Benefits:
- Strengthens the back of your arms and legs
- Improves posture
- Stretches your shoulders and chest
Challenge: Try squeezing your legs together and lifting them up as one leg. This will feel way different than lifting them up slightly parted and will really work your thigh muscles. Keep your hands placed on the ground for support if you need to.
10. Warrior II
Warrior II pose is a wonderful strengthening pose used in many flow sequences. It will get your heart rate up, open your hips, and give your thighs a great workout.
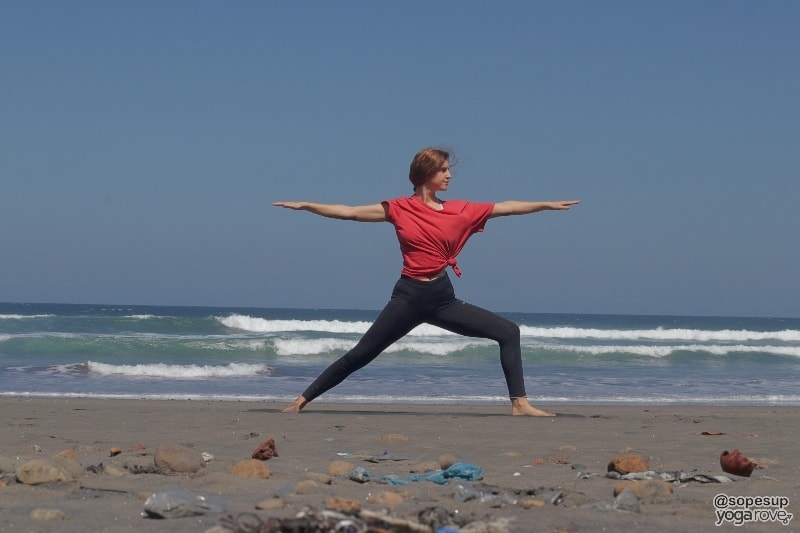
To get into Warrior II:
- Start in a regular standing position, or Mountain Pose. Step your feet about three feet apart, wider than your hips.
- Turn your left foot to the left so it is facing away from your body at 90 degrees.
- Exhale and begin to bend your left knee to a 90 degree angle. As you do this sweep your arms up and out to your sides and bring your gaze over your left fingertips.
- Keep your arms level with your shoulders with your palms facing down. Actively ground through your back foot and bend through your front knee, being sure your knee doesn’t move past your ankle to protect it.
Modification:
If you have a difficult time supporting yourself in this pose due to lack of lower body strength or joint issues, use a chair underneath you to support you. Have the seat part of the chair facing you and place it directly underneath your front thigh for support. Keep in mind, you should still be actively engaging your legs as much as you can!
Benefits:
- Opens hips
- Strengthens lower body and tones thighs
- Improve stamina
Challenge: Try flipping your palms so they are facing the ceiling and then sink deeper into your front leg- you will be surprised at how much more challenging the pose becomes with one little change!
11. Chair
If you like the feeling of your thighs burning, this is the pose for you! Word of caution, when you start off practicing this pose and you put in a lot of effort, your legs will feel wobbly. Shake out your legs and take your time to gain your balance back.
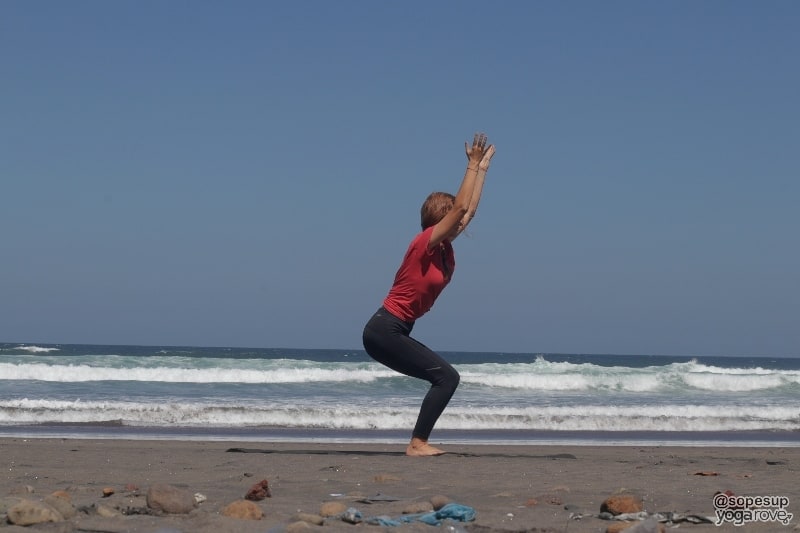
To do Chair Pose:
- Start in Mountain Pose with your feet touching, feet grounded, and arms by your sides.
- Start to shift the weight into your heels so you are able to lift your toes off the ground while still balancing.
- On your exhale, sink your seat and lift your arms straight up by your ears and lift through your chest.
- Engage your core to keep your back straight.
- Make sure to keep your hips even by taking notice if one leg is more forward than the other.
Modification:
If you have a difficult time sinking down towards the ground, try placing a rolled up yoga mat or blanket under your heels. This will reduce the angle of ankle flexion and allow you to sink easier towards the ground.
Benefits:
- Sculpts your leg muscles
- Strengthens hip flexors and back
Challenge: Once you have sunk your seat as much as you can, try coming onto your tip-toes. This will cause you to naturally use more of your thigh muscles, and give your calves a workout too. You can either stay like this or alternate between your heels lifting and grounding.
12. Eagle
Starting off this was a very difficult pose for me to get into because I have very stiff shoulders, but there are different modifications that I will list below. This pose requires a lot of balance and is paired with a squat position similar to chair pose, which is great for targeting your thighs.
To do Eagle Pose:
- Start in a regular standing position with feet slightly parted.
- Bring your arms out straight in front of you, and wrap your left arm under your right, placing your right elbow inside your left elbow. Wrap your left arm around your right until you get your hands to touch as close as possible, or grab onto your wrist. If you have tight shoulders and this is uncomfortable, see the modifications below.
- Bring your arms up to shoulder height. Shift your weight into your right foot and bring your left foot into your chest. Wrap your left leg around your right as much as you can and squeeze your legs in to each other.
- Once you are in this form and feel stable, begin to slowly sink your seat towards the ground as you would in chair pose.
- To assist you in balancing, find a drishti (focal point) to help you stay focused and concentrate.
Modification:
If you cannot wrap your arms around one another it is ok to hold on to your shoulders or bring your hands into prayer position.
Benefits:
- Aids in digestion
- Stretches the shoulders and upper back
- Strengthens your ability to balance and focus
Challenge: If you’d like to add in a little core strength into this and, try doing standing eagle crunches by slowly crunching your upper body towards your lower body then coming back up into regular eagle pose. Remember to keep squeezing your thighs!
Glutes
Toning your glutes isn’t all squats and lunges. You can get the same results and make it fun and effective with the following yoga poses.
13. Bridge
Everyone thinks squats are the number one way to develop a nice butt. Once you start doing this pose for the next couple weeks you will see exactly why this movement is going to sculpt your butt even more.
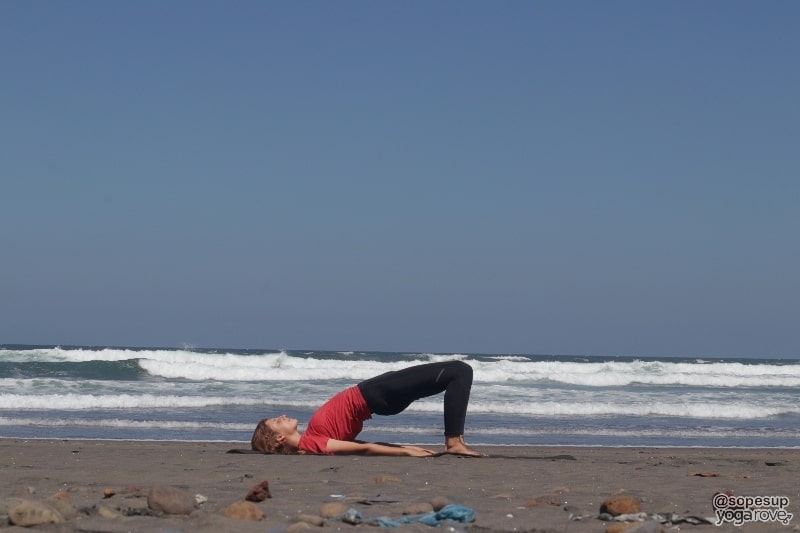
To do Bridge Pose:
- Begin lying on your back with your knees bent and feet flat on the ground. Your legs should be about inner hip distance apart. Lay your hands flat by your sides.
- Lift your shoulder blades up just enough so you can adjust them and “shimmy” them a little more underneath you, so you are mainly laying on your shoulders.
- Slide your feet in closer towards your hands, and your hands closer towards your feet until you can almost touch them with your fingertips.
- Take an inhale, then on your exhale lift your back, bottom, and legs up off the ground, squeezing your glutes and tucking your pelvis.
- Push down through the ground with your arms and hands as you actively send your butt up towards your belly button.
- To come down, slowly come down one vertebrae at a time to avoid injury.
Modification:
Place a towel under your neck if you are feeling lots of tension in that area when you are in bridge pose.
Benefits:
- Opens up the chest
- Improves digestion
- Strengthens glute muscles
Challenge: Lift up one leg at a time and hold as you are in your bridge pose. This will cause your glutes to work extra hard and give your core a good workout as well.
14. Warrior III
Warrior III, just like all of the warrior poses, is an ultimate fat burning and strengthening pose. There are many variations to this pose based on level, but all variations have one thing in common: they all work your glutes out tremendously well.
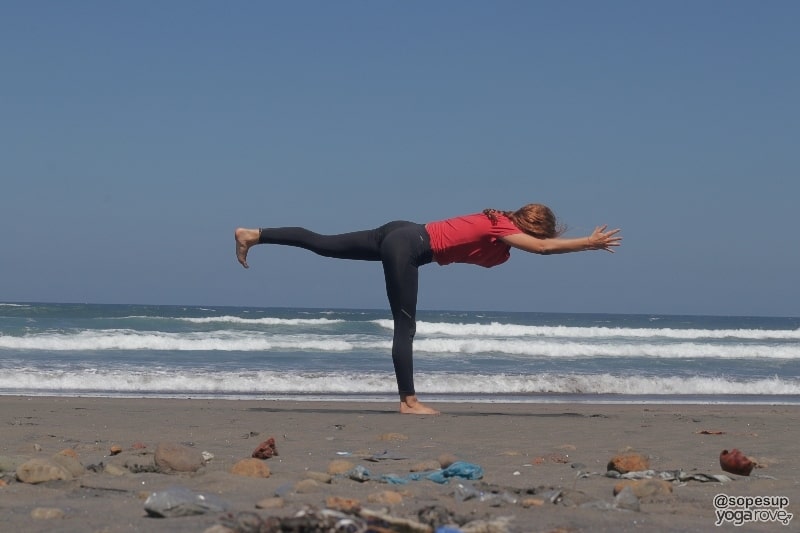
To do Warrior III:
- Start in Mountain Pose, and then step your right foot back behind you, coming into High Lunge.
- Your front leg should be bent at 90 degrees, and your back leg straight, extending through your lifted heel.
- Engage your core and lift your arms up overhead.
- Begin to slowly straighten your knee, still leaving somewhat of a bend, as you slowly shift your weight forward and lift your back leg into the air.
- You can choose to keep your arms by your ears or bring them into prayer pose or diver arms.
- Actively engage your lifted leg and adjust it so your hips are still level. You should easily be able to balance a block on your lower back.
- Engage your core and actively lift your leg up higher throughout the pose.
Modification:
If you have a hard time balancing in this pose, feel free to drop your hands to the ground or use yoga blocks to stabilize.
Benefits:
- Tones glutes, legs, and core
- Improves balance and concentration
- Strengthens the entire backside of the body
Challenge: Try doing a circuit from Warrior III on your inhale to Warrior II on your exhale. You will feel the burn in no time.
15. Goddess
Goddess is one of those poses you’ll have a love/hate relationship with: you’ll hate it because you’ll feel it EVERYWHERE in your legs and glutes, but you’ll love it because you’ll KNOW it’s working.
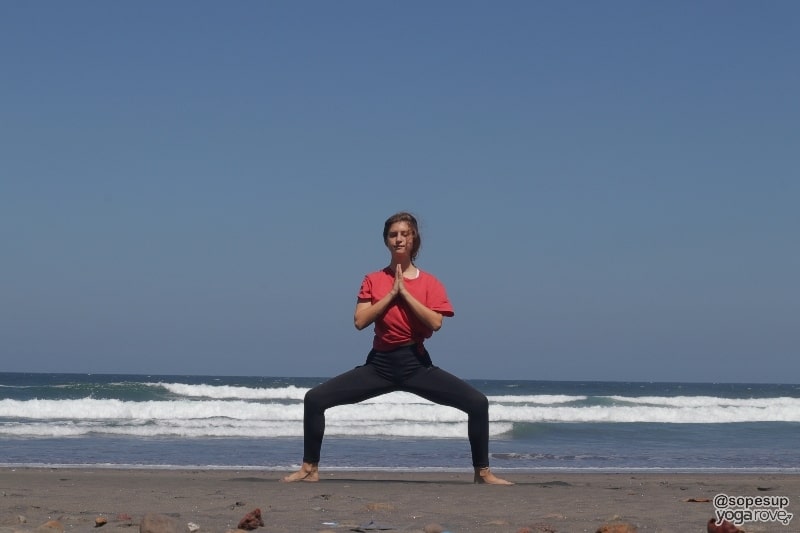
To do Goddess Pose:
- Start in Mountain Pose, and step your feet out as wide as they can go while still being grounded.
- Wiggle your heels in and toes out, so both of your feet are at a slight angle, at about 2 o’clock.
- Sink your seat and bend your knees so they form a 90 degree angle. Lift your arms up overhead or bring them into goal post formation.
- Tuck your pelvis .to ensure you don’t arch your back and engage your core.
- Keep sinking deeper throughout the pose and lifting through your chest.
Modification:
Feel free to bring your arms to prayer pose or place them on your hips if your arms are too tired to stay up. For those building up their lower body strength, you can place a chair underneath you for you to hover over for extra support.
Benefits:
- Strengthens and tones thighs and glutes
- Opens the hips
- Elongates the spine
Challenge: Try doing Goddess Squat Pulses, by sinking deeper and coming back up in quick motions to really give your legs and glutes a good burn.
16. Extended Side Angle
Extended Side Angle has a strong focus on the glutes and legs. In this pose, you have the same feet stance as you do in Warrior II and III, except your leg is bent and you are extending through your side body, offering a challenge.

To do Extended Side Angle:
- Start in Mountain Pose, and step your feet out about 3 feet. Turn your left foot to the left so it faces away at 90 degrees.
- Bend your front knee as you keep your back leg straight and ground through your foot. Sweep your arms out to either side to come into Warrior II.
- Make sure your knee is bent at 90 degrees, and then bring your front forearm to the inside of your front foot, slight shifting forward.
- Keep your feet grounded and lift through your chest. Keep extending and grounding through both feet and engaging both legs.
- Lift your right arm up and reach over your head towards the front of the room.
Modification:
If your hand cannot reach down towards the ground, use a block or rest your forearm on your front thigh.
Benefits:
- Lengthens and stretches the side body
- Strengthens and tones the glutes and lower body
- Stimulates abdominal organs
Challenge: Come into a “bind” by wrapping one arm underneath your front thigh and reaching behind your back with your other arm to touch. This will open up your chest, cause you to use more of your core, and naturally cause you to sink deeper.
Well, there you have it! The 16 best yoga poses for weight loss, based on arms, stomach, thighs, and glutes. I hope you found this post helpful and try out a few of the yoga poses, and maybe even the challenges! Please let me know in the comments below if you do! We’d love to cheer you on 🙂
Want to save these poses to practice later? Pin this infographic!

Victor is a Registered Yoga Teacher, Certified Breath Coach, and the Co-Founder of Yoga Rove with his wife Ally. He has been practicing yoga for 12+ years and has a passion for teaching others how to feel better physically, mentally, and spiritually through movement and mindfulness practices.

What is your favorite yoga pose to help you lose weight? Chair pose always gets me!
This is really fantastic!! I have attended yoga classes for years but have searched long and hard for a routine I can do at home when class isn’t an option. Your routines flow so well and your descriptions are wonderfully detailed. I especially love your encouragement and optional modifications. You’ve walked us through the process beautifully. Including details PLUS printables is really outstanding. THANK YOU!!
You’re very welcome Kristin! Glad you enjoyed it!
How long do you hold each pose? I am 62 and looking for some type of exercises I can do with COPD and exercise induced SOB.
Hi Kathy, we have an entire post on this that you might find helpful! How Long to Hold a Yoga Pose: Beginner’s Guide
You can change it up based on your goals. But if you get short of breath while you exercise and have COPD, I would make sure to talk to your doctor first to see what they recommend so you don’t overexert yourself. I hope that helps 🙂