

This post may contain affiliate links. Please read our disclosure for more info.
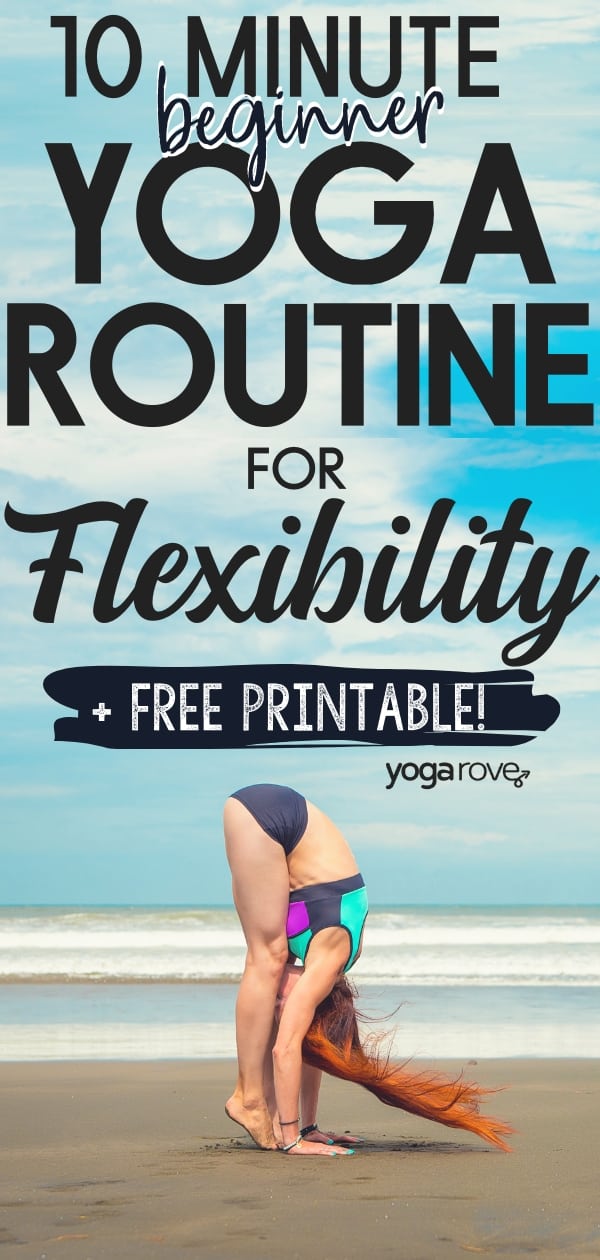
If you are like me, you were not blessed with a naturally flexible body. This quick 10 minute beginner yoga routine for flexibility will seriously stretch and release all those tight areas and get your body primed for the day.
Starting yoga in the beginning can be rough when you see other people that are easily doing the splits when you can barely get your fingertips to touch the ground. I know, I’ve been there!
But realize, they were not there on day 1. What you are seeing is a result of practice and dedication.
So if you really want to build flexibility, realize you are going to have to put the work in. But lucky for you, it really doesn’t take that much.
How Long Does it Take to Gain Flexibility With Yoga?
The amount of time it takes to gain flexibility with yoga depends on you- how consistent you practice and where you are currently with your flexibility. Typically, people tend to see noticeable results in 3 to 6 months.
In a study done on 26 male college students that did yoga for just ten weeks, they saw significant improvement in their overall flexibility and balance.
Another study was done on an elderly group of patients.One group participated in calisthenics, and the other group participated in yoga. The group that did yoga saw an increase in flexibility four times that of the control group.
Although body weight exercises such as calisthenics are great for preventing loss of range of motion, practicing yoga consistently has been proven to be one of the best ways to improve your overall flexibility, no matter what age you are.
If they can do it, you definitely can! All you need is 10 minutes a day.
Related: Why is Flexibility Important?
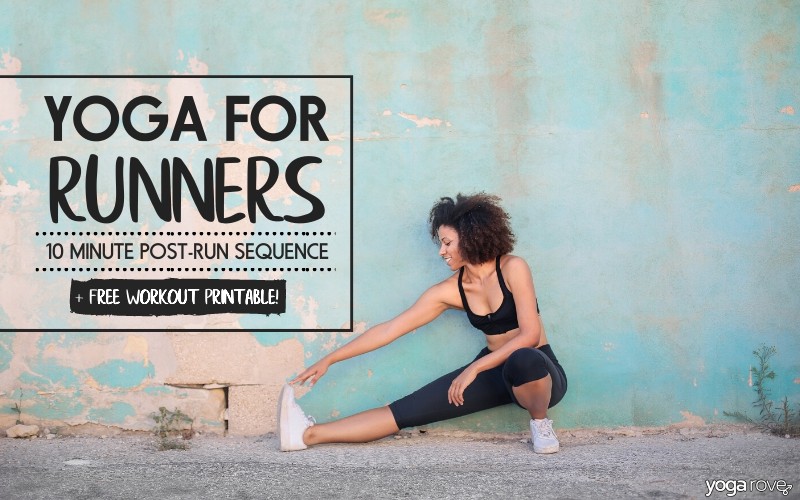
Beginner or expert, here is a simple 10 minute yoga routine for flexibility you can do every single day to see results and become more flexible. Set your timer to 10 minutes and let’s begin!
Before attempting this routine, I highly suggest you do a simple warm up to prepare your body for deep stretching and prevent injury.
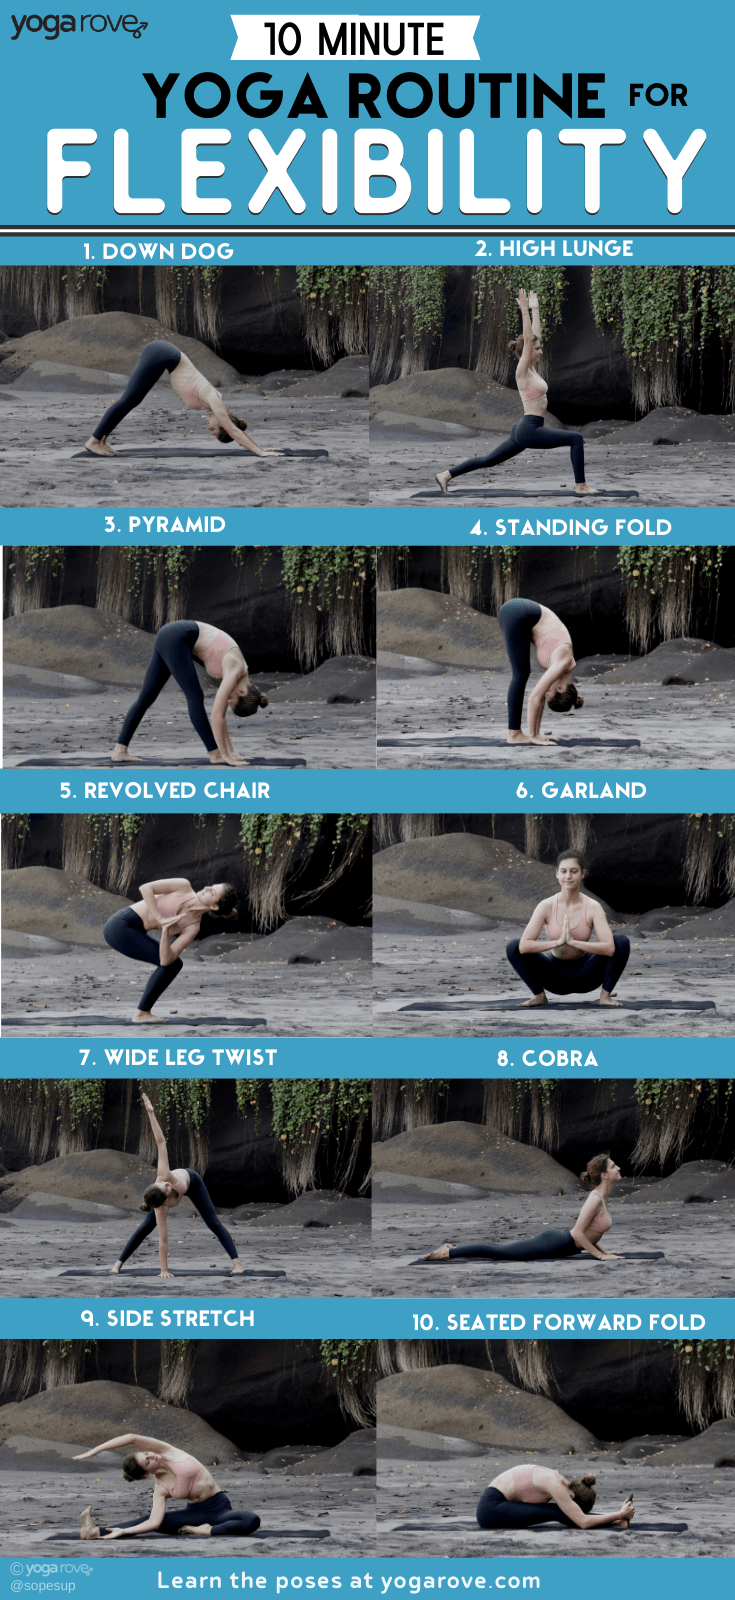
The 10 Minute Beginner Yoga Routine goes like this:
- Downward Facing Dog
- High Lunge
- Pyramid
- Standing Forward Fold
- Twisted Chair
- Garland
- Twisted Wide Legged Forward Fold
- Cobra
- One Legged Side Stretch
- Seated Straight Legged Forward Fold
1. Downward Facing Dog
Downward facing dog is one of the best poses to do if you’re not flexible. It gives you a deep hamstring stretch and forces you to open up your chest and shoulders. Downward dog is completely modifiable for beginners, so if you have a hard time doing the traditional pose, don’t worry, we will give some tips below.
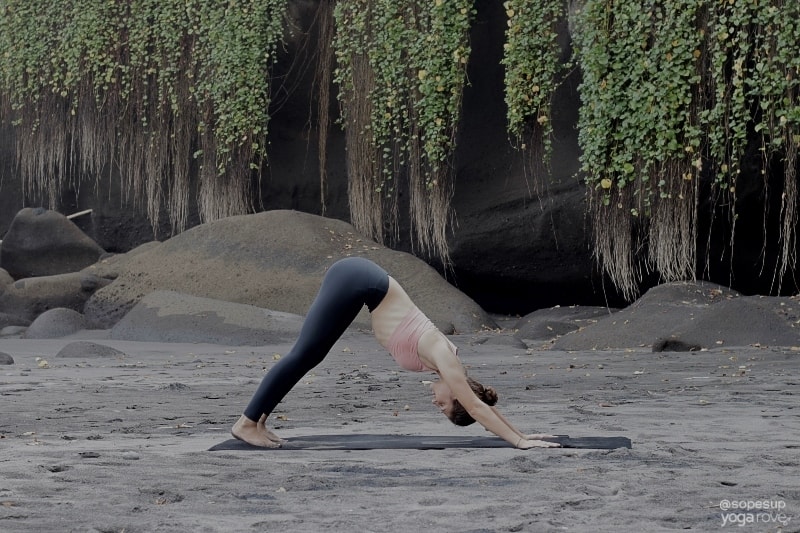
How to do Downward Facing Dog:
- Start on all fours with your knees inner-hip distance apart and toes tucked.
- Plant your palms completely on the floor and push your hips back, sending your butt into the air.
- Pump your feet by bending one at a time while you straighten the other.
- Engage your arms here and keep pushing back while you ground your hands to get a good shoulder stretch.
- Engage your core to make sure your weight stays balanced and doesn’t fall on your upper body. Keep actively pushing through your heels, even if they can’t touch the ground.
- Stay here for 30 seconds while you pedal out your feet.
Stretches: Hamstrings, shoulders, hands, feet
Modification: If you have weak wrists or have a very weak upper body, try using a yoga block under each hand instead of placing your hands directly on the ground.
2. High Lunge
Although this doubles as a strengthening yoga pose, this is a great pose to practice to open your hips and psoas region.
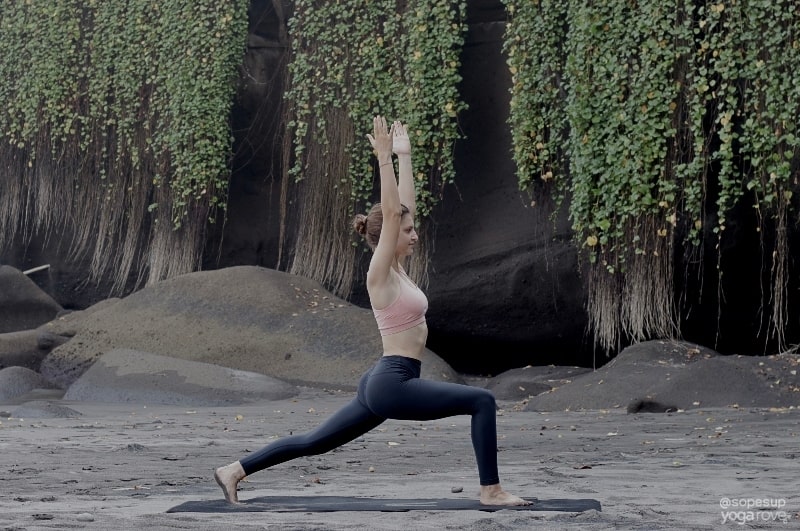
How to do High Lunge from Downward Dog:
- Bring your right foot in between both of your hands, planted firmly on the ground. Your left heel should be off the ground and facing forward, extending and engaging your left leg.
- Bend your right leg at a 90 degree angle as you ground your foot and rise up, bringing your arms overhead and pushing your chest up towards the ceiling.
- Extend through your back heel as much as you can to deepen the hip stretch and maintain balance.
- Ensure your hips are squared and you aren’t leaning more to one side.
- The more you engage your back leg and lift up through your chest, while bending your front leg, the deeper you will feel the stretch in your hip flexor.
- Stay here for 30 seconds.
Stretches: Hip flexors, calves, ankles, hamstrings
Modification: If staying in high lunge is too deep of a stretch or requires more strength than you are able to exert right now, bring your back knee down to the ground to come into Crescent Lunge. Rest both hands on your front knee, pushing it forward to deepen the stretch.
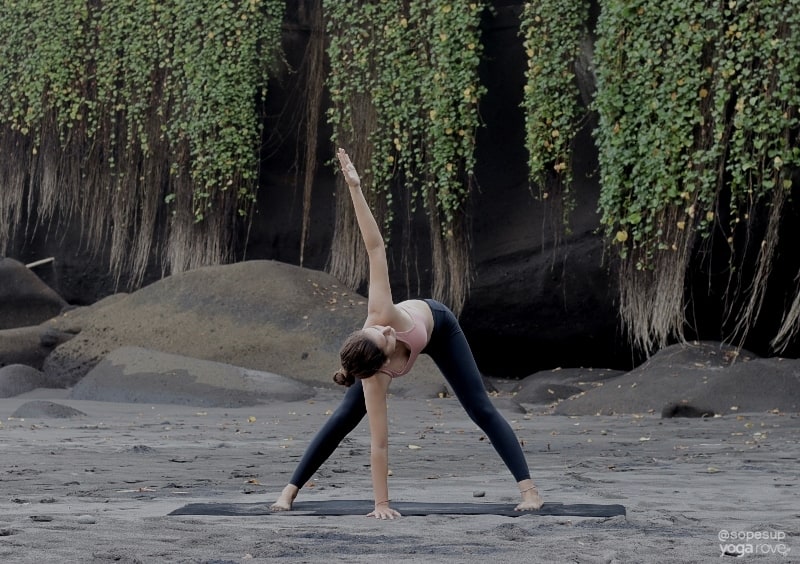
3. Pyramid Pose
Pyramid pose is also known as Intense Side Stretch because that literally is what it is. You may hate it at first, but you will begin to love it once you notice how much tension you release in your hamstrings by practicing it.
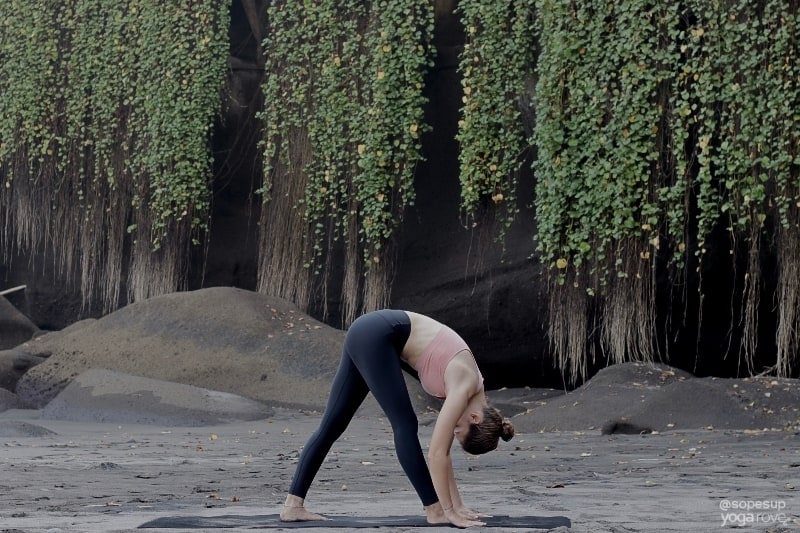
How to do Pyramid Pose from High Lunge:
- Bring your back foot in just enough so that your heel can touch the ground. Try to maintain as wide of a stance as possible.
- Make sure both feet are facing forward (back foot can be slightly on an angle) and are completely straight. Lift your arms up into the air as you flatten your back, and fold over your right leg.
- Do not let your chest collapse onto your leg- still actively engage your core and lift up through your chest as you fold.
- Stay here for 30 seconds and remember to breathe into the discomfort!
Stretches: Hamstrings, spine, hips
Modification: If this is your first time practicing this pose, or you have very tight hamstrings, make sure you have a yoga block on either side of your front foot. Adjust the height based on your needs- the taller they are, the less intense the stretch will be. As time goes on, you can make them short and shorter, until you don’t need them at all!
4. Standing Forward Fold
Standing Forward Fold is a great stretch for the spine that is also incredibly relaxing. The mistake a lot of people make is they treat this as a rest pose. Although the more relaxed version, Ragdoll Pose, is equally as great for improving flexibility, if you really want to improve your spinal and hamstring flexibility, actively stretching is the way to go.
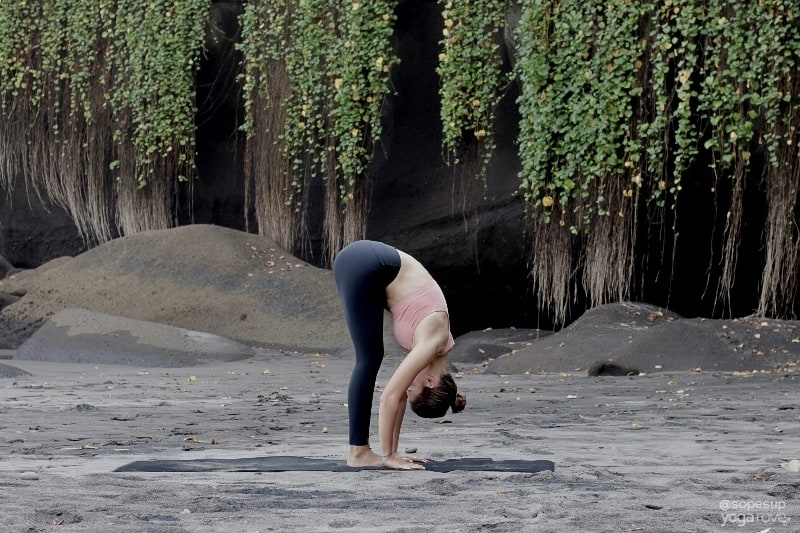
How to do Standing Forward Fold from Pyramid Pose:
- Bring your left foot up to meet your right foot so that they touch. Plant your hands onto the ground as you maintain a straight back and fold in towards yourself.
- Extend your feet through the floor and grab the back of your shins or ankles and pull yourself closer towards your body with each exhale.
- You do not need to fold in completely to properly do this pose, as seen in the picture above. You want to fold as deeply as you can without completely rounding your back in order to properly stretch the spine and back of your legs.
- Stay here for 30 seconds as you breath deeper and fold deeper.
Stretches: Hamstrings, hips, calves
Modifications: Keep your yoga blocks from pyramid pose next to you for this pose as well. Instead of rounding your back trying to reach for your toes, if you’re too inflexible, use blocks to support you so you maintain a straight back and allow your self to fold deeper.
5. Revolved Chair Pose
Twists are great for releasing tension in the spine and opening up the shoulders. This pose is also great to come into from Standing Forward Fold as it helps improve your balance and challenges your endurance.
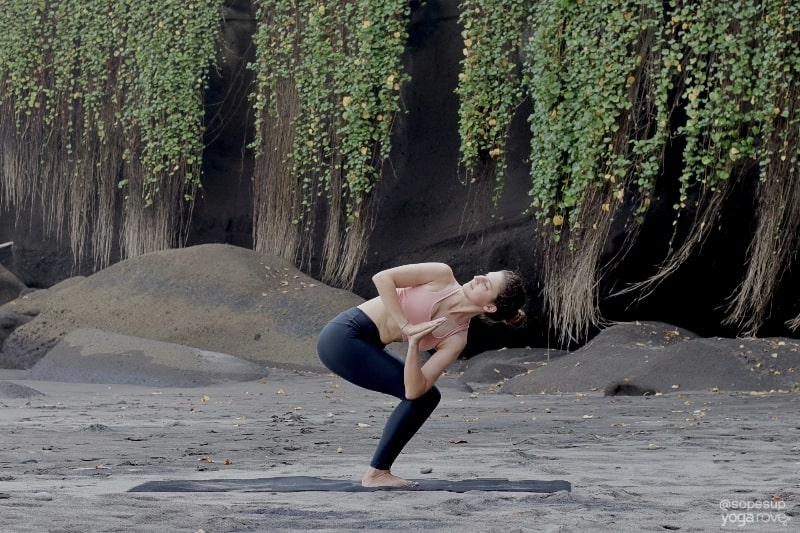
How to do Revolved Chair from Standing Forward Fold:
- Distribute your weight onto your heels and bend your knees as you sweep your arms up into the air to come into Chair Pose.
- You should be able to wiggle all ten toes without losing balance. Keep pushing through your heels and lift through your chest.
- Drop your shoulders from your arms and bring your hands together at your heart, then twist over to your right side.
- Keep your elbows even and shoulders away from your ears. Your right elbow should be pointing towards the ceiling.
- Keep sinking your seat and twisting deeper with every exhale and stay here for 30 seconds.
Stretches: Spine, shoulders, lower back
Modification: If you have a difficult time twisting, place a block at it’s tallest height in front of your feet. Instead of keeping your arms in prayer position, bring your left arm down onto the block, and bring your right arm up into the air towards the ceiling. You can also bend at the elbow if you have tight shoulders.
6. Garland Pose
Garland Pose, also known as a yoga squat or Malasana Pose, is well known for being a hip opener, but once you get into it, you’ll also realize it gives you a great ankle stretch as well.
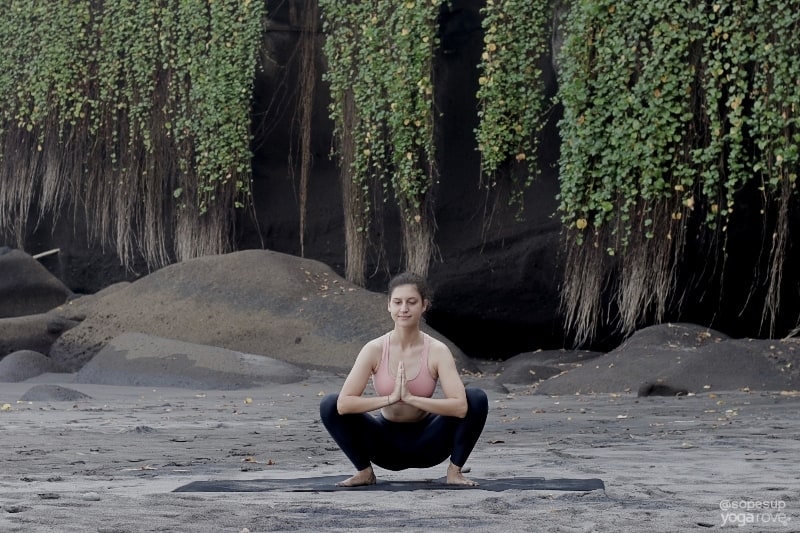
How to do Garland Pose from Revolved Chair Pose:
- Come out of the twist and back into traditional Chair Pose, or straighten your legs to come into Mountain Pose.
- Step your feet out so they are hip distance apart with your toes out and heels in.
- Sink your seat while keeping your heels grounded and your chest lifted.
- Bring your hands to touch at your heart with your elbows out to the sides.
- With each exhale, use your elbows to push your legs out farther apart to get a deeper hip flexor stretch.
- Make sure not to let your chest collapse, keep it lifted. Stay here for 30 seconds.
Stretches: Hip flexors, ankles, back
Modifications: There are multiple modifications for yoga squat pose, but the main issue many people have is not being able to keep their ankles on the floor as they sink their seat. In this case, place a folded blanket underneath your heels to support them.
7. Twisted Wide Legged Forward Fold
Another twisting pose, but this time we are adding in a stretch for the hips and lower back as well. Twisted Wide Legged Forward Fold wakes up your body and works on strengthening your core and shoulders as well.
How to to Twisted Wide Legged Forward Fold from Garland Pose:
- Come back up to a standing position with your arms up into the air for a full body stretch.
- Heel-toe your feet apart as far as your body allows for your whole foot to still be grounded on the floor, then slide your heels slightly out and your toes slightly in.
- As you exhale, hinge at your hips and fold forward. Plant your hands on the ground.
- Keep your left hand planted and as you exhale, sweep your right arm up into the air as your upper body opens up to the right, your gaze following your right hand.
- Lift up and through your chest, and expand through your right arm.
- Stay here for 30 seconds as you take deep cleansing breaths.
Stretches: Spine, hips, hamstrings, calves, lower back
Modification: If you are unable to bring your hands to the ground, use a block just how you did and standing forward fold, adjusting the height of it so you are able to keep a straight back and are not stressing your body too much.
8. Cobra
Cobra pose is practiced commonly after abdominal workouts because of the deep stretch it provides for your stomach. This is also a great pose to help prepare you for Upward Facing Dog, a similar yoga pose that is used in many vinyasa flows.
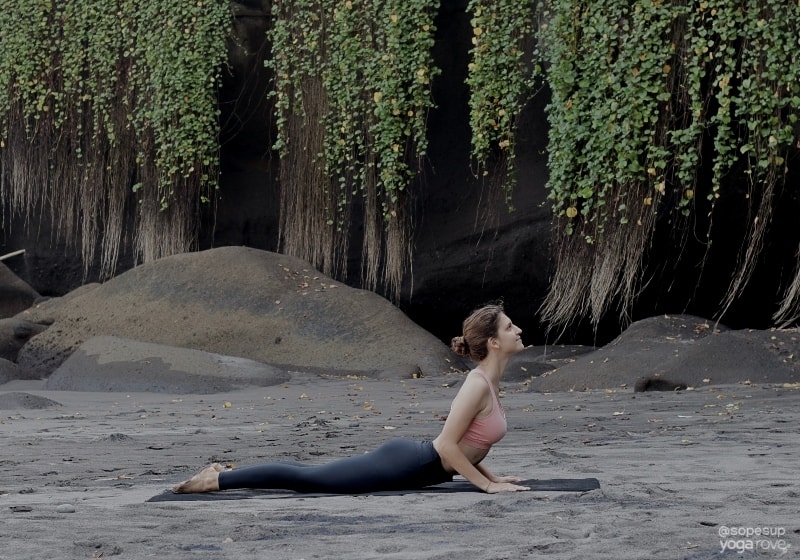
How to do Cobra Pose from Twisted Wide Legged Forward Fold:
- Come out of your twist, and then slowly come down to the floor onto your belly.
- Place your forehead onto the floor the floor and bend your arms and place your hands by your shoulders, like you are ready to do a push up. Squeeze your arms in towards your body.
- On your next exhale, chest, head, and shoulders off the ground. Let your shoulders fall from your ears and keep your chest pointing up and forward. Keep both legs and tops of your feet planted on the ground.
- Hold for 10 seconds and repeat 3 times.
Stretches: Abdomen, chest, shoulders
Modification: Traditional Cobra Pose can feel intense on your back if you are not used to it or are very tight. If it doesn’t feel comfortable, come into Baby Cobra Pose by keeping your arms bent and only lifting your head, neck, and your upper chest off the floor. If the pose bothers your lower back, keep your legs wider than hip distance to soften the intensity,.
9. One Legged Side Body Stretch
The side body is often neglected as we don’t realized how tight we are there, or that we even need to stretch it. One Legged Seated Side Stretch helps open up the rib cage and provides circulation into this often forgotten area.
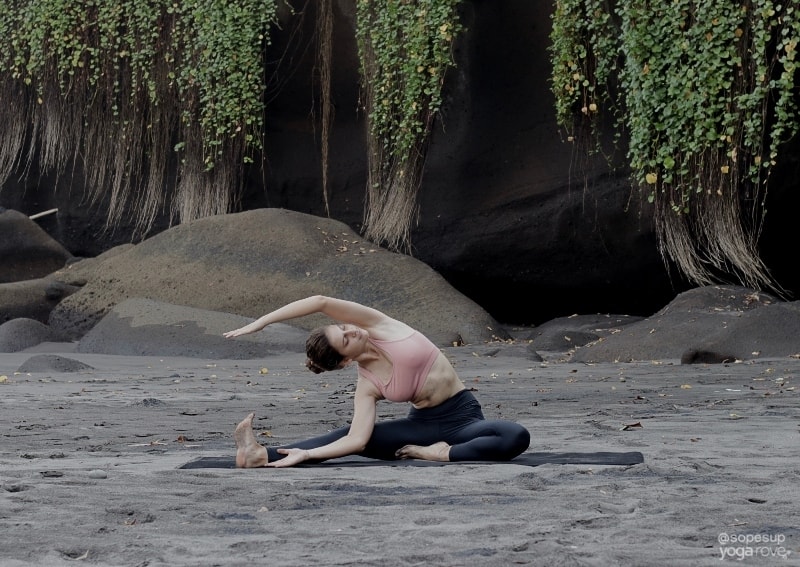
How to to Seated Side Stretch from Cobra Pose:
- Come to a seated position with your feet together. Straighten your right foot out in front of your with your foot flexed. Make sure your spine is straight and you are sitting tall.
- Bring your right arm by your right ankle and sweep your left arm up overhead, folding over sideways. Allow your gaze to come to your left and look up.
- Keep your left leg ground as you continue to breathe into your ribcage and folder deeper over your side, while being mindful to maintain a straight back.
- Stay here for 30 seconds as you breathe deeply.
Stretches: Side body, shoulders
Modification: Sitting upright can be difficult for many when first starting out. If you find it challenging to maintain a straight back, place a blanket underneath you to assist you. You can also choose to do a side body stretch from Easy Seat, which is one of the first yoga poses beginners learn due to its accessibility for all levels.
10. Seated Straight Legged Forward Fold
Seated Straight Legged Forward Fold is very similar to Standing Forward Fold, except that you have a bit more control on how deep you make the stretch and provides more of an intense stretch in your hamstrings and calves (with the right tools).
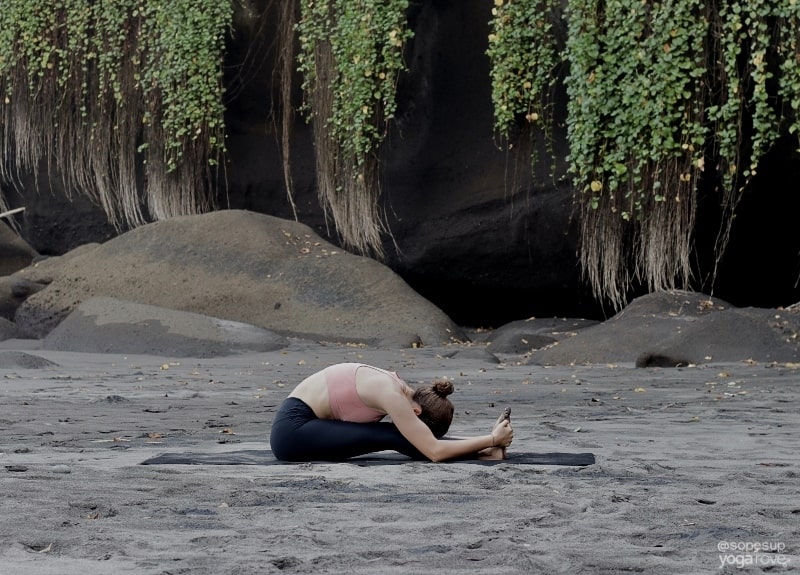
How to do Seated Straight Legged Forward Fold from One Legged Side Body Stretch:
- After you come up to a neutral position, straighten your right foot out to meet your left, and flex both feet in towards you as much as you can.
- Remove any extra “flesh” underneath your seat, so you are sitting directly on your sits bones.
- Sweep your arms up as you lift your chest, and fold over your legs using your core, grabbing your toes, shins, or ankles.
- Keep flexing your feet in towards you during the pose as you pull on them to fold deeper with each exhale.
- Stay here and hold for 30 seconds, folding deeper with each exhale.
Stretches: Hamstrings, calves, spine
Modification: Using a yoga strap would be very beneficial here to reduce strain on your back, promote proper alignment, and get a deeper stretch. Simply place the yoga strap around your feet and grab either end, using the strap to pull your upper body closer to your lower body as you flex your feet in towards you. You can also place a blanket underneath you in this pose to help maintain a straight spine.
Complete this sequence and then perform again on the other side.
Do this every morning and I promise you will see a huge difference in your level of flexibility in a short amount of time!
If you would like to stay in the poses longer and it feels right and good for your body, then by all means do so! Just make sure to move slowly and with your breath, and remember to always listen to your body to prevent strain.
What to save this routine for later? Pin it:
Ally is a Registered Nurse, Registered Yoga Teacher, and Co-Founder of Yoga Rove with her husband Victor. She first started yoga over 7 years ago when she started her nursing career to combat the physical and mental strain, and now loves to teach and help others.
Thank you for sharing such valuable body mind and spirit poses to so many! Appreciate your time. Stay safe!
Thank you for the kind words Cathy! You as well 🙂
Hours sat at my desk are starting to take their toll. And I’ve always had very poor flexibility.
Looking forward to giving this a go. I hope it isn’t too advanced for a beginner.
Excited for you to try it James! You can always modify to your needs. You might find our in depth posts on how to use yoga blocks and how to use a yoga strap helpful. Try it out and let me know how it goes!
I retired from being an gymnast at a young age and was very flexible then but, that has changed over the years. I hope this routine will help me restore some of my flexibility.
That’s great Anne! I definitely think consistency and persistence go a long way 🙂