

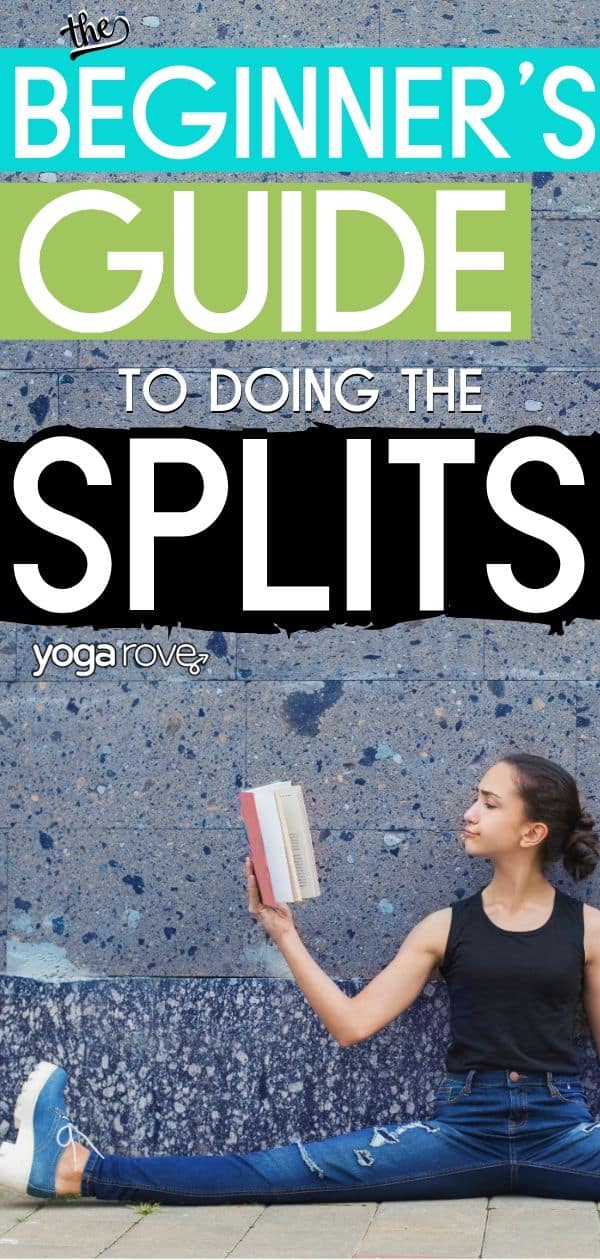
This post may contain affiliate links. Please read our disclosure for more info.
Being flexible never came easy to me and it always took a good amount of time to even be able to touch my toes. Now that the new year is upon us I want to take this opportunity to challenge myself to reach this goal.
In order to be able to accomplish a split I compilated a lot of research on people that have done it before me and dove deep into learning more about the flexibility of the human body.
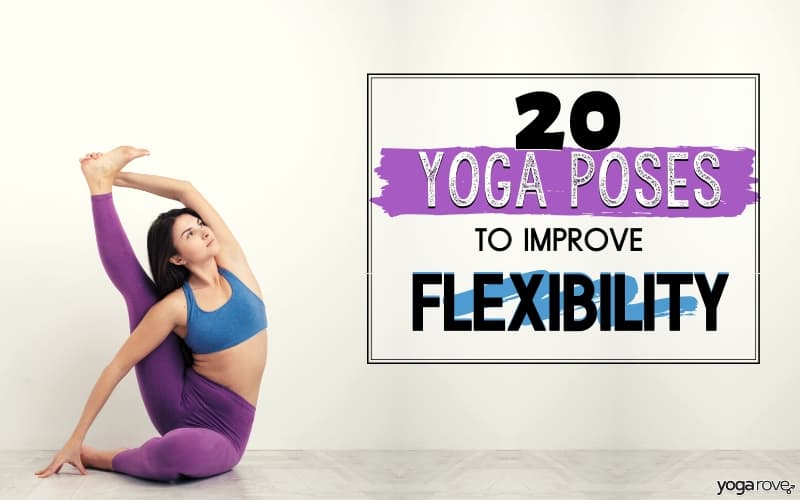
In this guide you are going to learn about:
- If Everyone Can Do A Split
- Flexibility Factors
- Different Types of Splits
- Three Different Types of Stretching
- The Benefits of Stretching
- Flexibility Mistakes
- Why Drinking Water Is Essential
- Supplements To Increase Flexibility
- How Long It Will Take To Achieve a Full Split
- How to Do the Splits for Beginners:
The goal of this guide is to give you everything you need to know in order to obtain a split. Before starting let’s do a simple flexibility test to see how flexible you really are.
Flexibility Test (Beighton Scoring System)
The name of this flexibility test is called the Beighton Score and it is used to determine if someone is hyper flexible. A person that passes this test is going to have an easier time being able to accomplish these different stretching positions with ease.
After taking this test I scored a 0. Even though I am not hyper flexible it will not prevent me from accomplishing my goals because the human body is very adaptable. Let’s see how flexible you are:
- Pinkies Test: Place your right palm and forearm flat on a table. Take your pinky and extend it as far as possible. If you can go past your knuckle, beyond 90 degrees, give yourself 1 point. Try this same test on your other pinky and if you pass, give yourself another point.
- Thumbs Test: Sit down and extend your right arm out aligned with your shoulder and your palm facing down. Have a slight bend in your elbow and your wrist fully bent down. Take your thumb with your left hand and try to touch your forearm. If you can, add 1 point for each thumb that touches your forearm.
- Elbows Test: Bring your right arm out so the side of your body with the palm facing up. Attempt to bend your elbow upwards. If a bend with 10 degrees or more occurs add 1 point. Test your other elbow.
- Knees Test: Stand straight and lock out your knees. If a bend of 10 degrees or more happens, give yourself 1 point for each knee.
- Spine Test: Stand straight and bend over to have your palms touch the floor. If you are able to get your palms to touch the floor without having to bend your knees, add 1 point.
The highest possible score you can obtain on this test is 9 points. I just wanted to remind everyone that I scored a 0 and if they also scored a 0 to not be discouraged.
More information and images on the Beighton test can be found in this article on assessing joint hypermobility.
[mv_video key=”t7paj36ofp8ks5ktzrov” volume=”70″ aspectRatio=”true” title=”11 Yoga Poses to Practice Everyday” thumbnail=”https://mediavine-res.cloudinary.com/v1606397592/cm2f153oepbimzein63p.jpg” jsonLd=”true” doNotOptimizePlacement=”false” doNotAutoplayNorOptimizePlacement=”false” sticky=”false”]
Can Everyone Do a Split?
Before doing any research on how to train for a split I was curious to know if everyone is even capable of doing a split. To my surprise there is a simple test a person can do if they want to figure out if their hips will allow them to do a split.
- Find a fence or a table that is the same height as your hips
- Stand with both of your feet facing forward
- Lift your leg up and place it on the table or fence
- If you create a 90 degree angle you will be able to do a split with training
- Test your other leg
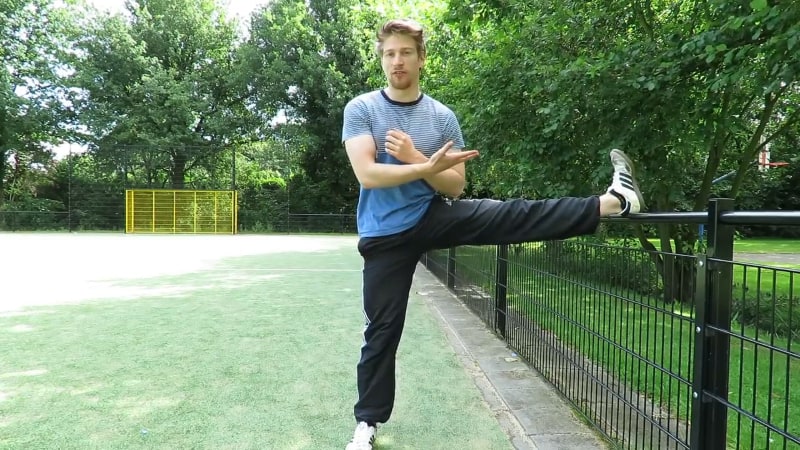
Image and information courtesy of flexibility and fitness expert JeromeFitness
If you are not able to do a 90 degree angle this means your hip placement is at a different angle then most people and your body will not allow you to do a split even if you train for years. Failing this test does not mean you should give up on improving your flexibility and mobility.
Physiology of Stretching
Learning more about the physiology of stretching is going to inspire you the same way it inspired me because it shows proof that you can improve your own flexibility.
There are different process that are occuring while you stretch, without even realizing it:
- Your Tissues are Elongating: When you get into a stretch you are stretching out the tissues of you muscles, tendons, and ligaments. When you first start stretching your muscles are going to elongate the most. Consistently stretching for a long period (months/years) of time will change the material in your tendons and ligaments to become more elastic.
- Sensation Modifies: When you first start to stretch you are going to experience pain. Eventually with enough practice your body will begin to desensitize the pain and start to relax into the pose.
- The Reflex Loop Between the Body and Muscle Adjusts: Whenever you stretch, you body is sending signals to the spine to prevent the muscles from stretching out too far. These signals contract your muscles. Eventually when you practice stretching multiple times a week the body will send signals to the muscle so it doesn’t contract as much allowing you to go deeper into your stretch.
After learning about how the body adapts to stretching, it gives me the confidence that I will be able to stretch my legs in order to get into a split. The key thing to remember is to not force your body to get into the position too fast and give it time to adapt to the different poses and stretches.
External Flexibility Factors
When it comes to training, your flexibility you are going to face many factors that you should keep in mind that will alter the way you train:
- Temperature: Training in cold temperatures will stiffen up your muscles and tendons. This stiffness will prevent you from going into a deeper stretch. This is why training in a warmer location will increase your flexibility.
- Time of Day: If you attempt your stretching routine in the morning you will not get that much from it if you were to train in the afternoon or at night. Most people tend to be the most flexible in the middle of the day around 2-4pm. This does not mean you need to train at this time. I prefer to focus on my flexibility training at night.
- Injuries: If you are injured in a specific location it will be much harder for you to stretch that area. On a physiological level the body is not going to want that injured area to have any movement so it will cause a lot of stiffness making it harder for you to stretch.
- Age: Generally people of a younger age tend to be more flexible. The older you are the more time it is going to take you to obtain the degree of flexibility you desire.
- Gender: Females are usually more flexible than males.
- Consistency: Focusing on stretching for 10 minutes a day 5x a week is way better then someone who focuses on flexibility for 1 hour once a week.
- Clothing: Your clothing may be preventing you from going into a deeper stretch. Keep in mind the type of clothing you have on when stretching.
Different Types of Splits
This guide is going to teach you how to get into two different types of splits:
- Front/Back Split
- Middle Split
Front/Back Split: This split is the easier of the two because it does not require as much mobility as a middle split. Just because it does not require as much mobility does not mean it is going to be easy. In order to get into this split you are going to have to bring one leg in front of you and one leg in back of you while bringing your pelvis to the ground.
Middle Split: In order to get into this split it is going to require a lot more hip mobility. Most people tend to have tight hips because through out the day we sit down and it causes our muscles to shorten in length over time. In order to get into this split you are going to have to bring both legs to the side and get the pelvis to touch the ground.
The Three Types Of Stretching
Before getting into the specific stretches you need to work on in order to get the split, let’s dive more into the different types of stretches.
- Static Stretching: This is the most basic type of stretching that most people are aware of and practice. For this type of stretching you are going to hold a stretch for a period of 10 to 30 seconds. When stretching you should feel a mild discomfort and never force your body to feel extreme pain.
- Dynamic Stretching: This is separated into two categories; active and ballistic. Active stretching focuses more on moving your limbs in their full range of motion. Ballistic stretching focuses more on rapid movement, or bouncing, when in a specific position. Overdoing ballistic stretching may cause injury if not warmed up properly.
- Pre-Contraction Stretching: This type of stretching contains multiple techniques, but the one we are going to focus on throughout the program is Contract Relax (CR). This type of stretching is done using a strap and will be talked about more later in the article.
The Top 8 Benefits of Stretching
1. Improves Posture
One of the main causes of bad posture is due to sitting all day which creates many muscle imbalances. Focusing on a flexibility routine will help realign your muscles, providing you proper alignment.
2. Improves Flexibility
Being flexible will provide your body with more mobility. This increased mobility gives you more energy throughout the day and provides less strain on your body.
3. Improves Performance
The type of stretching that improves your performance the most is dynamic stretching. This is the type of stretching I love to do before I go on my long runs.
4. Improves Blood Flow
When you become more flexible you increase the blood flow to your muscles. Increasing the blood flow will help you reduce your recovery time after a workout.
5. Reduces Stress
Whenever you stretch and focus on your breath it calms your mind. With a calm mind it helps you reduce your stress and improves overall health. Stress is the number one cause of many problems in the human body and taking any opportunity to reduce it is very important.
6. Increases Range of Motion
Increasing your flexibility will also help you increase the range of motion of your limbs. Having this increase in mobility will drastically decrease your rate of getting injured.
7. Decreases Back Pain
One of the leading causes of back pain is from sitting for long periods of time. Sitting for long periods of time causes our muscles to tighten and it decreases our range of motion. Increasing your flexibility through out your body will increases your overall range of motion and reduce your pain.
8. Calms Your Mind
Every time you focus on stretching you are going to want to pay very close attention to your breath. Focusing on your breath allows your body to relax so you can get into a deeper stretch and it also calms your mind. Calming the mind is the best way to end your day to help you go into a deeper sleep so you can wake up the next day full of energy!
Common Flexibility Mistakes
Here is a list of mistakes beginners tend to make when they are trying to increase their flexibility. Taking note of these mistakes will significantly reduce your chances of getting injured.
- Not Warming Up: Never start stretching out your muscles and ligaments if you are cold. Not properly warming up and going into these routines will actually cause injury to your body.
- Stretching Too Far Too Fast: Some people may want to do a split in a very short amount of time so they are going to push their body. Forcing your body to get into uncomfortable positions that push way too far will send signals to your brain to not relax your muscles. Slowly progressing toward the split is the key towards improving your flexibility.
- Spending 1 Hour A Week: In order to see large improvements in your flexibility you are going to want to focus more on volume instead of packing your routine in one day. Stretching out for 10 minutes a day for 7 days is way better than stretching for 1 hour once a week.
- Not Breathing: Losing focus and holding your breath when you are stretching is very bad for your body. Focus on your breath and breathe very slowly and relaxed. Add in additional breathing exercises and meditation will also help your body reduce the overall tension it holds on to.
- Focuses on the Pain: When you first start trying to increase your flexibility you will find yourself experiencing different poses that hurt more than others. This pain I am referring to should not be a sharp pain that you feel from your tendons or joints, if that is the case, STOP. The pain I am referring to is the pain you would feel from the center of your muscle while it is being stretched. Focus on your breath and relax your mind for best results.
Why Drinking Water Is Essential
One of the best things you can do for your body is to drink water on a regular basis. Not only is drinking water essential for your overall health, but it is going to help you become more flexible.
Fascia surrounds all of our muscles, ligaments, and tendons. This thin layer that surrounds everything becomes less smooth when the body is dehydrated.
In order to be fully hydrated it is important to drink ½ to 1oz of water for every pound that you weigh. If you weigh 150 pounds, you should be drinking 75 to 150 oz of water everyday.
If you are the type of person that is not used to drinking this much water, slowly increase your intake little by little. Start off by drinking 1-2 cups of water a day. And every couple days slowly introduce more and more water to your body.
Hydration is going to be very essential in gaining more flexibility and it is something you are going to have to take seriously if you want to reach your goal.
Supplements To Increase Flexibility
Vitamins and minerals are essential for a healthy body. Each one has a different function and I looked into see which ones will help improve flexibility the most.
Magnesium
This mineral helps the body relax the muscles and mind. It is my favorite thing to take right before bed because of how relaxed it makes you feel. The ability to relax is essential in becoming more flexible because it prevents your muscles from tensing up.
Calcium
Calcium plays a big role in supporting your bones which is the foundation of your muscles and ligaments. Having strong, healthy bones is going to help develop a strong foundation in your body.
Vitamin D
Vitamin D goes hand and hand with calcium. In order to absorb calcium properly you need to take this supplement with it. The natural way of obtaining it is through the sun but because of today’s way of living most people don’t get the necessary amount and are deficient in this vitamin.
Glucosamine
When you stretch you not only stretch your muscles, you also stretch your joints and ligaments. Taking this supplement has been found to provide optimum joint health and mobility.
Vitamin C
Vitamin C helps produce collegian which is a protein that can be found in your connective tissue. Taking a good amount of this supplement for a long period of time will help promote elasticity in your ligaments, muscles, and tendons, essentially making you more flexible.
How Long Will It Take to Achieve a Full Split?
Each person is going to vary based on their current flexibility and amount of consistent effort they put into it. After searching around different forums I have found that the average person is going to take around 6 to 12 months to do a split.
In order to obtain the full split consistency is key. If you decide to focus for two weeks and take off the next you aren’t going to achieve your goal as fast as you possible can.
The goal for you is to focus on the routine we are about to go over.
Warm Up for Routine
Before starting any type of flexibility routine you should always make sure your body is warmed up properly. Starting a routine with a cold body will lead to injury.
The warm up we are going to go over is the basic morning routine we have talked about in a previous article.
The Basic Routine is:
- arm circles
- elbow to knee oblique twists
- squats
- jumping jacks
- forward lunge
- crunches
- plank
Total time for this routine should only take you 10 minutes.
For more details on how to accomplish this routine check out the this article that will go into more detail.
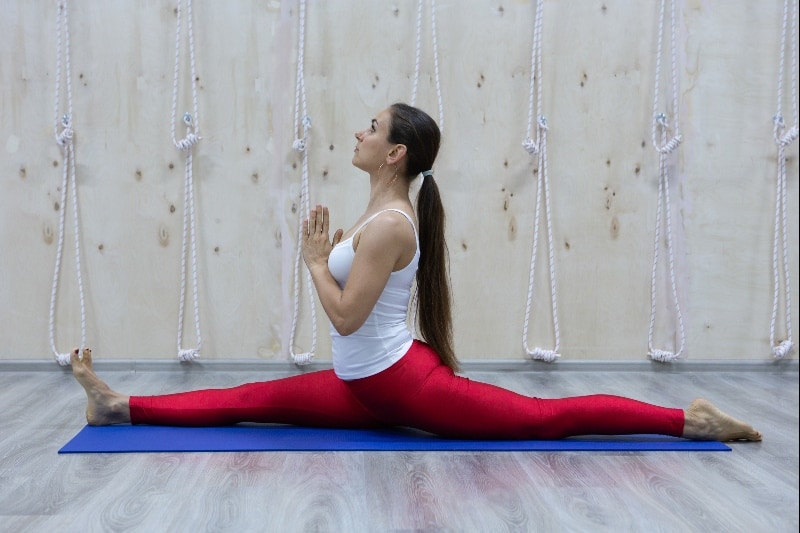
Front Split Routine
Now that your body is warmed up, you can start the front split routine.
This routine is found on the YouTube channel PsycheTruth. Out of every video I have watched this routine has brought people the best results.
Below I am going to break down their video into images. These images can be found in the 12 Minute Splits Stretch Flexibility Workout For Beginners How To Tutorial For The Splits. Lets get started!
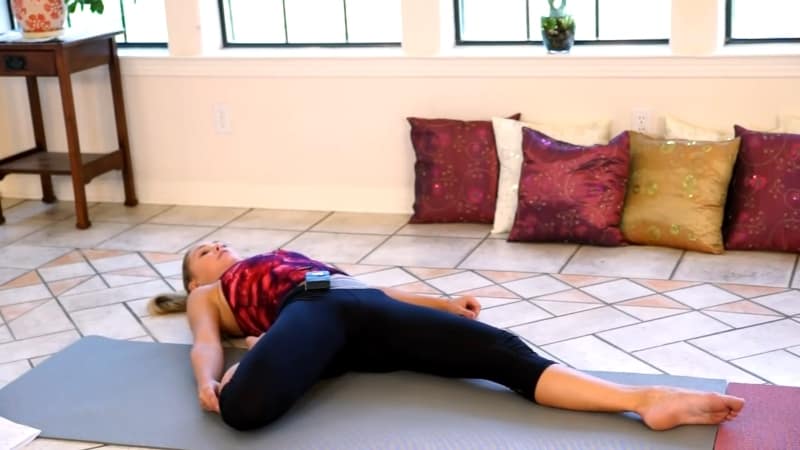
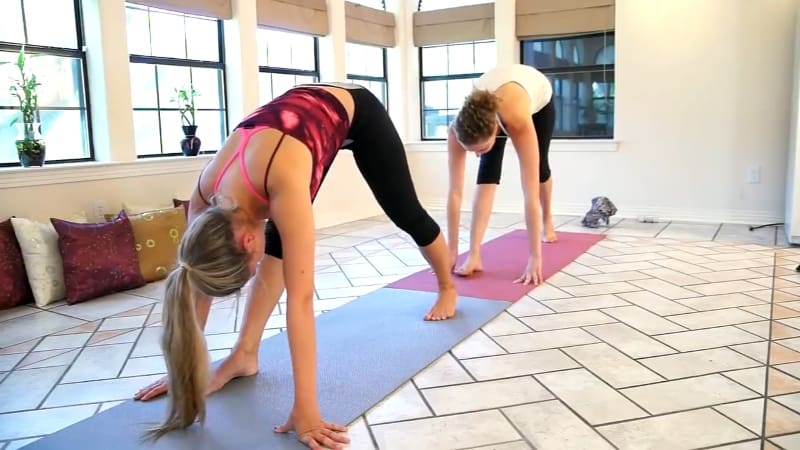
1. Forward Fold
Sit on the ground with your legs straight ahead. Flex your feet and begin to fold over your legs with your chest leading the motion.
Relax your breath and hold this position for 15 seconds.
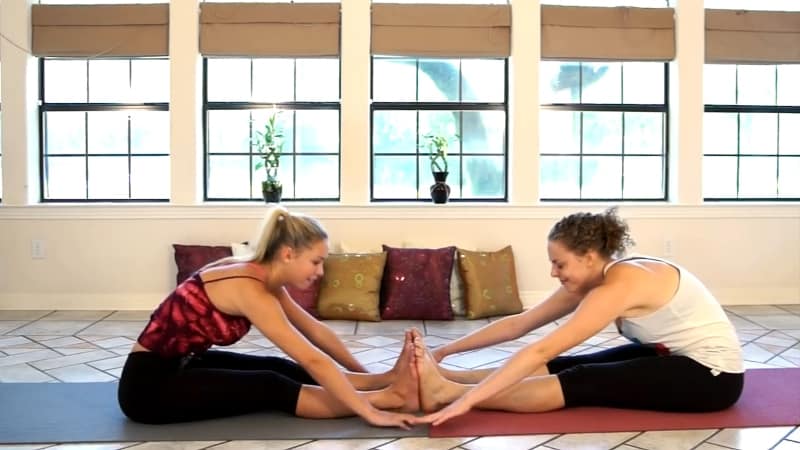
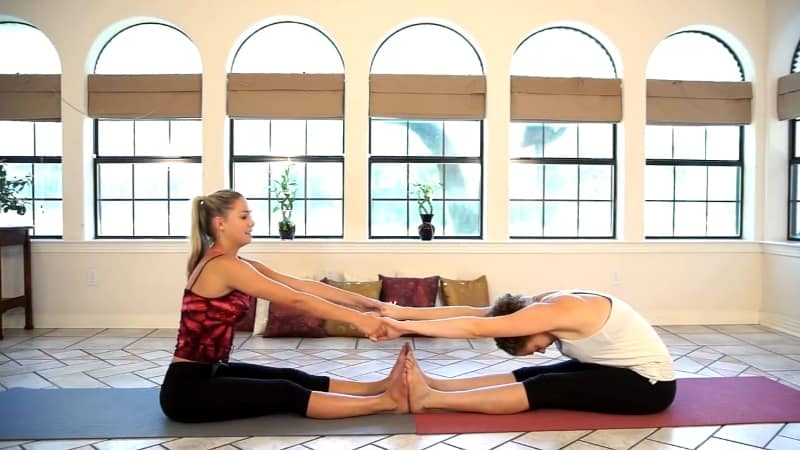
2. (Optional) Forward Fold With Partner
If you have a partner you could work with to assist you in obtaining a deeper stretch it would be highly recommended.
For beginners first starting out make sure you focus on being relaxed when getting pulled toward your feet. At no point should you feel extreme pain. The goal is to not hurt your body, but to allow it to relax into these poses.
If you do not have a partner, don’t worry about it. To get into a deeper stretch you can use a yoga strap for assistance
3. Side Stretch With Opposite Hand
These next two stretches are going to create a flow.
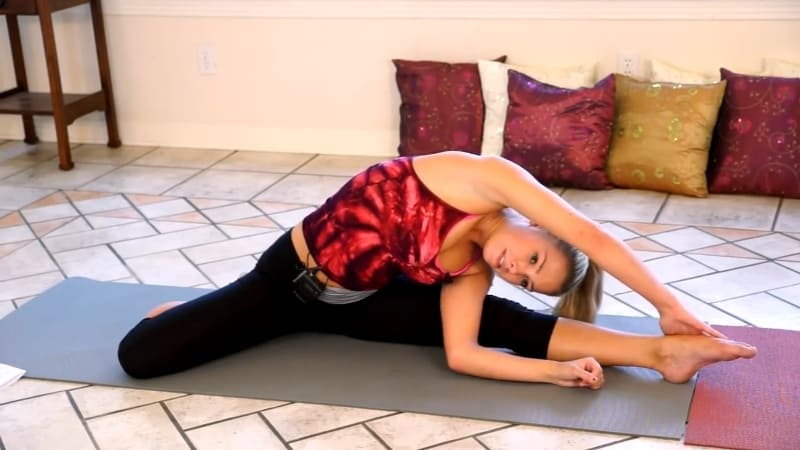
Get into the side stretch position by extending your right leg forward and bending your left leg behind you. Look straight ahead and bring your left hand over your head and reach toward your right foot. Hold for 12 seconds.
4. Side Stretch Forward Fold Over Leg
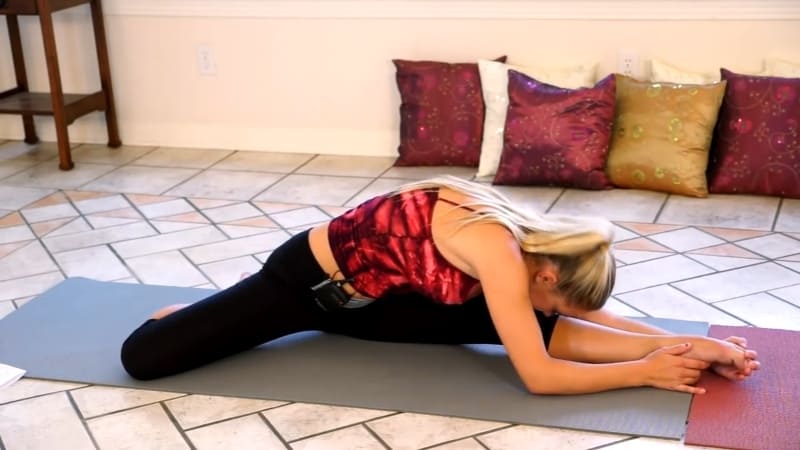
Come back to starting position and face your right foot. Take a deep breath and on the exhale fold your chest over your right leg. Hold this pose for 12 seconds. Now go back to the side stretch with the opposite hand.
*Repeat this flow for two more sets before moving on to the next flow*
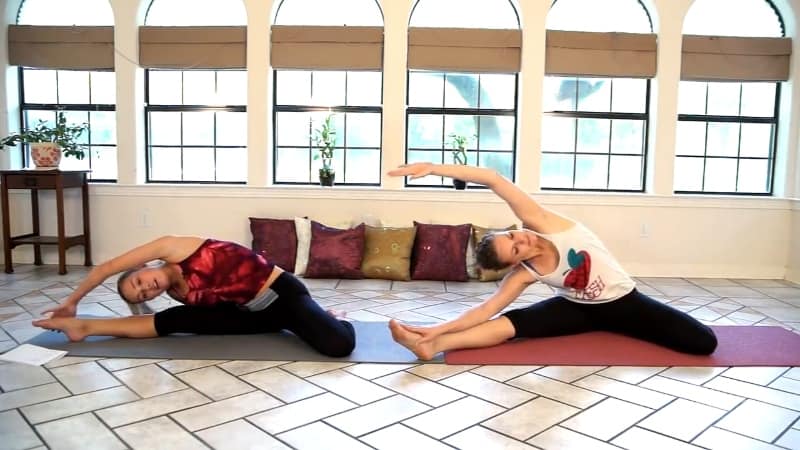
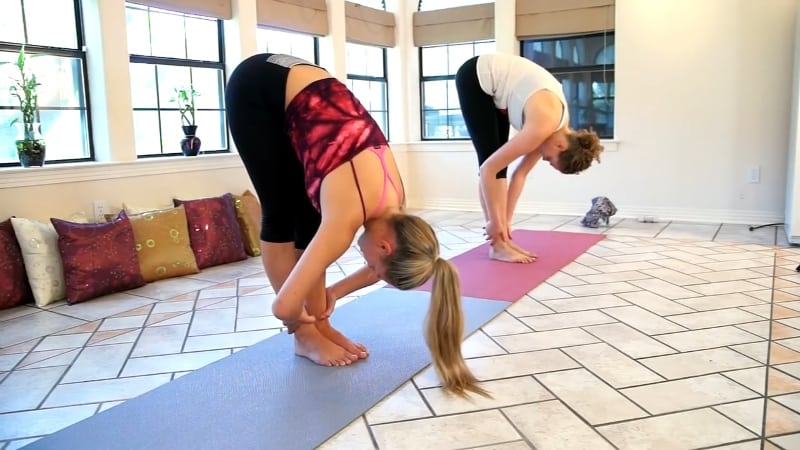
5. Side Stretch Front Fold
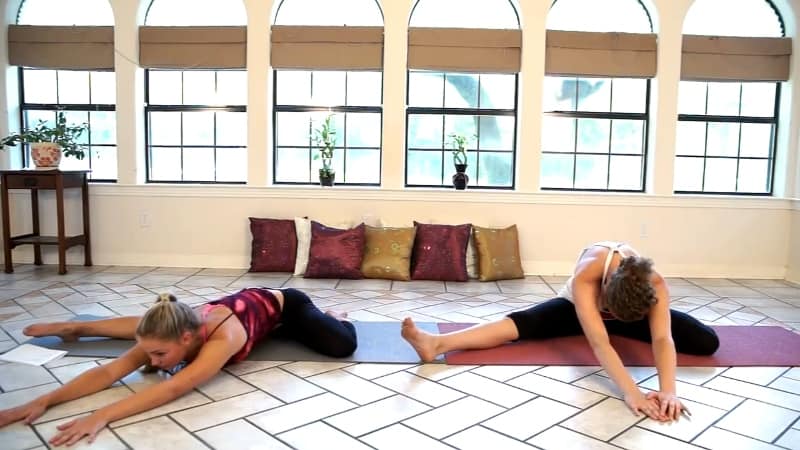
Now go back to the starting position for the side stretch. Look in front of you. Take a deep breath, on the exhale fold over in front of you. Hold for 12 seconds.
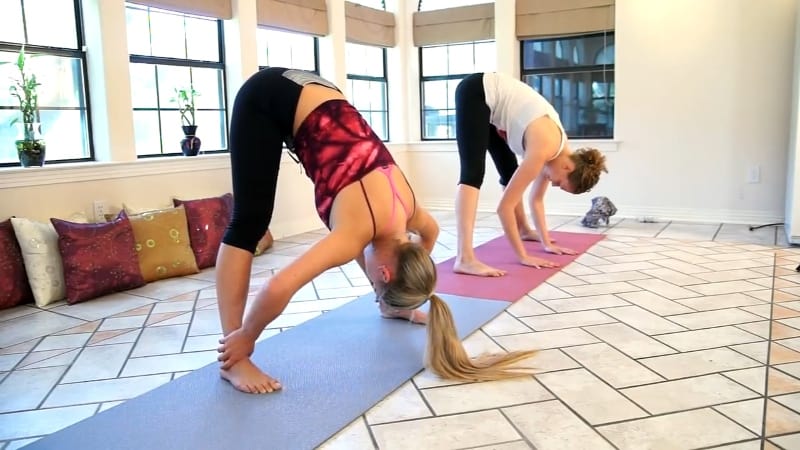
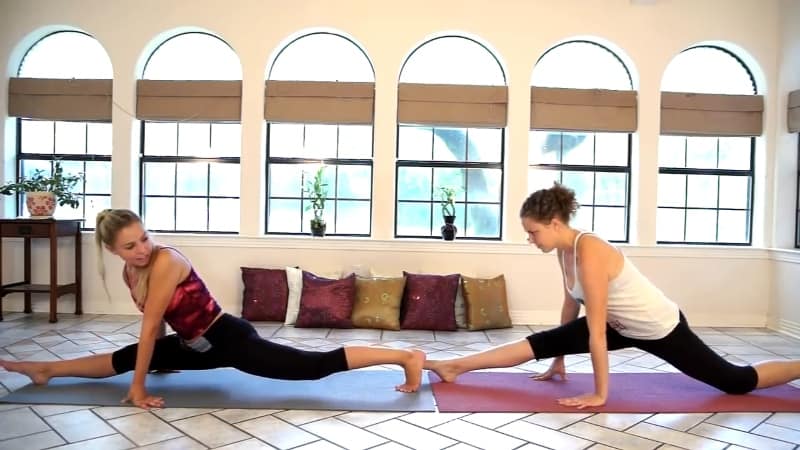
The depth in which you are able to bend over is based on your flexibility level. In the image below the person on the left side is clearly more flexible than the person on the right. Realize with enough practice you will be able to stretch as far as the flexible person in the image.
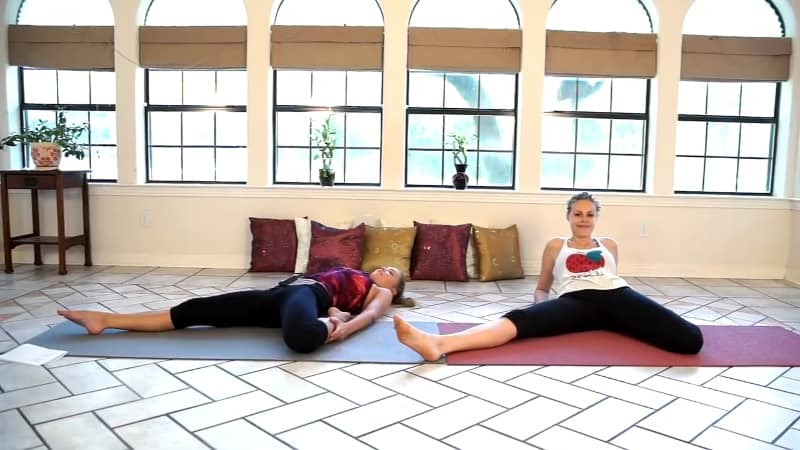
6. Side Stretch Lean Back
Come back to the side stretch starting position and lean backwards. Hold for 12 seconds.
Here is another position that is going to vary based on the individual’s flexibility level. If you are very flexible you will be able to have your back touch the ground. For those of you starting out in the same position as me you’re going to need to place your hands behind you for extra support. Only go as far back as is comfortable for your body.
*After this pose start the flow over again and repeat it one more time on your right side*
Once you’re finished with this flow you are going to switch over to your left side. Straighten out your left leg and bend your right leg behind you. Start each flow again and follow the routine for the left side of your body.
Repeat this flow three times
Repeat this flow two times

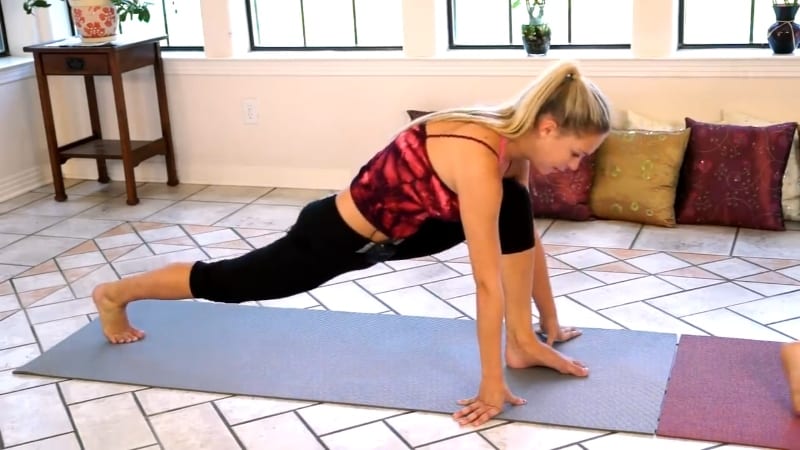
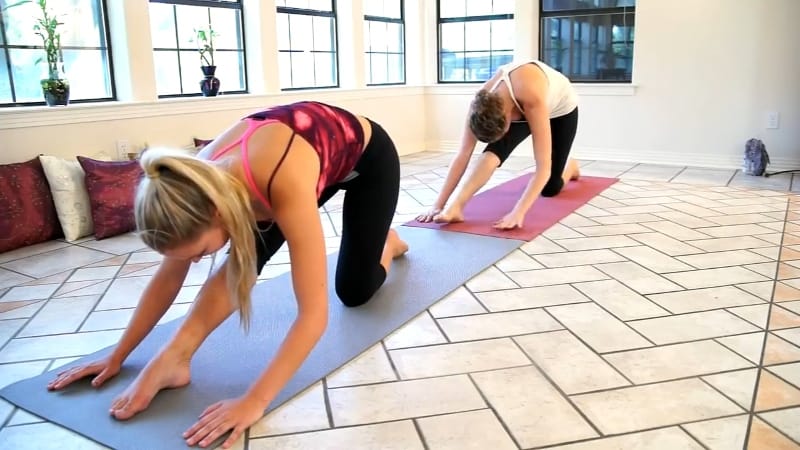
7. Lunge
The start of this flow is going to begin with a lunge. To get into this position plant your left foot into the mat and extend your right foot to the back. You should feel the stretch in your hip flexor. In order to increase the stretch for those of you that are flexible, bring your hip closer to the ground and try rocking your back foot to open up your hip flexor even more. Hold this pose for 12 seconds.
8. Single Leg Standing Forward Fold
Next, bring your right foot closer to your body and straighten out both legs. Fold over your left leg to get a deep hamstring and calf stretch. Hold for 12 seconds.
*After this pose get back into the lunge pose and repeat the flow one more time*
Once you are finished with the single leg standing forward fold, rotate your feet forward and lean forward. For a deeper stretch grab the back of your ankles are pull forward. Hold this pose for 12 seconds.
After the center forward fold rotate your feet to the right and start the single left standing forward fold. This pose will begin the same flow for the right side of your body.
Repeat flow two times.
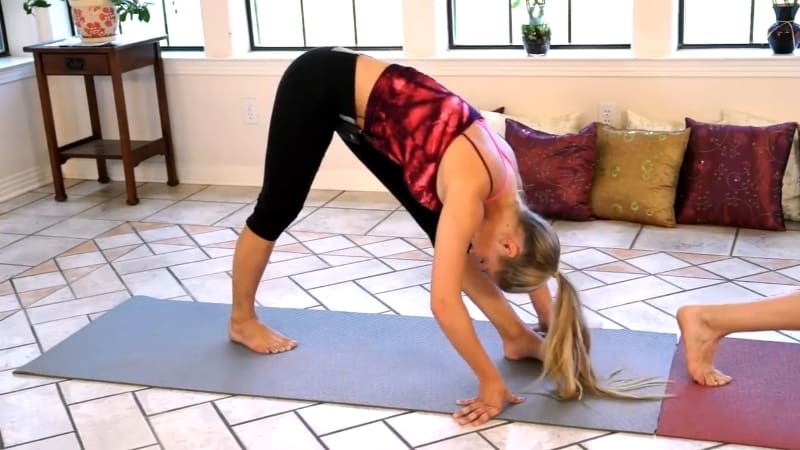
9. Feet Together Standing Forward Fold
After you complete the flow come back to center with your feet together and fold over your feet. Grab your ankles for a deeper stretch. Hold pose for 12 seconds.
10. Straight Legged Forward Lunge
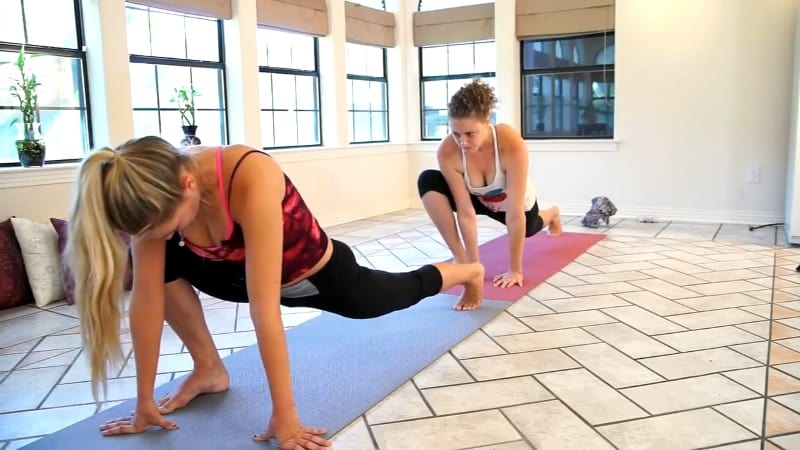
Get into the lunge pose with your right foot forward, now straighten your right leg, and bring your hips back over your left foot. Fold over your right leg and feel the stretch in your hamstrings. Hold for 12 seconds.
11. Isometric Front Split Hold
In the same pose bring your fight foot more forward and your left foot back. Take your time in this pose. Use yoga blocks for assistance if your hands can’t touch the ground. Hold this pose for 12 seconds.
*Repeat this flow one more time. Then do the same flow on the left side of your body two times*
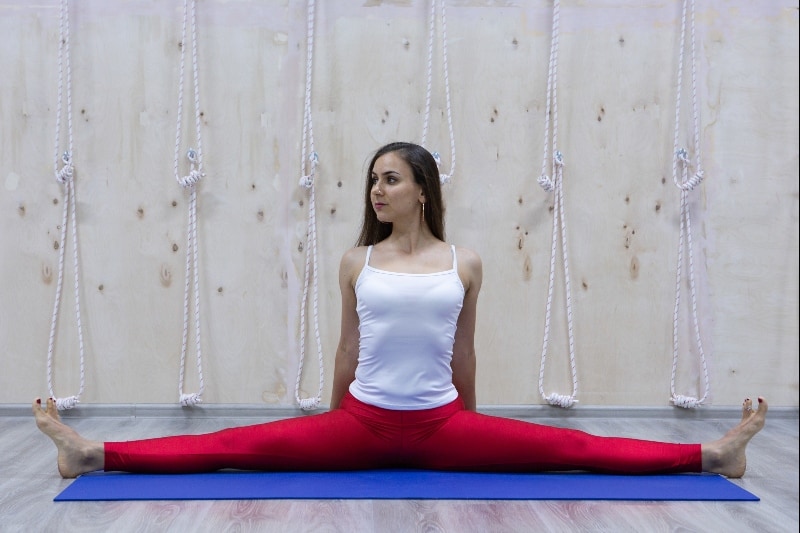
Middle Split Routine (also known as Side Split)
In order to build up to be able to do a middle split it is going to take a lot more work because it requires much more flexibility and strength. That being said if you have not come close to being able to do a full split yet I wouldn’t work on this routine at all.
Another requirement in order for you to do this routine is to be able to hold a horse stance (aka Goddess Pose) for about 2 minutes. If you are not able to hold this pose you have not yet developed the necessary strength to start the routine.
Work on building up your thigh muscles before even attempting this. The reason they want you to build up your thigh muscles is because it takes more stress off of the knees and reduces the chances of injury.
This routine I am about to share with you has been created by the YouTuber Tom Merrick. He is very passionate about gymnastics, body weight exercises, and mobility. This is the routine he used that took him around 12 months to achieve the middle split. Spend 2-3 times a week on this routine. The name of the video I am about to breakdown with all these images is from Middle Split Loaded Mobility Routine.
1. Warm Up
Always warm up your body before attempting any type of strenuous physical activity. The previous warm up we talked about before starting the full splits for beginners is going to be the same warm up routine you should do before starting this middle split routine.
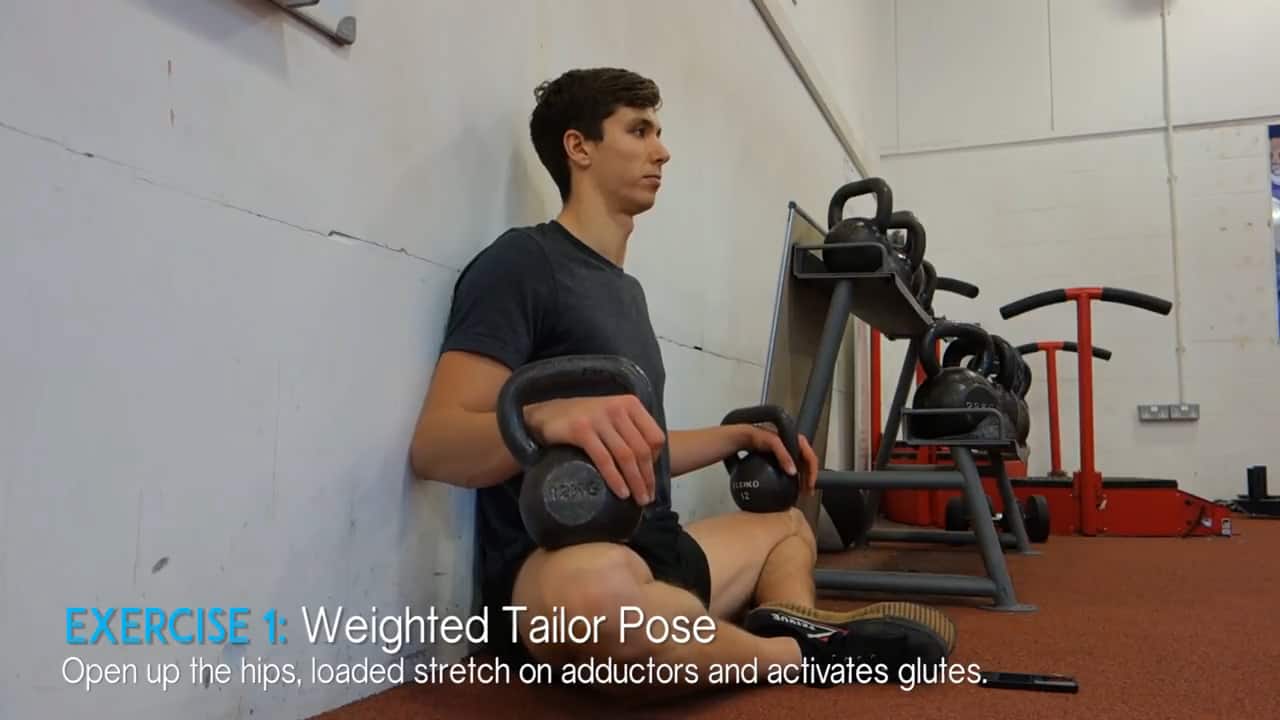
2. Weighted Tailor Pose
For this exercise you are going to need to use a set of weights. Start off with 5 lbs and work your way up to 15lbs. Sit up against a wall and place both feet together. Now place both weights on your things and bring the weight up 10 times. After the 10th rep maintain a fully stretched position for 30-60 seconds.
Perform 3-5 sets with 60 seconds rest in between.
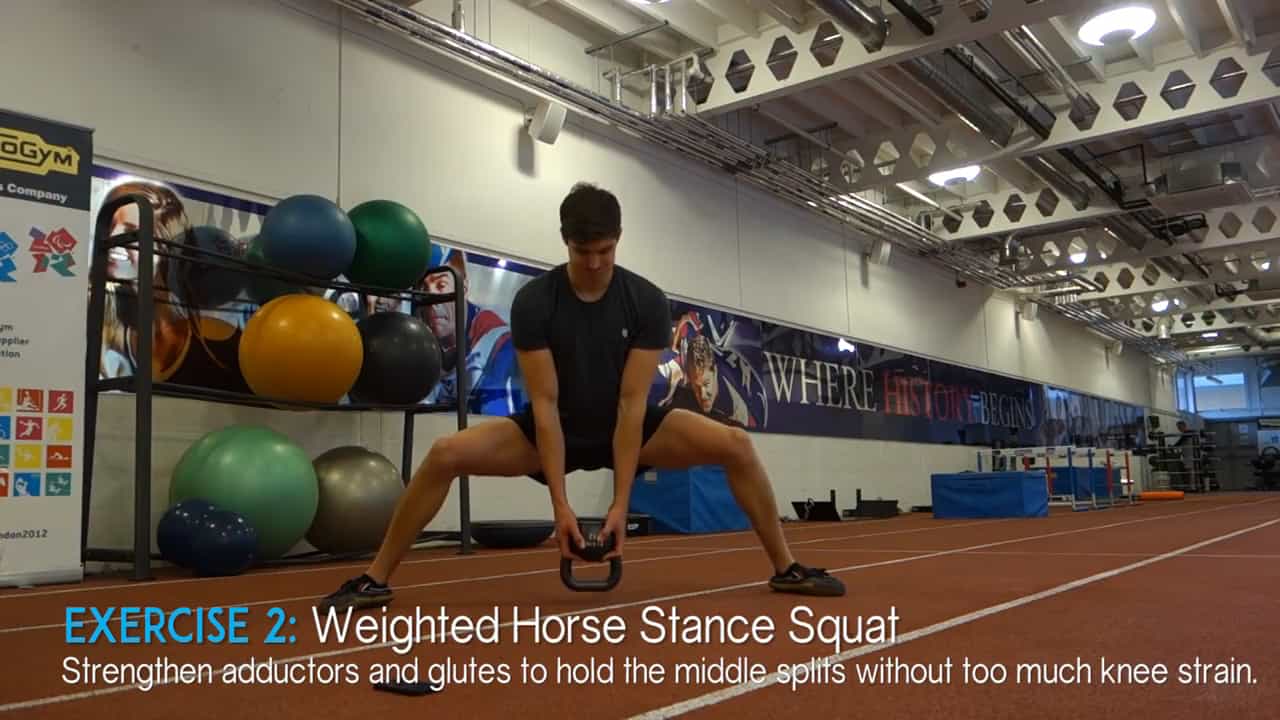
3. Horse Stance Squats
To begin this exercise start with your feet together with a 5lb to 15lb weight in the center. Twist your heels out then your toes out about five times. When you sit into this pose your form should look very similar to the image below. Always start with a low weight and build up to 15lbs. Squat 10 times. Then hold the squat pose with the weight for about 10-30 seconds.
Perform 3-5 sets with 60 seconds rest in between.
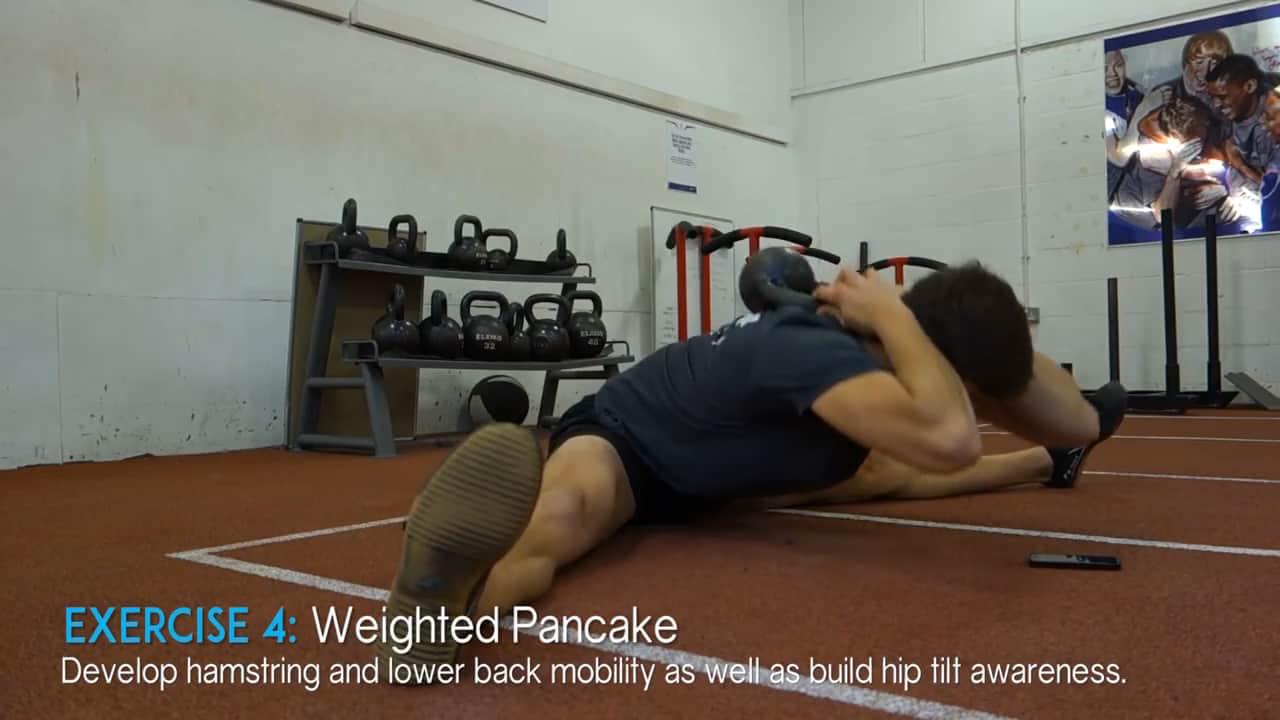
4. Weighted Pancake
This next exercise is going to help you develop your hamstring and low back mobility. If you are not that flexible yet you are going to want to elevate your hips. Place a pillow or foam on the ground and sit down on it. Get into a straddle position with your legs wide apart. Place the weight behind your head and fold at the hips and sink as low as you can to the ground. Perform 10 reps. On the last rep hold the bottom position for 10-30 seconds.
Perform 1-3 sets with 60 seconds rest in between.
5. Side Split Isometric Hold
The goal of this exercise is to get your body comfortable with getting into the split. At first your body is not going to want you to increase the range of motion because it is not used to it. With time the central nervous system will adapt and relax the muscles and tendons more so that you are able to get into a full middle split. Go slow with this exercise and use yoga blocks or a chair for support. Hold the deepest middle split you can for 20 to 60 seconds.
Perform 3-5 sets with 60 seconds rest in between.

Summary Notes
This is a very extensive guide and I wanted to provide a summary at the end to provide you reminders on your flexibility journey:
- Your mind and breath have the power to relax your body to allow it to become more flexible.
- Have the patience and persistence to keep improving your flexibility for at least 10 minutes a day, every day.
- Warm up before every flexibility routine for best results.
- Drink lots of water every day.
- If you feel pain…STOP. We do not want anyone getting hurt.
- Do not rush the process. Give your body time to adapt to what you are putting it through.

Victor is a Registered Yoga Teacher, Certified Breath Coach, and the Co-Founder of Yoga Rove with his wife Ally. He has been practicing yoga for 12+ years and has a passion for teaching others how to feel better physically, mentally, and spiritually through movement and mindfulness practices.

Hi,
I am doing front split from past 3 months
And 4-5 days before i finally made it to ground but now when i go to strech i feel a striking lighting shock in my front leg just before touching ground what i do.
Hi Ayush,
You may be going into the pose too deep, too fast. Make sure you are warming up enough prior to doing the splits, and then I would suggest using props like a pillow or blocks to support you first so you can ease into it. Remember to always stay away from sharp pain- this is NOT something you want to feel and may mean you are putting yourself at risk for hurting yourself. Just go slow and listen to your body!
Hello, is it okay to train both the middle and the front split af the same time, or is it too much and would be preferable to work only towards one goal at a time? 🙂
I think it all depends on how much time you are able to dedicate 🙂 Each requires practicing different stretches so if you have the ability to devote that much time that’s definitely okay! Just be careful not to push too far, too fast and have rest days!