

This post may contain affiliate links. Please read our disclosure for more info.
We’ve all been there – your yoga teacher asks you to stay in Downward Dog for 10 deep breaths, and by breath 3, your wrists are screaming at you! You look around the room, and other yogis are not only holding it, but relaxing into it. But all you can think about is how much your wrists hurt!
Wrist pain is extremely common in yoga. So many yoga poses require you to place your hands on the mat, which can lead to tension and strain in your wrists. Whether it’s Plank pose or Handstand, without the proper alignment and body awareness, your wrist pain may, unfortunately, continue to bother you during your practice.
The great news is that wrist pain in yoga is easily fixable! Once you are aware of your weight distribution, alignment, and body engagement, it will be easier to avoid wrist pain. Soon you will be holding your Downward Dog with strength and ease.
Why Do My Wrists Hurt When Doing Yoga?
Whether you are driving, typing, or Netflix and chilling, your wrists spend most of the day in mild extension, which means they are not fully flexed and not fully extended. Your wrists are strongest in the position they spend the most time in (mildly extended), and weaker in the positions they’re not always in.
Because full extension and flexion is common in yoga poses, it is no wonder that you may experience discomfort when in certain positions. When you start a yoga practice or practice a new pose, the tissues, tendons, and ligaments in your wrists are in a different position than they are used to. They are moving and bearing weight beyond their customary semi-extended range and you may feel discomfort or even a dull ache.
This minor pain is a signal to your body. Think of it as saying— “Hey! Help! Please modify or strengthen other areas before proceeding!” Instead of trying to push past it, take a step back, breathe in, and practice in a way that allows your wrists to ease into the full expression of the pose.
How Can I Protect My Wrists So They Don’t Hurt During Yoga?
Body awareness is everything. There are certain sensations in your body to look out for when dealing with wrist pain in yoga. In addition, there are different tips that you can keep in mind when practicing so that you can avoid wrist pain or discomfort.
Engage and activate your hands and fingers: Visualize the middle of the palm of your hand lifting off the mat, almost as if you are tenting up on your fingertips. Spread your fingers wide on your mat and feel yourself grounded with your hands. Activate the outer edges and four corners of your palm and your finger-pads.
Use your core: Arm balances like Crow pose or Handstand can look as though all the strength is coming from your upper body. If you visualize the energy coming only from your hands or upper body, then you will likely dump a lot of weight into your hands and your wrists. Keep your core and entire body engaged in your poses so that you will learn to activate your entire body instead of dumping weight onto your hands and wrists.
Practice on a stable foundation: There’s a reason most yoga mats are on the thin side—thick cushioning causes unstable ground! If you are using a thick mat to protect your knees, considering using a thin yoga mat, and using a folded towel or blanket under your knees instead. Check the floor that is underneath your yoga mat, and stick to harder surfaces instead of sand or grass.
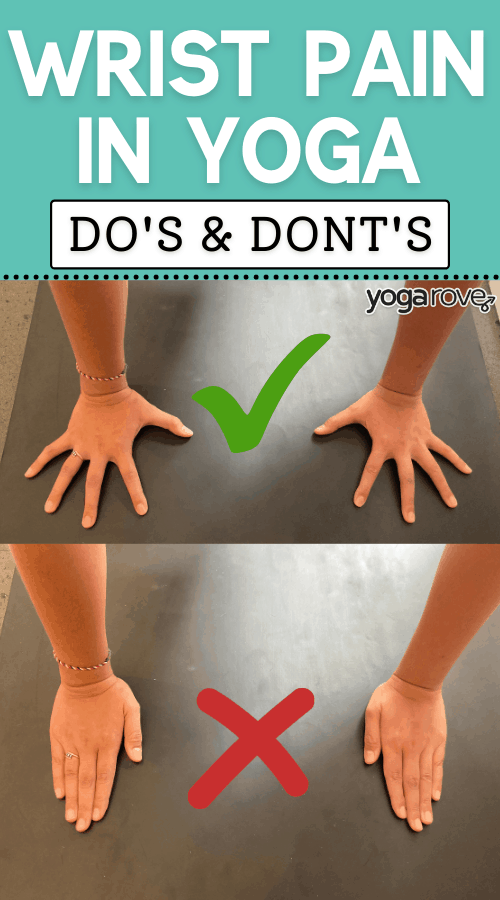
Wrist Pain in Yoga Do’s & Don’ts
If you usually experience some discomfort or pain in your wrists during your yoga practice, take a moment in your pose to check in with yourself. Body awareness is key in yoga, and if there is some pain or discomfort it is usually your body trying to tell you something. If you feel this, back off from your pose, take a breath, and check-in with your body.
Here are some DO’s and DON’T’s to keep in mind while practicing:
- DO press evenly with the heel of your hand and your fingertips. Feel the weight distributed evenly and steadily.
- DON’T place all weight in the heel of your hand.
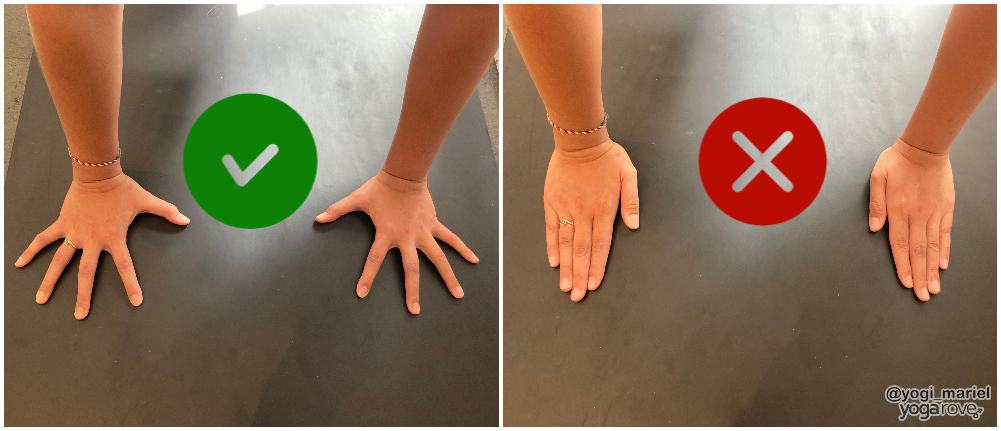
- DO spread your fingertips wide, activate your hands, and press your finger pads down on the mat.
- DON’T keep your fingers close together and inactive.
- DO use your core and your other muscles to support your body.
- DON’T let the weight of your body sink into your wrists.
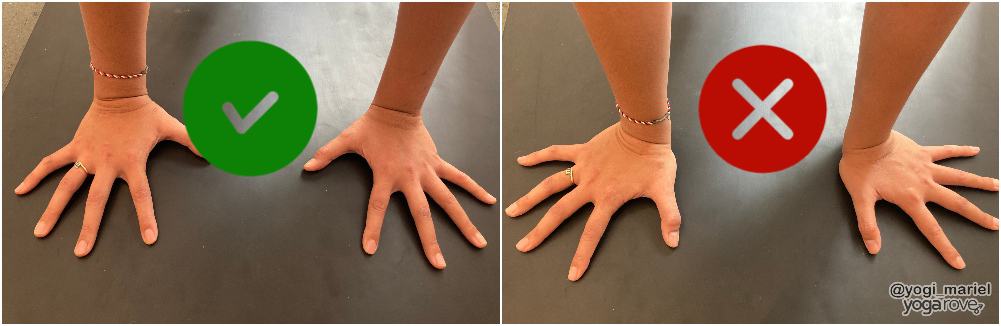
- DO align your wrists properly so that your wrists are in line with the mat and your middle finger points forward.
- DON’T rotate your wrists or point your fingers to the sides of the room.
In addition to these do’s and don’ts, keep the following in mind if you are in a pose and you begin to feel wrist pain:
- Activate your core in your postures by pulling your belly button into toward your spine
- Engage your hamstrings and glutes to lift the weight of your legs upward
- Engage your biceps and triceps to activate your arms and promote even weight distribution
- Visualize your biceps rotating outward and your triceps rotating inward. The counteracting direction will allow both muscles to activate and align
- Glide your shoulder blades away from ears to promote proper alignment and less weight on your wrists
Wrist Strengthening Exercises
In addition to mindfully practicing yoga poses with proper alignment and form, there are a few non-yoga exercises you can do to strengthen your wrists. These exercises not only help strengthen your wrists for your yoga practice, but they also help ease wrist pain from typing, writing, or scrolling through your phone.
Give these exercises a try a few times a week. However, if your wrists are already in pain or inflamed, give yourself a few days of rest before you attempt to try them out. It’s a good idea to talk to your doctor if you have wrist pain that will not go away.
Wrist Curls
Similar to bicep curls this exercise is done with very light weights. Work with 1-2 pound weights, or even a water bottle if those weights feel too heavy.
- Begin seated in a chair with a weight in each hand.
- Place your forearms and elbows directly on top of your thighs with your hands hanging over the edge of each knee and your palms facing down.
- Keep your palms facing downward.
- Curl your wrists upward.
- Pause for 1-2 seconds, and release back down.
- Make sure that only your wrist and hands move. Keep your forearms completely still on top of your thigh.
- Repeat 8 times.
- Flip your hands so the palms face upward and repeat 8 times in this direction.
Ball Squeezes
This works best with a semi-soft stress ball or even a dog toy! There are a two variations to this exercise, so give each one a try to see which feels best in your body.

- Crab Squeeze: Keep all your fingers tightly together except for your thumb, as if you were making a claw. Squeeze the ball between your “claw.” Squeeze for 2 seconds and release for 2 seconds. Do 3 sets of 8 repetitions.
- 3-Finger Squeeze: This is similar to the crab squeeze, however, you keep two fingers together and squeeze the ball with those two fingers and your thumb.
-
-
- First set: Take your pointer and middle finger together and squeeze the ball between the pointer/middle finger and your thumb.
- Second set: Take your middle and ring finger together and squeeze the ball between the middle/ring finger and your thumb.
- Third set: Take your ring and pinkie finger together and squeeze the ball between the ring/pinkie finger and your thumb.
-
-
Yoga for Carpal Tunnel Syndrome
Are you at a computer or desk all day? If so, you have likely heard about Carpal Tunnel Syndrome. You have 9 flexor tendons in each hand that connect through the carpal tunnel. The carpal tunnel houses the median nerve, the main nerve connecting the hand to the wrist to the forearm. Overuse can cause the flexor tendons to swell and the pressure on the median nerve can cause pain, tingling, and numbness.
Carpal Tunnel Syndrome usually brings about tenderness or inflammation in your wrists, hands, or forearms. Luckily, yoga is one of the recommended activities to do as it can help to ease your symptoms. As long as you’ve been cleared by your doctor, you absolutely can still practice yoga. Be mindful about incorporating few wrist-friendly modifications in your practice.
Yoga Poses with Modifications for the Wrists
Modifying yoga poses because of wrist pain is super easy. Props will become your new best friend in your yoga practice and can help you practice seamlessly and with no pain.
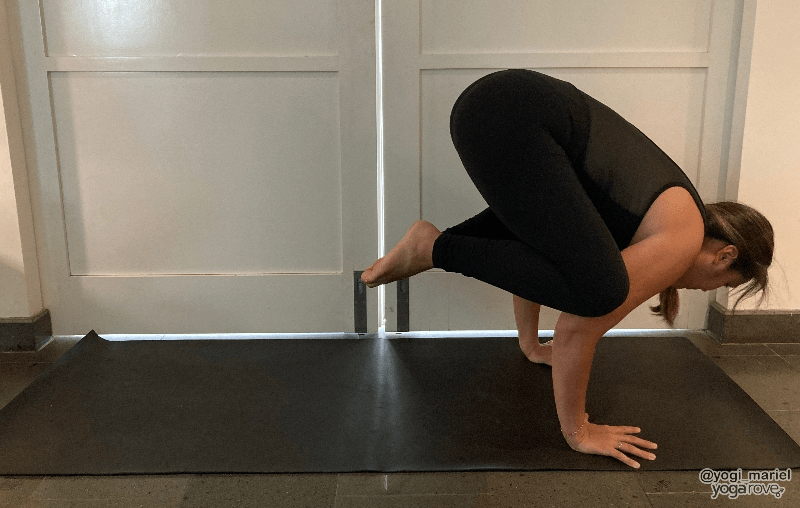
Use a Wall or a Chair
Any pose that has the palms pressing into the mat, such as Downward Facing Dog or Plank pose, can be practiced either on the wall or a chair. Practicing on the wall is the lightest variation – the only weight that you’ll bear onto your wrists is minimal and can be easily controlled by you.
A chair introduces a bit more weight into your hands. To modify with a chair, use a solid (not cushioned) chair that will not move. It’s best to lean the chair against the wall for even more support.
Here are some poses you can practice with a wall or a chair:
- Downward Dog
- Plank
- Chaturanga
- Upward Dog
- Cobra
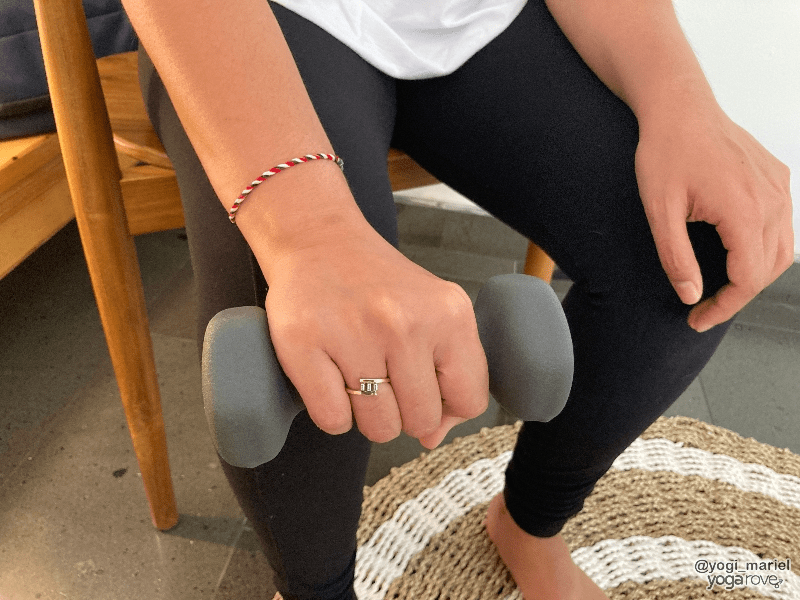
Use Light Weights or Dumbbells
Weights or dumbbells can help you to align wrists and lessen the weight on your wrists. In Plank and Side Plank, you can grip square-sided dumbbells instead of placing the palms on the mat. This grip will keep your wrists in the mid-extended alignment that they are used to. This can help to prevent stress on the median nerve. Make fists in poses that would usually require your palms on the mat like as Cat/Cow or Tabletop.
Use a Folded Mat or Towel
This can lessen the angle of your wrist and spread out the weight load to the full span of your hand. Use your mat or a towel to modify by folding it 1 to 2 times over at the very edge. When your palms are flat on the mat in your pose, keep your fingertips off the mat and the heel of your hand on the cushioned, folded-over part. Ideally, the height of this cushioning is 1-3 centimeters, but no more.
Practice on Your Elbows
Take the stress and weight off of your wrists by practicing certain poses on your elbows and forearms. Practicing this variation can be much more comfortable and you still get the full benefits of the posture.
Poses that can be practiced on your forearms include:
- Plank
- Side Plank
- Cobra
- Downward Dog
How to Warm-up Your Wrists
Another cause of wrist pain is not properly preparing your muscles, ligaments, and tendons prior to bearing weight and entering full flexion/extension. Before you practice, make sure that your wrists are properly warmed up. You can try these exercises on your way to class, or while you are waiting for class to start.
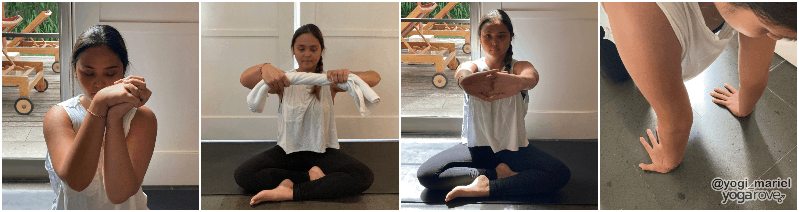
Figure-8’s
In this exercise, focus on moving only to your wrists instead of your entire arm.
- Clasp your hands together.
- Draw figure 8 sideways, keeping the palms pressed together.
- After 8 repetitions, switch your clasp to have your non-dominant thumb on top.
- Repeat 8 times.
Towel Wringing
You can also use a sweater, blanket, or any fabric item you have nearby. Grab your yoga towel before class to warm up your wrists.
- Hold each end of the towel with each hand.
- Wring the towel in one direction 8 times.
- Repeat in the other direction 8 times.
Interlaced Fingers
This juicy stretch feels great in the entire body. Make sure to keep your shoulders and neck relaxed.
- Extend your arms in front of you in line with your shoulders.
- Interlace your fingers as if you were going to cradle the back of your head
- Turn your hands to face your palms away from you.
- Extend your arms and try to keep your palms in one straight line perpendicular to your arms. not allowing the finger-pads to extend forward.
- Relax your shoulders and your neck and stay for a few breaths.
Backward Wrist Extension in Tabletop
In Tabletop, we usually practice with the fingertips pointing to the front of the room. Try this variation to stretch and open up your wrists.
- Start on your hands and your knees in a Tabletop position.
- Check that your hands are under your shoulders and your knees are under your hips.
- Instead of keeping your fingertips pointing to the front of the room, begin to move the fingertips to point to the sides of the room or the back of the room.
- If it is too intense to point the fingertips toward your knees or the back of the room, keep them pointing to the left and right sides of the room.
- Shift your weight forward and backward into your hands to feel the stretch.
- Stay here for a few breaths, or practice a few rounds of Cat/Cow.
Can I Still Practice Yoga If I Have a Wrist Injury?
Having a wrist injury can be frustrating. There may be certain poses that cause pain in your body, or some poses that you have to skip during practice. However, the journey of yoga is to learn about yourself and the world around you.
Often, injuries can lead you to great discoveries. You can find new ways of practicing, find new opportunities to strengthen other muscles, and greater self-awareness. That being said, you can absolutely practice yoga if you have a wrist injury, but keep the following in mind:
- Know your body: Wrist pain and wrist injury are not the same. If you have a sprained, strained, or broken wrist, rest it completely before jumping straight into your practice.
- Be mindful of pain: Pain is a message that your body is giving you that you may have gone too far. Be sure to take it easy and listen to your body when you practice. Don’t force yourself to be anywhere.
- Modify your poses: Modifications can make your yoga practice so much more enjoyable. Use a wall, practice on your forearms, or roll up your mat for extra comfort.
- Practice standing poses: There are so many yoga poses that do not require you to put any weight on your hands and wrists. Feel free to skip certain poses all tighter and focus on a standing yoga practice such as Warrior 1, Tree pose, and Triangle pose.
A wrist injury doesn’t mean that you need to stop practicing yoga. In fact, there are many poses that can help alleviate your wrist pain. Try a few of those poses, modify what you need to, and make props your new best friend. Ease and comfort are a must during your yoga practice and both can definitely be found even despite wrist pain.
Mariel is a writer and NYC-based yoga teacher. She has been teaching for a decade and is a life-long student of the ancient practice.

Enjoyed this comprehensive article. I will definitely benefit from the information shared.
Thank you
Glad you found it helpful Sue!
Excellent advice!
I am currently dealing with Proximal (or Chronic High) Hamstring Tendinopathy, also commonly a called yoga butt. I am doing physical therapy to strengthen my hamstrings. Stretching the hamstrings is not good.
Do you have any experience or information that would be be helpful?
Thanks, Susan
Yes definitely strengthening the hamstrings is a good idea! That’s great you are doing physical therapy for it 🙂 The only other things I would recommend are avoiding poses that you feel caused the injury and being mindful not to overstretch. A great pose to add in to help activate your glutes and hamstrings is Bridge Pose. You can place a block between your legs and squeeze while lifting to help you strengthen your mind-muscle connection of activating the glutes. Hope that helps!
My wrists were bothering me from a summer of mountain biking, kayaking and yoga. I was looking for some ways to strengthen my wrists and this article provides so many great tips. Thanks!
Glad you enjoyed it Barb!
Great article. Very helpful. I not only do yoga and cycling but I also bowl. The wrist exercises are great for strengthening my wrist to be able to move up to the next weight level bowling ball. Keep up the great articles.
Glad you enjoyed it Laura! Ah yes definitely important to care for the wrists if you bowl!
Thanks so much Ali and Victor for a great memo. I have been diagnosed with mild Carpal Tunnel so these tips are great advice. xx PS Loving the Yoga Pages!!
Happy you enjoyed the tips Sophie 🙂 And so glad to hear you’re enjoying Yoga Pages!!