This post may contain affiliate links. Please read our disclosure for more info.
When first getting introduced to the world of yoga, it can be quite overwhelming.
There are so many poses (there’s over two THOUSAND according to Daniel Lacerda’s book 2,100 Asanas), so needless to say, it can be difficult figuring out where to start.
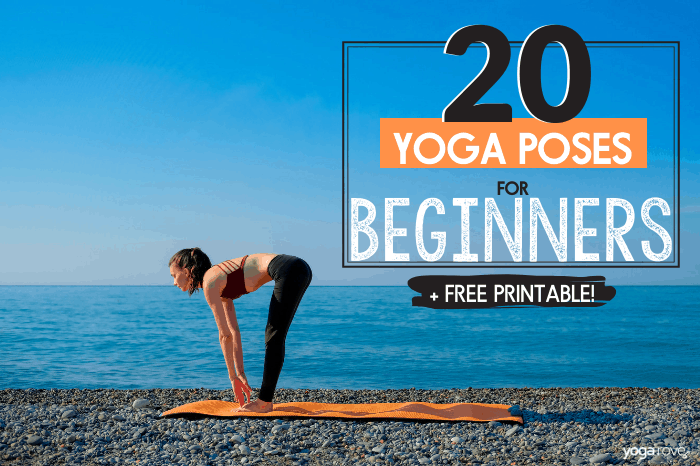
That is why today we wanted to write an article on the top 10 yoga poses we feel are the most important to practice on a daily basis, regardless of what level yogi you are.
We have linked tutorial videos below to help you get each pose down pat!
But first off, I’m sure many of you that are new to yoga and are skeptical (just as I was) and thinking “why should I even practice yoga”? Well, here are a few science backed reasons, and ones I have personally experienced myself:
- Improved flexibility
- Decreased aches and pains
- Weight Loss
- Faster metabolism
- Increased strength
- Improved mood
- Decreased stress
Regardless of what you’ve heard, yoga is not just stretching. It contains so many more benefits than that, and is a magnificent exercise to implement into your life to reach your goals.
I started yoga originally to decrease stress and relieve pain associated with my nursing job, but then soon realized how great of an exercise it was as well without having to get on a boring cardio machine.
It’s great because it is a low impact exercise, meaning you are not putting stress on your joints like you do with running and jumping, and is actually good for maintaining longevity in common problem areas such as your joints.
Being flexible is pretty much the key to not having pain and maintaining your body. The great thing about yoga is that it combines flexibility with strength, so you are becoming stronger while improving your range of motion as well!
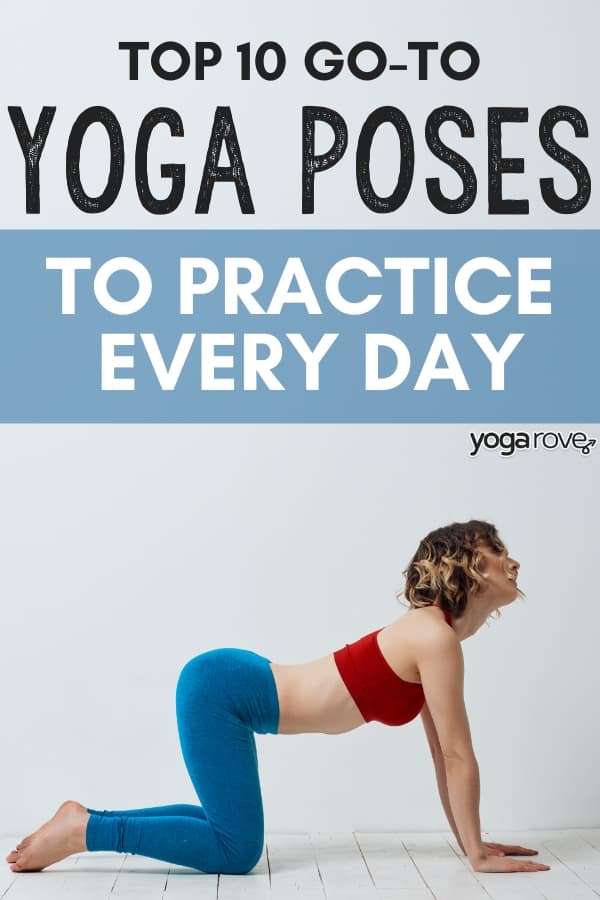
10 Every Day Yoga Poses:
1. Cat-Cow
This is actually two poses, but together they form a nice mini flow thatare great for stretching and warming up your back and neck.
Cow Pose specifically stretches your abdomen, shoulders, and chest, while Cat pose is great for stretching your neck and lower back.
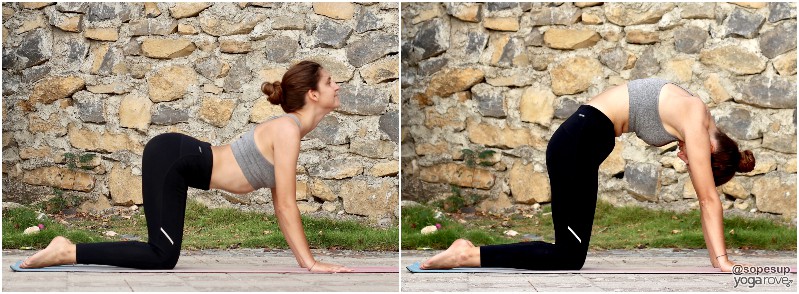
Cow Pose Instructions:
- Start on your hands and knees, with your hands underneath your shoulders and your legs inner hip distance apart. Tuck your toes.
- Inhale as you drop your belly, arch your spine, and lift your gaze upwards.
- Make sure to keep your shoulders away from your ears
- From cow, exhale as you round your back, tuck your tailbone, hollow out your stomach, and drop your gaze downwards.
- Inhale back to cow pose, exhale back to cat pose.
- You can choose to stay in each pose for a few breaths, or you can use your breath to flow back and forth slowly between cat and cow to promote mindfulness.
2. Pigeon
Pigeon Pose is a great pose for releasing tight hips and promoting relaxation. This is a great pose to use props in such as yoga blocks to make sure you are in proper alignment so you can get the full benefits.

Pigeon Pose Instructions:
- Start in Tabletop and then come into Downward Facing Dog as a starting point.
- Inhale as you bring your right leg in towards your chest, then bring it to the front of your mat so your right ankle is behind your left wrist and your knee is behind your right wrist. To lessen the intensity and protect your knee, bring your right foot in closer towards your body.
- Make sure your hips are squared and both facing towards the front of the room and that you are not shifting your weight onto one side. You can place a block under one hip to help even yourself out.
- Lengthen through your spine and graze your fingertips on the ground. If you feel comfortable doing so, you can fold over on your exhale to deepen the stretch and come into a more relaxing variation.
3. Tree
This is the perfect pose to initiate some balance into your life. It is one of the simpler balancing poses, and also reaps the benefits of being a great hip opener. Just be sure to repeat on the other side!
If you are a beginner working on your balance you should have a chair close by you when practice this pose because if you are falling you have a chair to help you. Remember to take it slow and with enough practice you will get better!
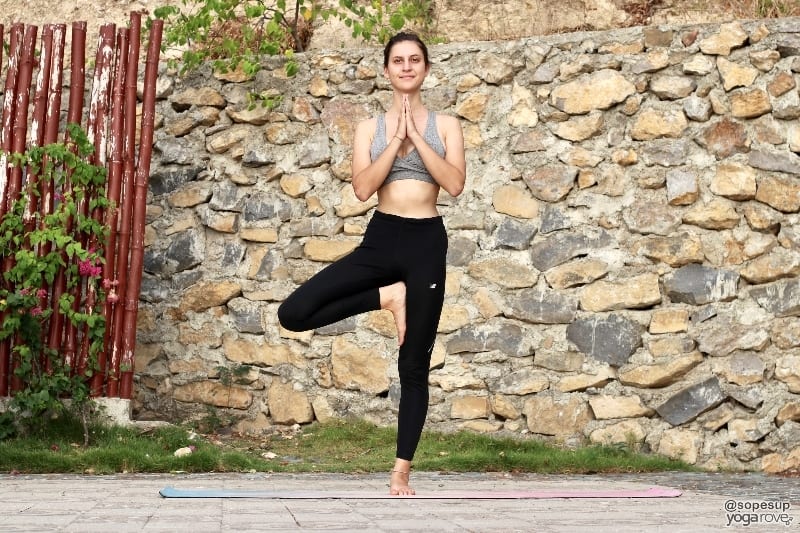
Tree Pose Instructions:
- Start in Mountain Pose, or standing pose.
- Begin to shift the weight into your left foot, then slowly begin to peel your right foot off the ground, so that it is hovering the floor.
- Bend your right leg as you bring your knee up into your chest, then slowly open it out to the side and allow it to rest on your inner thigh.
- It’s okay if you can’t get it to rest on your thigh, you can rest it on your shin or ankle as well, as long as you are still feeling the challenge of maintaining your balance.
- Bring your hands together at your heart, or you can bring them up overhead. Bringing them overhead will make it more challenging.
- Engage your core and lift through your chest to maintain alignment, and ground through your left foot.
- It may help to find a “dristi” which is a stationary area or item you focus on to help you maintain balance.
- Slowly bring your right foot down to the floor and begin the same process on the other side of your body.
4. Standing Forward Fold (Uttanasana)
There are tons of forward folds in yoga, and tons of inversion poses as well (going upside down). Standing Forward Fold combines the benefits of both!
It is a great pose to release tension in your neck, shoulders, and lower back, and is a great way to improve the flexibility of your hamstrings.
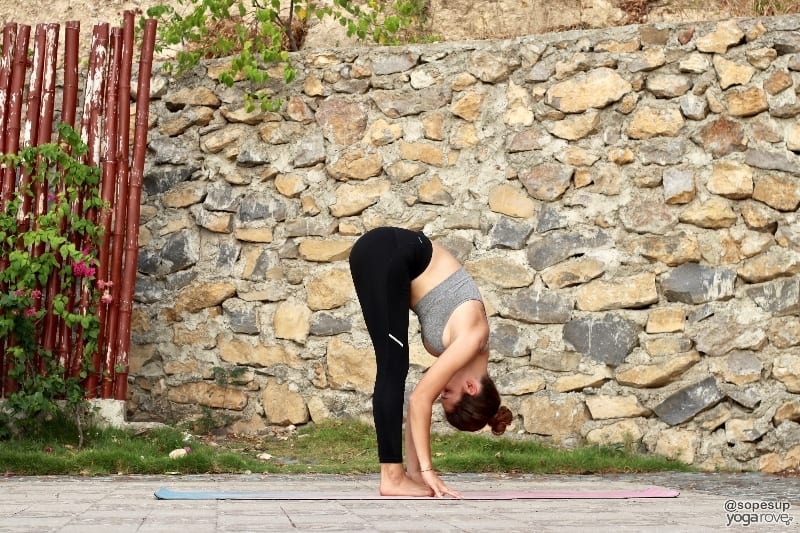
Forward Fold Pose Instructions:
- Start in a standing pose, and place your hands on your hips. Make sure your back is straight.
- Exhale and slowly start to hinge forward, keeping a straight back and lengthen the front of your torso.
- When you get to as far as is comfortable for you, drop your hands and reach for the ground or your ankles. Blocks are very beneficial to use in this pose when first starting out to provide you support.
- Release tension in your neck by rocking in back and forth, then side to side.
- Every time you exhale sink deeper into the pose
- Hold the pose for 5 breaths.
- To get out of the pose bring your hands back on your hips and your elbows behind you. Slowly start to bring yourself back into starting position while maintaining a flat back. Repeat this process around 3 to 5 times for the full effect.
5. Downward Facing Dog (Adho Much Svanasana)
The all famous Downward Facing Dog. This is probably one of the most well known poses in the western world, and is one of the most used foundational poses in sequences. Getting this pose right is definitely essential.
It is a great strengthening pose for your arms and abs, and gives your hamstrings and shoulders a nice stretch. As a beginner you will quickly find out that downward facing dog is a lot harder than you expected. With enough practice this pose will soon feel like a rest pose. For my journey it took almost 3 months practicing 50 minutes a week to build up my strength.
Each of us are on a different path and the goal is to enjoy the journey. The more fun you have the more you will grow and gain more benefits than you ever imagined.
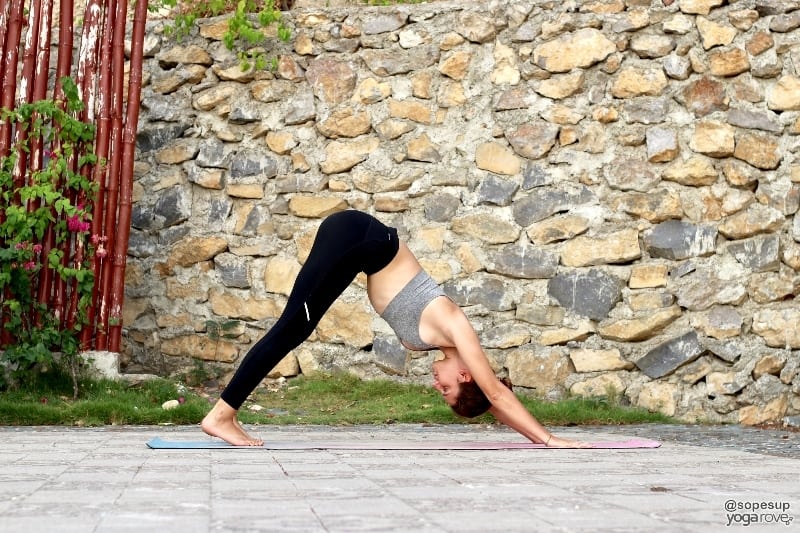
Downward Facing Dog Pose Instructions:
- Get on your hands and knees. Make sure your hands are slightly in front of your shoulders and your knees are aligned with your hips. Keep your fingers wide apart and your toes curled under.
- Exhale and life your knees off the ground and create a “V” shape with your body.
- Straighten your arms and roll the inner parts of your elbow forward.
- Keep your gaze in between your feet or at your naval.
- Press your heels toward the mat. Every time I first get into this pose I love to peddle out my feet. This helps me warm up my hamstrings and calves.
- If its more comfortable to keep your knees to be slightly bent and your heels off the ground hold that position. The goal is to feel sensation, not to cause pain.
6. Crescent Lunge
This is another commonly used pose in yoga sequences. It builds strength in your legs, and is a great hip opener for those of you with tight hips.
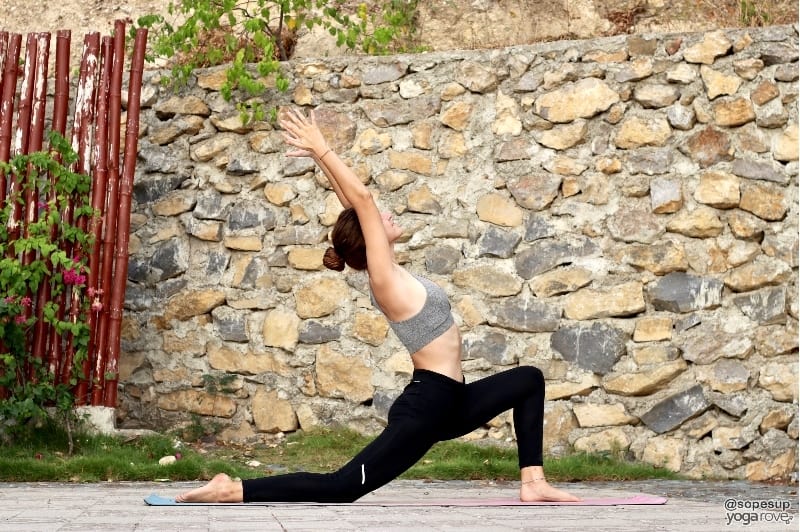
Crescent Lunge Instructions:
- Start in in Tabletop, the bring your left foot forward to come in between your hands.
- Step it forward enough so your leg forms a 90 degree angel and your back leg is in extension. Your knee should be directly over your ankle.
- You can place your hands on your front thigh to help yourself get a deeper hip stretch, or choose to inhale as you reach your arms up overhead to come into a mild backbend.
7. Warrior II (Virabhadrasana II)
This is the second of the warrior pose family, and is a great pose to build stamina and concentration.
Your body is completely open to one side of the room, you are bending through your front leg, and engaging your entire body.
You will build strength and improve your focus if you practice this pose every day!
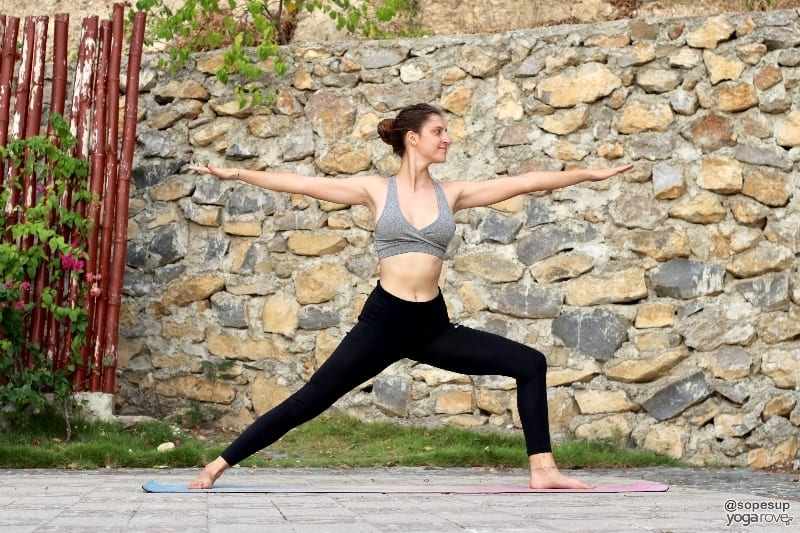
Warrior 2 Pose Instructions:
- Start off in mountain pose with your feet hips distance apart and your palms facing forward.
- Exhale and bring your right foot back around 4 feet and have your toes pointed at a 45 degree
- Keep your toes of your left foot facing forward and make sure your left and right heel are aligned.
- Reach your arms out to the side with your palms facing downward.
- Slowly bend your left knee over your left ankle.
- Make sure your torso doesn’t lean over your thighs and keep the shoulders directly over the pelvis. Face your head forward looking over your fingers.
8. Plank (Kumbhakasana)
Plank is a very well known pose in the yoga world and the fitness world in general.
People often say planks are one of the single best exercises you could perform to build core strength.
If you get this pose down and can comfortably stay here with good alignment, you are doing wonders for your body.
Plank strengthens your core, your shoulders, and legs, and is a great pose to build stamina and patience. Try increasing the amount of time you hold it each time!
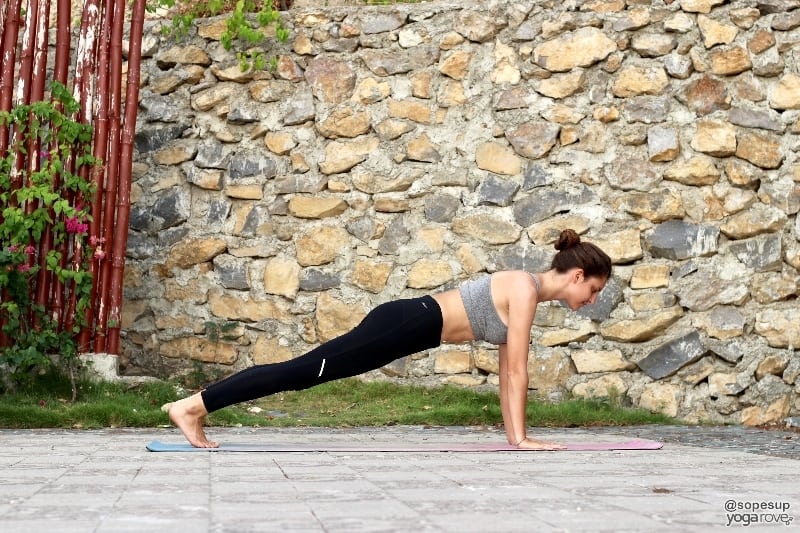
Plank Pose Instructions:
- Start in table top pose with your hands and knees on the ground. Make sure your hands are aligned with your shoulders and your knees with your hips.
- Bring one foot back at a time as if you are about to do a push up.
- Keep you tail bone tucked in and engage your core
- Make sure your shoulders aren’t near your ears and your elbows are drawn inward.
- Maintain a straight back.
- Hold this pose for 5 breaths
9. Seated Spinal Twist
Twists are great for your spine, and are actually great and releasing stress and tension from your body.
Doing Seated Spinal Twist is also a great way to consciously improve your posture, as you need to maintain a straight back throughout this pose.
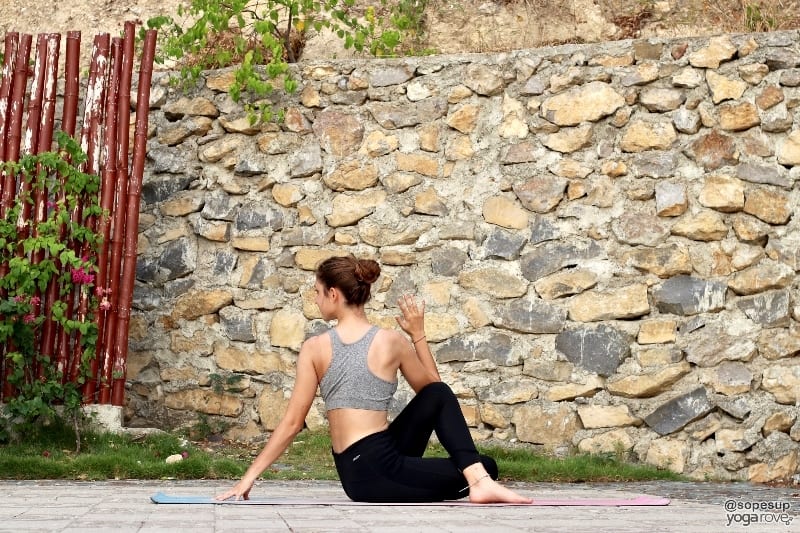
Seated Spinal Twist Instructions:
- Seated on your mat with your legs extended outward and your palms faced down on the ground (Seated Staff Pose)
- Bend your right knee and cross it over. Make sure your right foot is planted on the floor next to your left thigh.
- Bend your left leg and place your foot next to your right glute.
- Put your right hand behind your right glutei and twist gently towards your right side.
- Bring your left elbow toward your bent right knee and on the exhale go deeper into the twist.
- Hold here for 5 breaths. Lengthen on the inhale and go deeper into the twist on the exhale. Follow your breath and relax into the pose.
10. Corpse
This may not look like much of a “pose” but I truly think it is one of the most important ones to learn and the one that is the most beneficial to your body.
This is a resting pose, and the point here is to integrate the mind with the body.
You don’t need to be an active meditator or super zen yogi to practice this pose!
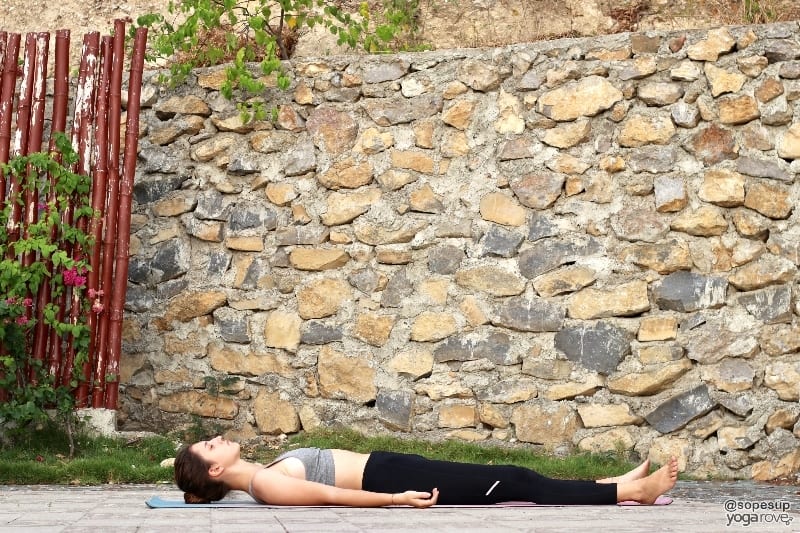
Corpse Pose Instructions:
- Lie down on your back.
- Spreed your feet and flop them open.
- With your palms facing up bring your arms out to the side
- Close your eyes and focus on your breath. The goal is to rest your entire body and help it restore after a long practice.
There you have it, guys! The top 10 go-to yoga poses to practice everyday. So if you are a new yogi and overwhelmed where to begin, these poses are a great place to start.
If you’d like more simple yoga routines you can do at home, go sign up for our FREE Yoga Resource Library here.

Ally is a Registered Nurse, Registered Yoga Teacher, and Co-Founder of Yoga Rove with her husband Victor. She first started yoga over 7 years ago when she started her nursing career to combat the physical and mental strain, and now loves to teach and help others.