

This post may contain affiliate links. Please read our disclosure for more info.
Hearing the cue of “let’s hold plank pose” in class can sometimes illicit a silent moan during your yoga practice. A strong, yet challenging posture, plank pose is a staple in vinyasa and hatha yoga classes. This posture can be a challenge to stay in, yet it holds so many benefits.
Practicing plank pose builds strength in the body and while it can be challenging at first, once you build up the muscular strength it can help you feel stronger in your entire practice. Plank can be modified according to your body and your needs and there is a variation for everyone. If you are looking to venture into arm balances and inversions, plank pose is the posture to master first.
Benefits of Plank Pose
Plank pose is a dynamic posture that is often found in HIIT workouts and exercise warm-ups. A strong posture, plank pose:
- Strengthens the muscles in your shoulders, forearms, wrists, and upper arms
- Improves your focus
- Strengthens your abdominal and back muscles
- Tones and strengthens your core
- Lengthens your spine
- Improves your overall stamina
- Strengthens and energizes your entire body
Warming Up for Plank Pose
Plank pose is a great warm-up for arm balances and inversions. However, it is also important to warm up before practicing your plank pose. Warming up your wrists, spine, and upper and lower body is a good idea before coming into your plank.
Wrist Movements
A nice wrist stretch can go a long way in your plank pose.
- Before coming into your plank, sit in a comfortable seated position.
- Make fists with your hands and begin to make circular movements with your wrists.
- First move clockwise for 3-5 rounds, and then switch to counterclockwise.
Cat/Cow
Open your entire body and connect to your breath with Cat/Cow.
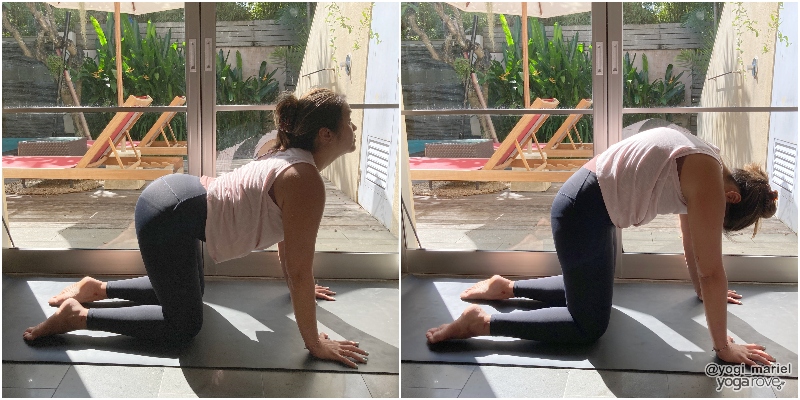
To practice Cat/Cow:
- Start on your hands and your knees with your hands under your shoulders and your knees under your hips.
- Check that your fingers are spread wide and that the heels of your hands are rooting down to the mat.
- On your inhale, arch your back and look up, lifting your chin away from your chest.
- On your exhale, round your spine, tuck your chin to your chest, and draw your belly in.
- Repeat 5 rounds and move with your breath.
Downward Facing Dog
This pose opens up your entire body and is a great warm-up to plank pose.
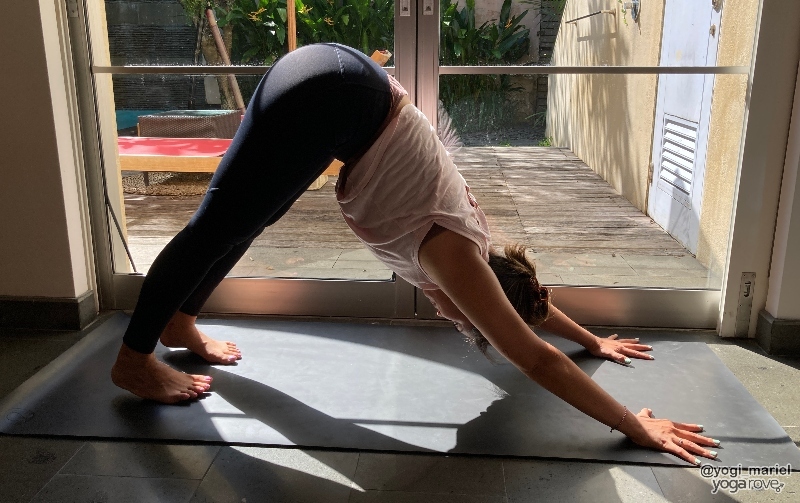
To practice Downward Dog:
- From your hands and knees, walk your hands slightly forward to the top of your mat.
- Curl your toes under and lift your knees off the mat and your hips up toward the ceiling.
- Spread your fingers wide, push the mat away from you, and feel your sit bones and hips lift up toward the sky.
- Bend your knees if you need to, otherwise, you can straighten your legs and root your heels down to the floor.
- Relax your head and your gaze as you keep pushing the mat away from you and lengthening your spine.
How to Practice Plank Pose
Plank pose can feel pretty intense if you are new to the posture. Move slowly and patiently, and be mindful of your body in the pose.
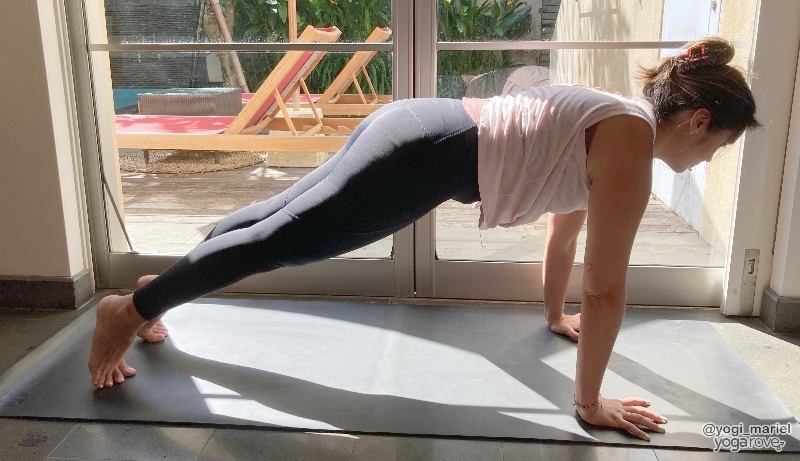
To practice Plank pose:
- Start on your hands and your knees with your hands under your shoulders and your knees under your hips.
- Spread your fingers wide on the mat and make sure that your hands are right underneath your shoulders
- Lift one knee up and straighten your leg back behind you. Do the same with the other leg.
- Stay on the balls of your feet and straighten both of your legs.
- Lift up through the backs of your knees and fire up your leg muscles.
- Draw your belly in and feel your belly button draw in toward your spine.
- Engage your core and keep your abs tight.
- Keep your hands under your shoulders and feel your shoulder blades squeeze slightly down your back.
- Scoop your tailbone slightly under.
- Look a few inches in front of you but make sure to keep the back of your neck long.
- Keep pushing the mat away from you while keeping your entire body strong.
- Stay for 5 deep breaths.
Common Misalignments
It is super important to have the proper alignment in plank pose. This can allow you greater ease while in the posture and can keep your body safe from injury. Some common misalignments include:
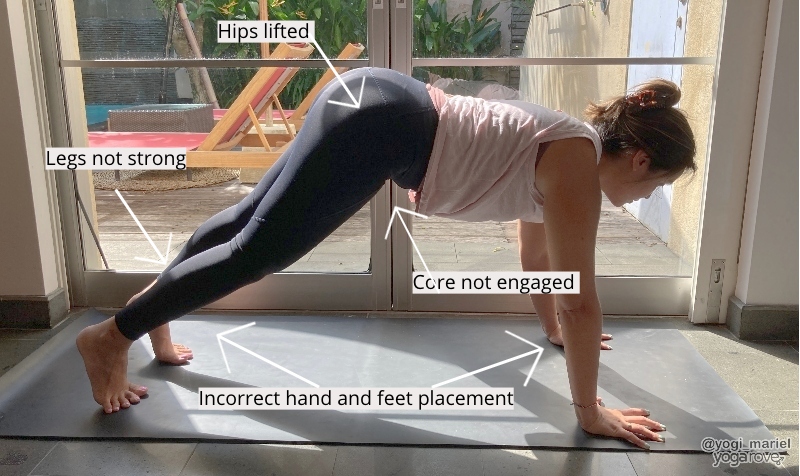
- Hand and feet placement: It is important to keep your hands under your shoulders with your fingers spread wide on the mat. Sometimes yogis may place their hands too far forward, causing the arms to be at an angle and the shoulders to come up toward the ears. Other times, they may be too far behind you, causing your shoulders to go over your wrists. Keep your feet hips-width distance and legs strong. To keep your arms straight and your upper body strong, make sure to keep your hands right under your shoulders.
- Hips lifting up: Because it is easier to keep your hips up in an almost Downward Facing Dog type of pose, some yogis lift their hips up to high if it is challenging to stay in plank. If you are practicing with a mirror, make sure that you can’t see your hips lifting up. Keep your body in a straight line, draw your belly in to engage your core, and engage your legs.
- Collapsing the body: Plank is a pose that can be challenging if you have not built up the strength in your body. The more that you practice, the easier that it will be and the more strength you will build. When practicing plank, it is important to keep your core strong and your spine long. If you are still building up your strength, practice plank with your knees down to avoid collapsing your body.
Modifications
It is always a great idea to modify poses that you don’t feel 100% comfortable in. Take your time to build up your strength and be sure to be very specific with your alignment.
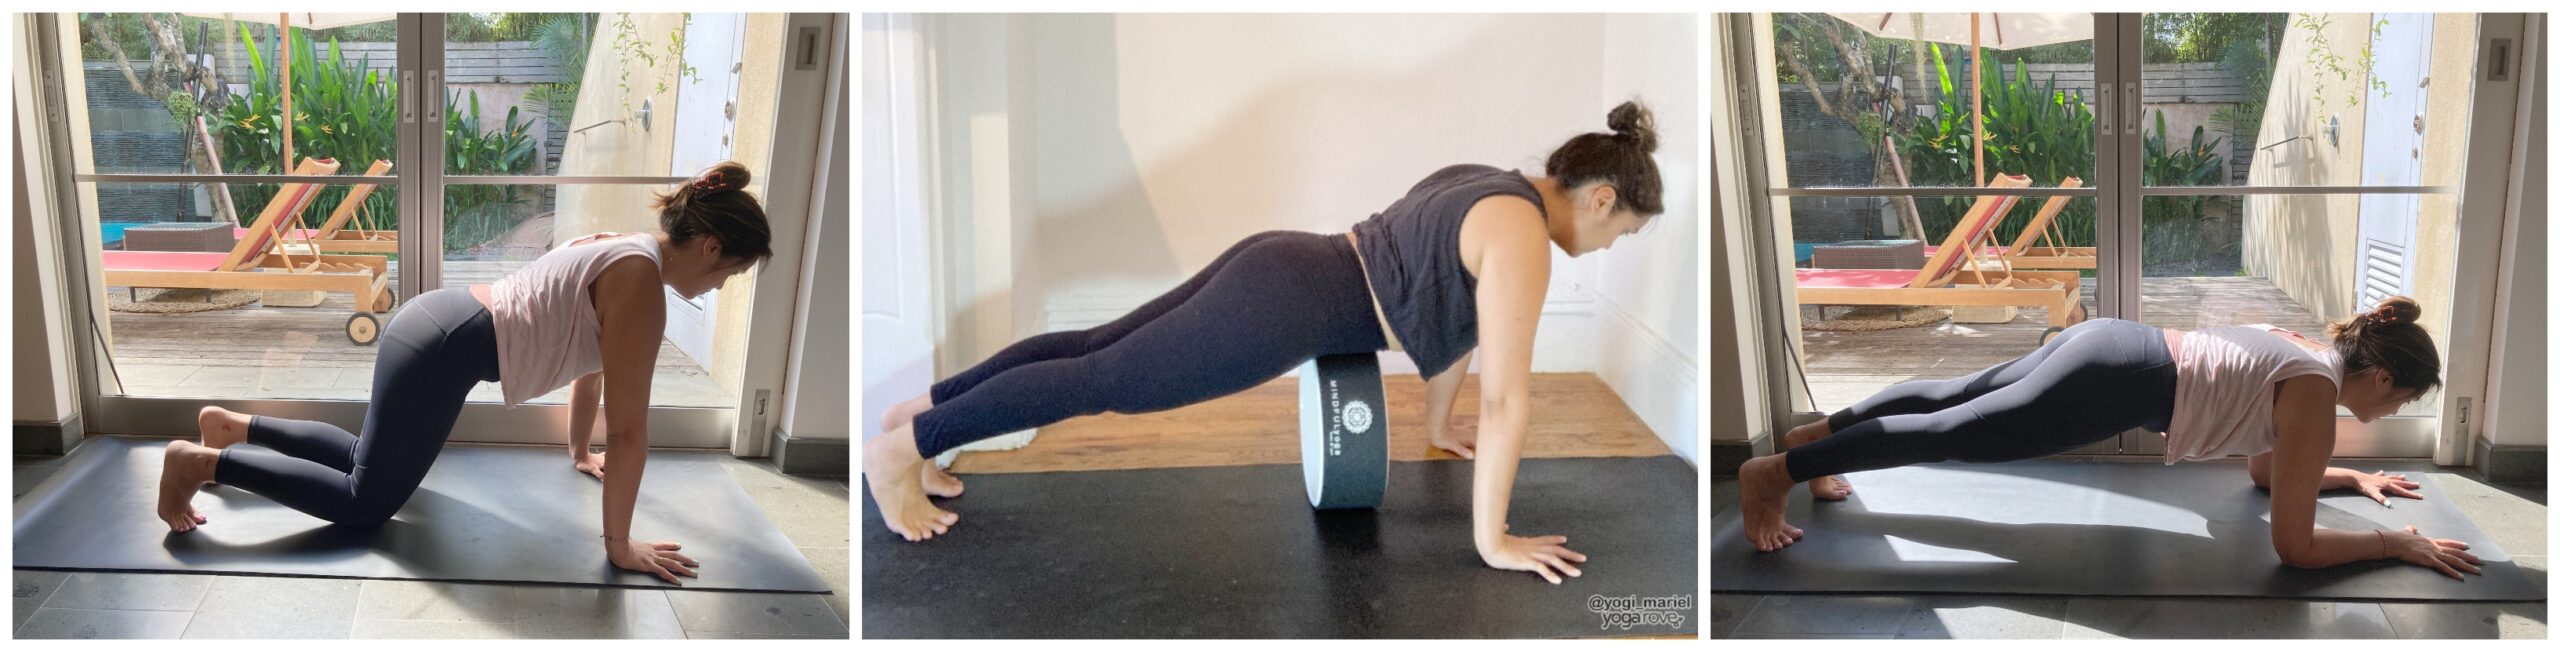
Place your knees on the mat: If you are building up your core and body strength, practice plank with your knees on the mat. Come into your plank pose and check your alignment. Keeping your body in the correct alignment for plank, drop your knees down on the mat. Keep your core tight and push the mat away from you. Focus on connecting to your core, lower body, and upper body strength with your knees down. You will begin to build strength in your muscles and eventually lift your knees off the mat.
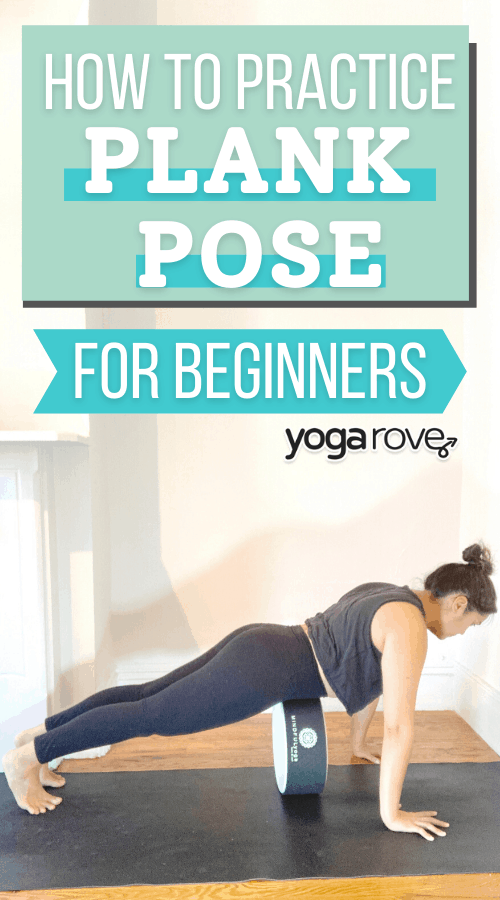
Use blocks or a yoga wheel: Support your body weight by stacking a few blocks or using a yoga wheel underneath your belly or chest. Before coming into your plank pose, set up your blocks where you need the support. Come into plank and use the blocks to support your body.
Forearm plank: If you have wrist issues or pain, you can practice forearm plank instead of plank pose. Instead of keeping your hands down on the mat, bring your forearms down instead. Check that your elbows are stacked under your shoulders. You can plant your hands on the mat with your fingertips pointing to the top of your mat, or you can interlace your fingers, resting the baby finger side of your hand on the mat.
Tips for Beginners
- Engage your lower body: Engaging your lower body will help you to strengthen the muscles you need to use in your plank pose. It will also lighten your lower body so that it is easier to stay in your plank. Keep your legs strong by staying on the balls of your feet, lifting your heels up toward the ceiling, and lifting up through the back of your knees. Engage your thigh muscles and engage your core by drawing your belly button in toward your spine.
- Be patient: Plank is not an easy pose to practice. Even the most seasoned yogis can find it very challenging so it is important to stay patient while you are on your journey to plank. Listen to your body by modifying or by staying in the pose for a shorter amount of time.
- Use your hands: Spreading your fingers wide on the mat will help you to alleviate any wrist discomfort and will also allow you to push the mat away strongly. With the proper alignment, feel your shoulder blades squeeze down your back as you straighten your arms and push the mat away. This will engage your upper body and help you find the energy that you need in plank.
Variations in Plank Pose
Plank pose can be fun! Try these variations out next time you practice on your mat:
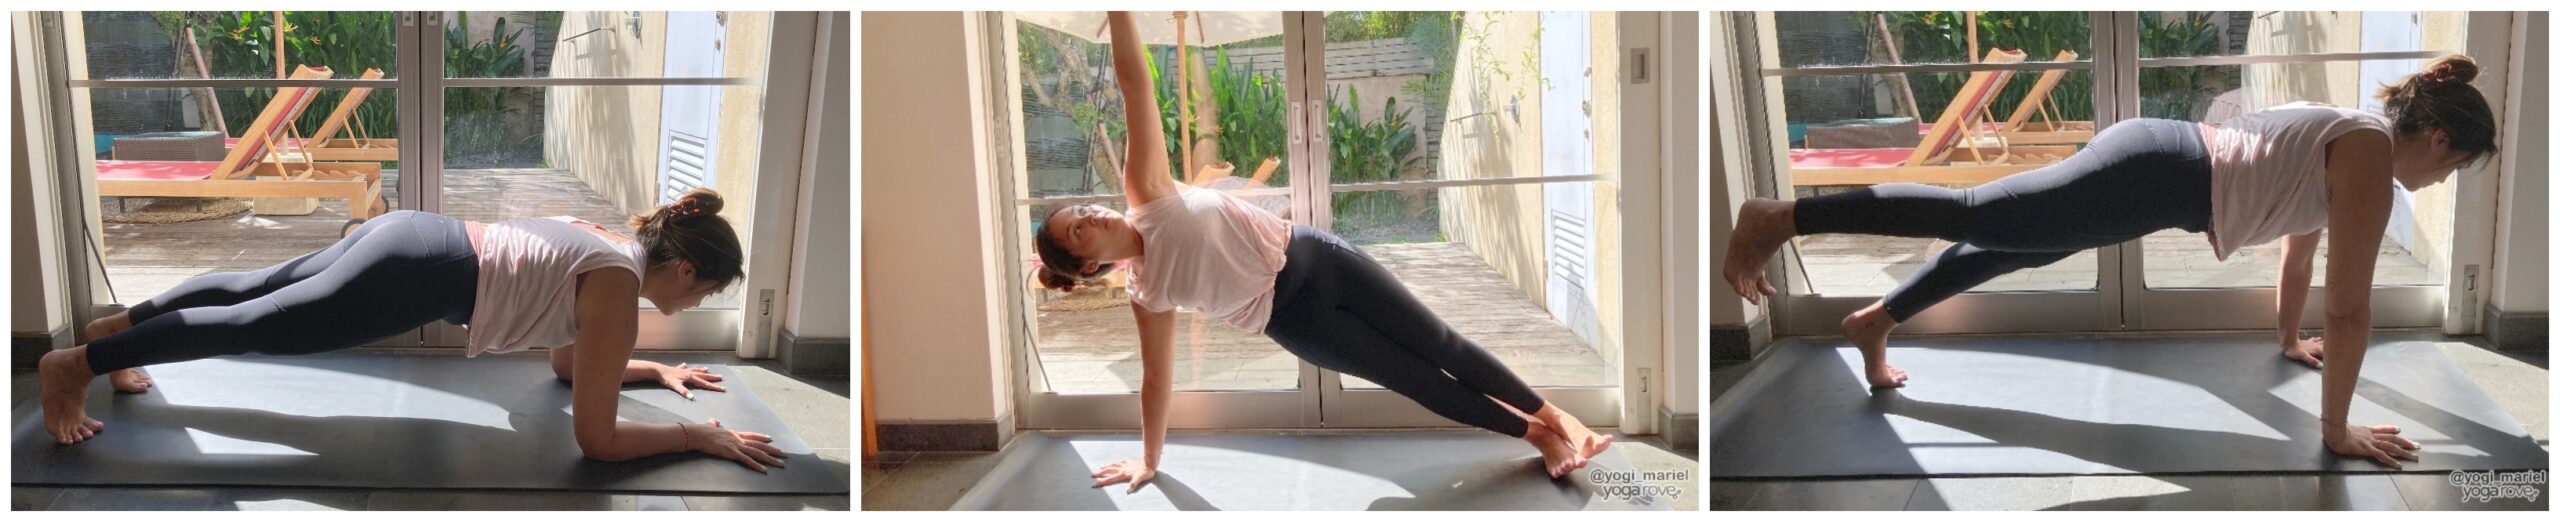
Forearm Plank: Practice plank pose on your forearms instead of your hands. Keep your elbows under your shoulders and either press your palms on the mat or interlace your fingers.
Side Plank: Shift your weight to your right hand and stack your legs on top of each other. Push the mat away with your hand as you lift your hips up and straighten your left arm up toward the ceiling. Stay for 3-5 breaths and repeat on the opposite side.
One-legged Plank: Stay in your plank pose and lift one foot off the mat. You can keep your leg straight with toes flexed, or you can take your knee to your nose while in plank pose. Repeat on the opposite side and take a few rounds of lifting one leg up at a time.
Contraindications
If you have a finger, wrist, or shoulder injury, skip plank pose or take a modified variation. In addition, take caution if you have high or low blood pressure; and if you have Carpal Tunnel Syndrome, it may be better to skip this posture or modify with a Forearm plank.
Plank is a pose where you can physically feel your strength and stability. With so many physical and mental benefits, it is definitely a posture that you should include in your movement practice. Remember to modify if needed, and be patient with yourself as you build up your strength and stamina.
Mariel is a writer and NYC-based yoga teacher. She has been teaching for a decade and is a life-long student of the ancient practice.
Great article thank you. I can do plank however have an aversion to attempting side plank.
Glad you found it helpful Stephanie!