This post may contain affiliate links. Please read our disclosure for more info.
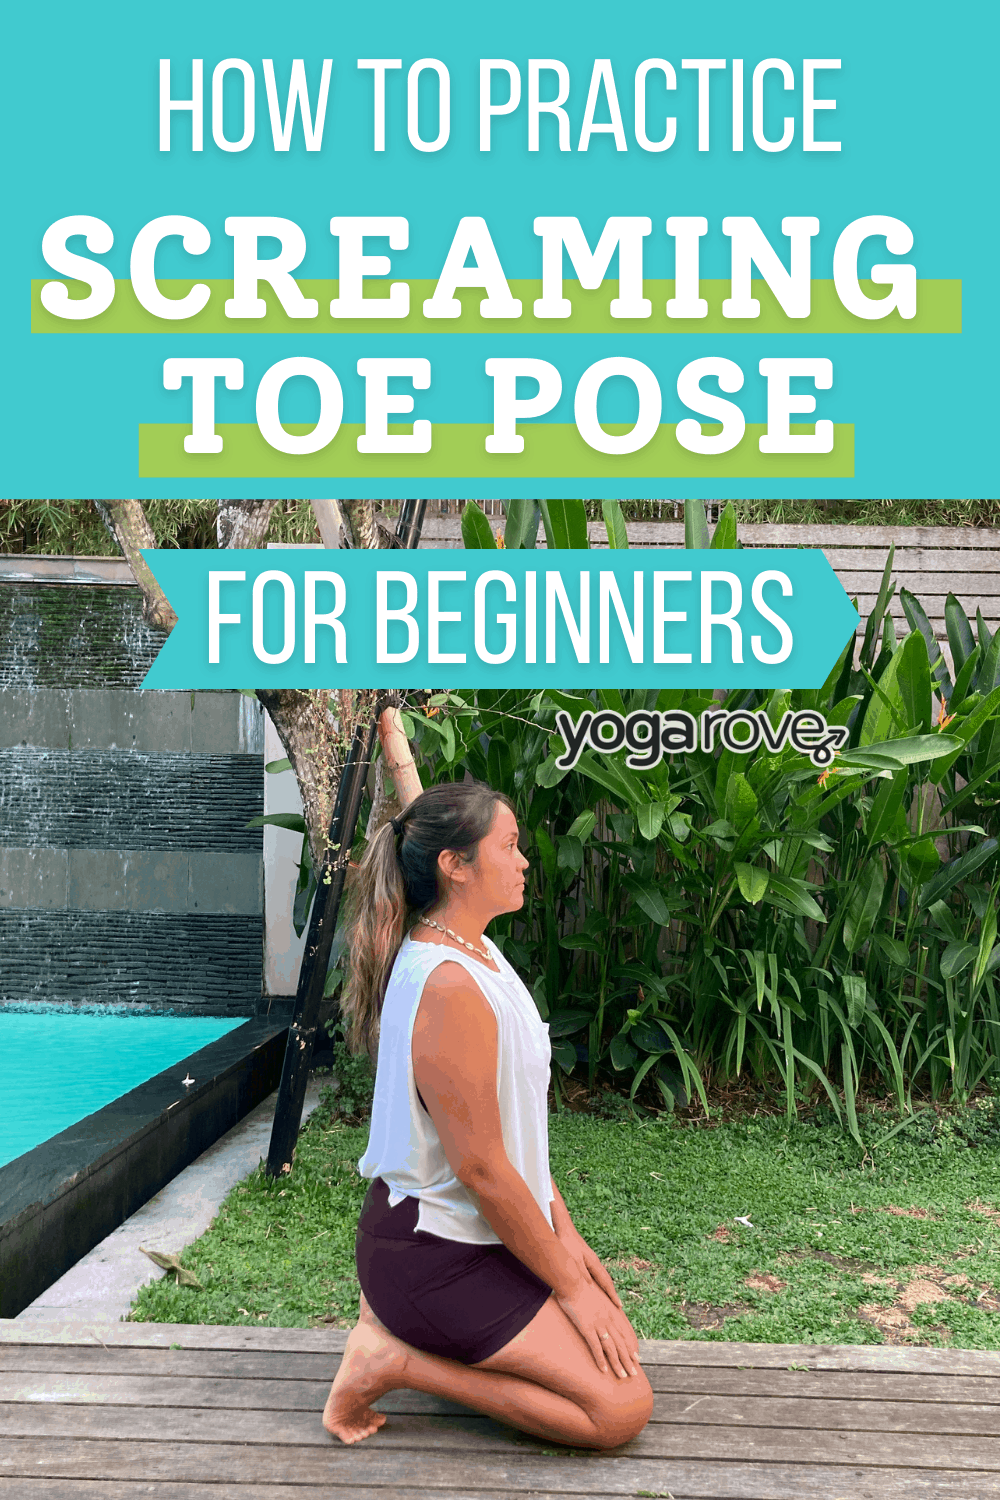
With a name like Screaming Toe pose, this posture does not sound like the most inviting pose to practice. But usually, the poses that we dislike the most are often the poses that we should practice the most! It’s great to practice during your yoga warm-up. This pose is easy to get into, but not so easy to stay in. You can slowly work your way up to stay in the pose for a longer amount of time. It is one of the best postures to open up your ankles, toes, and feet.
 In yoga, we often stretch and open every part of the body during practice. There are classes and poses that are dedicated to opening your hips, shoulders, hamstrings, and chest. But what about opening your feet, toes, and ankles?
 To practice Screaming Toe pose:
 Instead of skipping the posture, try to modify Screaming Toe pose. Try these modifications next time you practice the posture:
Use a prop: Grab a blanket or cushion while practicing this posture. Folding up a blanket or placing a cushion underneath your knees is a great option if you have sensitive knees. If it is uncomfortable to rest your hips on your heels, use a blanket on top of your heels
Don’t stay as long in the pose: If one or two breaths is what you can manage during your practice, that is perfect. Take your time working up to more breaths in this pose. It is completely normal to feel the intensity only after a few breaths. Be patient with yourself and focus on finding a slow and steady rhythm of breath.
Instead of skipping the posture, try to modify Screaming Toe pose. Try these modifications next time you practice the posture:
Use a prop: Grab a blanket or cushion while practicing this posture. Folding up a blanket or placing a cushion underneath your knees is a great option if you have sensitive knees. If it is uncomfortable to rest your hips on your heels, use a blanket on top of your heels
Don’t stay as long in the pose: If one or two breaths is what you can manage during your practice, that is perfect. Take your time working up to more breaths in this pose. It is completely normal to feel the intensity only after a few breaths. Be patient with yourself and focus on finding a slow and steady rhythm of breath.
 Take a mudra for your hands: Usually, your hands rest your hands gently on your lap with palms facing up or down while you are in this posture. However, you can play around with taking a mudra before you rest your hands on your lap.
Intensify the pose: If you want to feel a little more intensity in this posture, you can modify the placement of your knees and your toes. Take your knees slightly more forward and curl your toes under more. You should be able to feel the stretch greatly intensify!
Take a mudra for your hands: Usually, your hands rest your hands gently on your lap with palms facing up or down while you are in this posture. However, you can play around with taking a mudra before you rest your hands on your lap.
Intensify the pose: If you want to feel a little more intensity in this posture, you can modify the placement of your knees and your toes. Take your knees slightly more forward and curl your toes under more. You should be able to feel the stretch greatly intensify!
In yoga, we often stretch and open every part of the body during practice. There are classes and poses that are dedicated to opening your hips, shoulders, hamstrings, and chest. But what about opening your feet, toes, and ankles?
Benefits of Screaming Toe Pose
It is rare that we take time during our practice to solely focus on opening this part of the body. However, there are so many benefits to opening and stretching our toes, ankles, and feet. And luckily, Screaming Toe pose does just that! Here are some benefits of the posture:- Stretches you out: One of the most intense stretches I have felt in a yoga class has been from screaming toe pose, and it is one of the poses that you can feel the benefits in right away. Screaming toe helps to stretch out your ankles, feet, and toes.
- Releases Tension We often don’t realize that we carry tension in our toes and ankles. This pose releases any tension that you may be carrying in your ankles and your toes. The pressure also stimulates the reflexology points in your toes and your entire foot, allowing for release.
- Strengthens your toes and ankles: Feeling a little wobbly when standing on one foot? Screaming toe pose will not only open up your toes and ankles, but it will strengthen them as well.
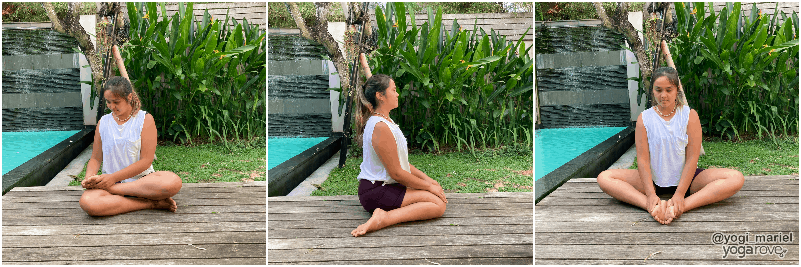
Warming Up for Screaming Toe Pose
Screaming Toe pose is often done at the beginning of your yoga practice. You will usually practice it as part of your warm-up for deeper asanas. However, there are some postures or exercises that you can practice before you practice the pose.
- Self-massage: Before starting practice, gently use your hands to massage the soles of your feet, your toes, and your ankles.
- Hero’s pose or Virasana: Opening up your ankles, knees, quads, and the tops of your feet, hero’s pose can be an intense but great posture to practice before you practice screaming toe pose. Start with your knees together kneeling down on your mat. Lift your sit bones up and open your heels out, keeping your toes pointing toward the back of the room. Gently sit in between your heels and stay for 5 breaths. If your sit bones do not easily touch the mat, place a block or two in between your heels and sit on your block.
- Cobbler’s pose or Baddha Konasana: This pose not only opens your feet, but your hips, ankles, and legs as well. Sit down on your mat and gently bring the soles of your feet together to touch. Creating a diamond shape with your legs. Use a block under each knee if you need the support and hold for 5 breaths. Cobbler’s pose helps to create mobility in your ankles and your Achilles.
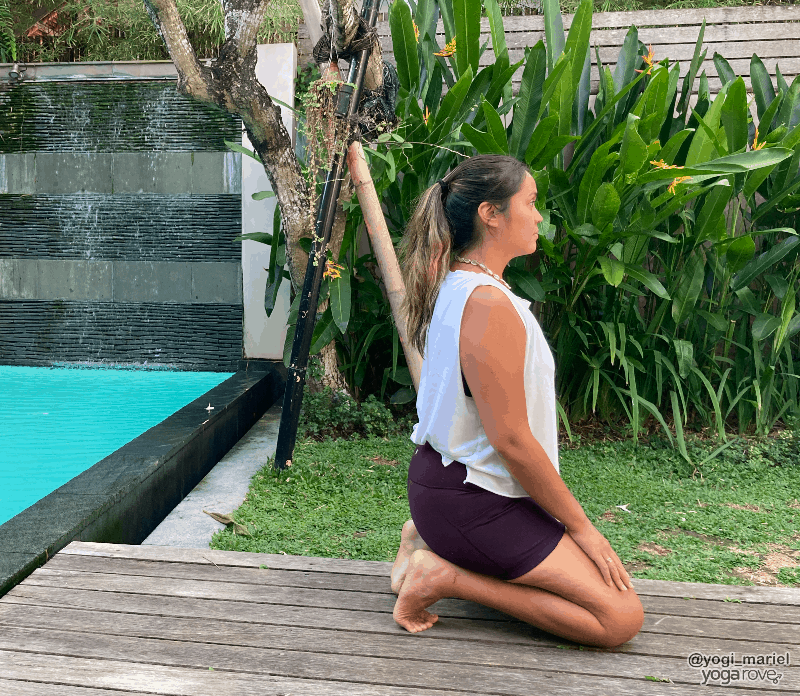
How to Practice Screaming Toe Pose
This posture is called Screaming Toe pose for a reason! Take your time coming in and out of the pose. Be very mindful of your breath and your body while you are in the posture. Move slowly and carefully, and use your breath to soften into the posture.
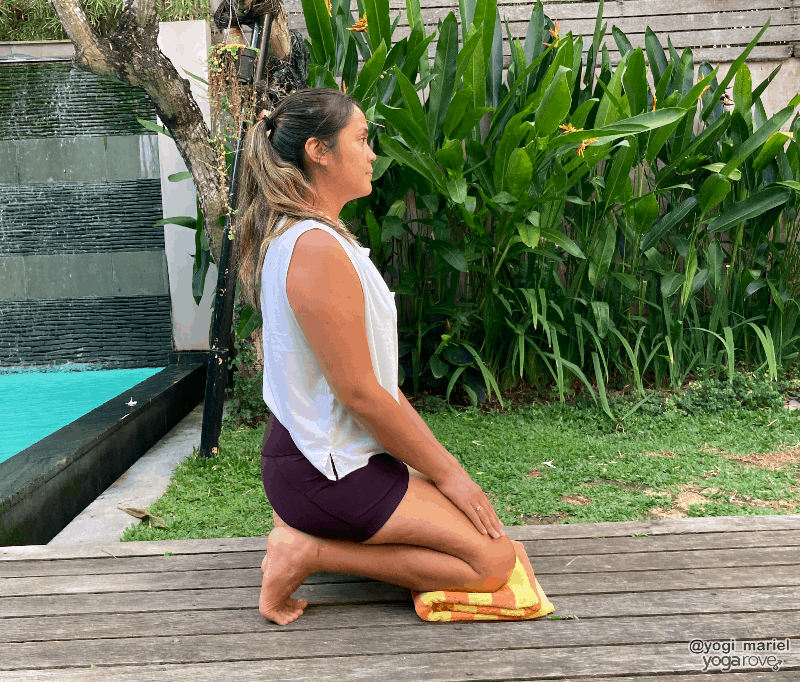
To practice Screaming Toe pose:
- Begin on hands and knees. Check that your hands are under your shoulders and your knees are under your hips.
- Walk your hands back toward your knees and lift your hands of the mat. You can place your hands gently on your lap.
- Stand on your knees and find a tall and long spine.
- Tuck all of your 10 toes under and check that your heels are pointing up toward the ceiling.
- Sit back onto your heels.
- Place your hands on your knees, keep your spine straight, collar broad, and shoulders relaxed.
- Stay for 5 deep breaths. Close you’re eyes and focus on a slow and steady breath.
- You can slowly increase the amount of time that you stay in the pose. If it feels too intense, stay for a shorter amount of time.
- To come out of the pose, place your hands back down on the mat in front of you. Release your toes behind you. Move your toes, ankles, and feet to stretch everything out.
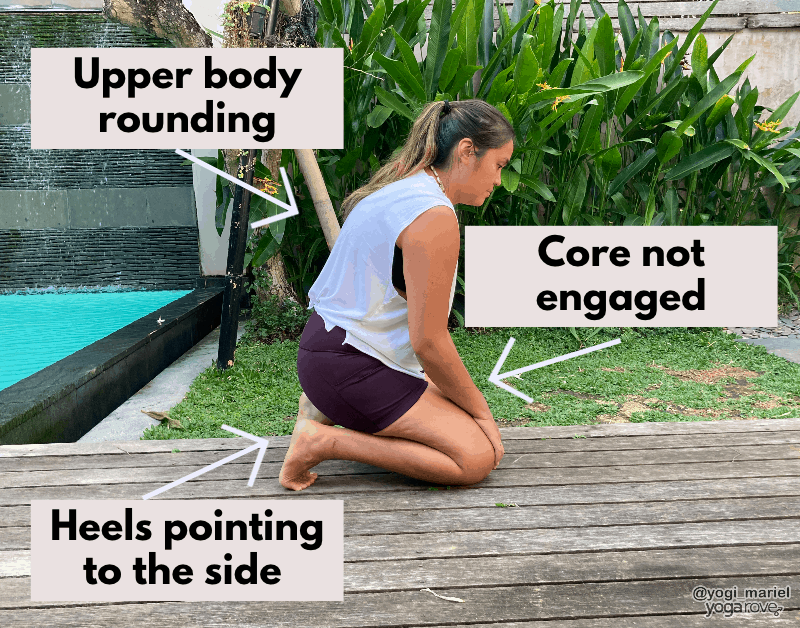
- Pointing your heels in the wrong direction: Make sure that you keep the alignment of the heels pointing up to the ceiling in order to keep your joints safe. The alignment of having your heels pointing up ensures that you don’t tweak your knees, toes, or ankles.
- Rounding your back: Keep your spine long in this pose and focus on finding length in the sides of your body. A rounded spine will cause your chest and shoulders to collapse and you want to keep everything open and spacious.
- Not engaging your core: Support yourself in the posture by drawing your belly button in toward your spine. If you allow your core and upper body to collapse, your body will not feel as supported. This may lead to more discomfort in your toes and ankles. Keep yourself strong, engaged, and centered.
Modifications
If you are a beginner to this posture it is completely normal to feel that this pose is a little too intense. That doesn’t mean that you should skip it altogether, though. Usually, the poses that we dislike the most are the ones that we should practice more of!
Instead of skipping the posture, try to modify Screaming Toe pose. Try these modifications next time you practice the posture:
Use a prop: Grab a blanket or cushion while practicing this posture. Folding up a blanket or placing a cushion underneath your knees is a great option if you have sensitive knees. If it is uncomfortable to rest your hips on your heels, use a blanket on top of your heels
Don’t stay as long in the pose: If one or two breaths is what you can manage during your practice, that is perfect. Take your time working up to more breaths in this pose. It is completely normal to feel the intensity only after a few breaths. Be patient with yourself and focus on finding a slow and steady rhythm of breath.
Tips for Beginners
- Find the resistance in the posture and slow your breath down.
- Try to clear your mind and focus on your inhales and exhales.
- Bring your attention and awareness back to your breath.
- Relax your jaw, face, shoulders, and other parts of your body that may be holding unnecessary tension.
- Back off a little if it’s too intense. Work your way up to 5 deep breaths.
- The more your body opens, the more resistance you can add to the pose. You can sit your hips down deeper or curl your toes under more.
Variations in Screaming Toe Pose
Looking for some variation in your Screaming Toe pose? There are a few variations that you can try to mix it up a little bit. Try these out next time you practice:
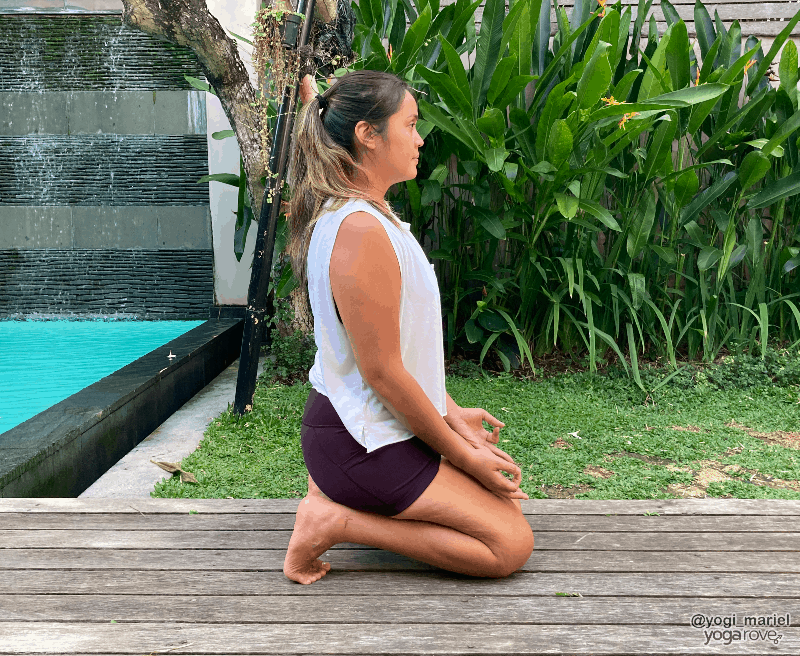
Take a mudra for your hands: Usually, your hands rest your hands gently on your lap with palms facing up or down while you are in this posture. However, you can play around with taking a mudra before you rest your hands on your lap.
Intensify the pose: If you want to feel a little more intensity in this posture, you can modify the placement of your knees and your toes. Take your knees slightly more forward and curl your toes under more. You should be able to feel the stretch greatly intensify!
Contraindications
This posture can feel intense even without any injuries. Make sure that you listen to your body. Stay only for a comfortable amount of time in your Screaming Toe pose. If you have a foot, knee, or ankle injury, it is likely that you should skip this pose or modify it in order to cause further damage. Even though it may not feel so great while you are in the posture, coming out of your Screaming Toe pose after a few breaths can feel so good! You’re ankles, toes, and feet may feel more alive and energized. After that intense stretch, make sure to release any tension in your toes, ankles, and feet by spreading your toes on the mat and wiggling them around. Stretching out your toes has never felt so good!
Mariel is a writer and NYC-based yoga teacher. She has been teaching for a decade and is a life-long student of the ancient practice.