

This post may contain affiliate links. Please read our disclosure for more info.
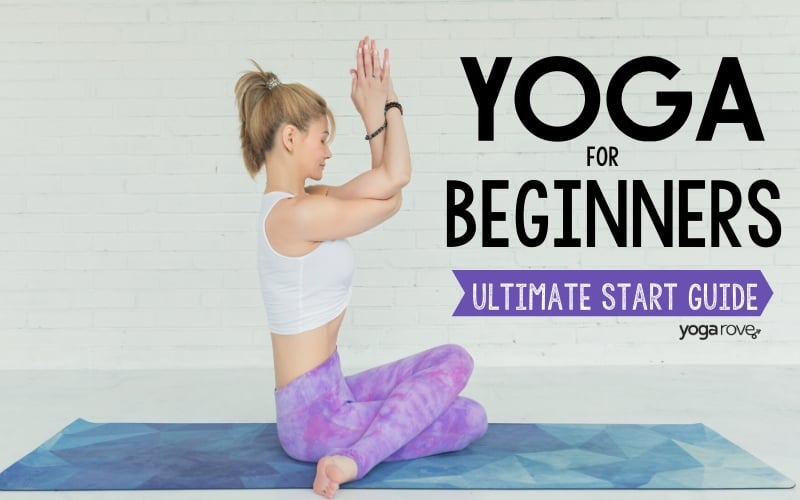
Are you completely new to yoga and looking where to get started? These beginner yoga poses are a great place to start in building a strong, successful yoga practice.
I see a lot of posts on beginner yoga poses that include poses that may be considered “basic” poses, but are not exactly beginner friendly.

When you’re first starting out, depending on your natural flexibility and background, you are not going to be able to do some of the “basic” poses like Pigeon Pose and Chaturanga. I know I couldn’t! Claiming these to be poses you should start with can be very discouraging to those that have just stepped onto their mat.
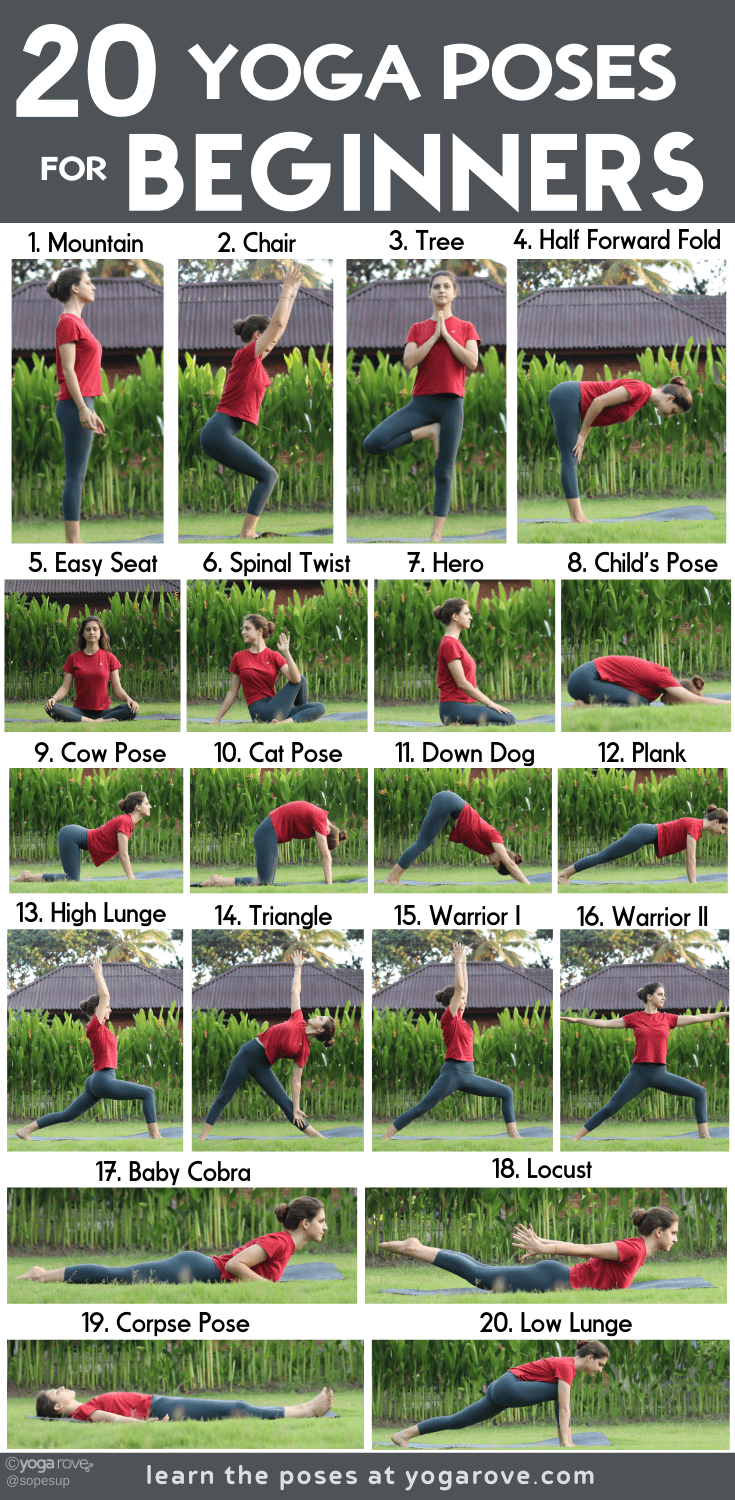
So that is why I’ve conjured up this list of 20 yoga poses for complete beginners. No matter where you are in your practice, and especially if you are just starting out, these are perfect to start with.
We also created a video that covers almost all of the poses on this list PLUS 13 other yoga poses with modifications that is perfect for beginners! You can check that out below:
Basic Yoga Poses for Complete Beginners:
- Mountain (Tadasana)
- Plank (Phalakasana)
- Easy Seat (Sukhasana)
- Hero (Virasana)
- Downward Facing Dog (Adho mukha śvānāsana)
- Child’s Pose (Bālāsana)
- High Lunge (Utthita Ashwa Sanchalanasana)
- Low Lunge (Arda Mandalasana I)
- Warrior I (Virabhadrasana I)
- Warrior II (Virabhadrasana II)
- Triangle (Trikonasana)
- Tree (Vriksasana)
- Baby Cobra (Bhujangasana)
- Locust (Salabhasana)
- Cow (Bitilasana)
- Cat (Marjariasana)
- Corpse (Shavasana)
- Chair (Utkatasana)
- Half Lord of the Fishes (Matsyendrasana)
- Standing Half Forward Bend (Ardha Uttanasana)
1. Mountain Pose (Tadasana)

This is the root of all standing yoga poses. Mountain Pose teaches you how to feel grounded in your feet, and consciously engage different parts of your body in a pose that seems so simple.
This pose is great for improving posture and relieving pain when practiced regularly. It also develops correct alignment for the rest of your yoga practice.
Your entire body should be engaged during this pose.
How to do Mountain Pose:
- Stand with your feet touching. Ground all ten toes on the ground, the edges of your feet, and you heels. Engage your quadriceps so your knees and top of your thighs draw up and back. Your thighs should rotate slightly inward.
- Engage your core slightly so that your pelvis is in a neutral position, pointing forward instead of downward.
- Tuck in your tailbone slightly so your spine is neutral, not rounded or arched. Your glutes should not be engaged, but the back of your thighs should be engaged enough to lift them.
- Lift up through your chest and press your shoulder blades back. Let your shoulders fall down from your ears and elongate your neck. Your arms should be straight down by your sides, engaged slightly and internally rotated, with fingers together and extended.
2. Plank Pose (Phalakasana)
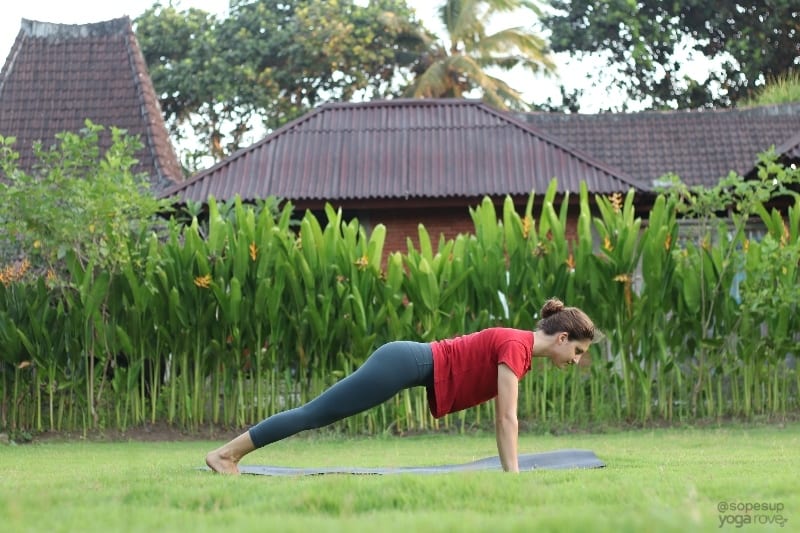
Plank pose is essential for building the proper arm and core strength needed for many other poses in the practice, and is very present during different sequences.
It is often used as a transitioning pose between different poses, so building the proper strength and alignment to maintain it is definitely needed to grow your practice.
How to do Plank Pose:
- Start on your hands and knees, and make sure your hands are directly underneath your shoulders. Ground your fingers into the mat and spread them like you do in Mountain Pose.
- Press down into your hands and engage your arms. Step one foot back one at a time behind you with your toes tucked.
- Engage your core and maintain a lengthen through your spine, keeping it straight. Keep your gaze between your hands, head inline with the rest of your body. There should be one straight line all the way down your body from your head to your toes.
Make sure to breathe while engaging your core. Try to hold it for five even breaths.
If full plank is too challenging for you at this time, drop your knees to the floor. Try to build up to full plank by lifting your knees for one breath and gradually increasing the amount of time you hold it.
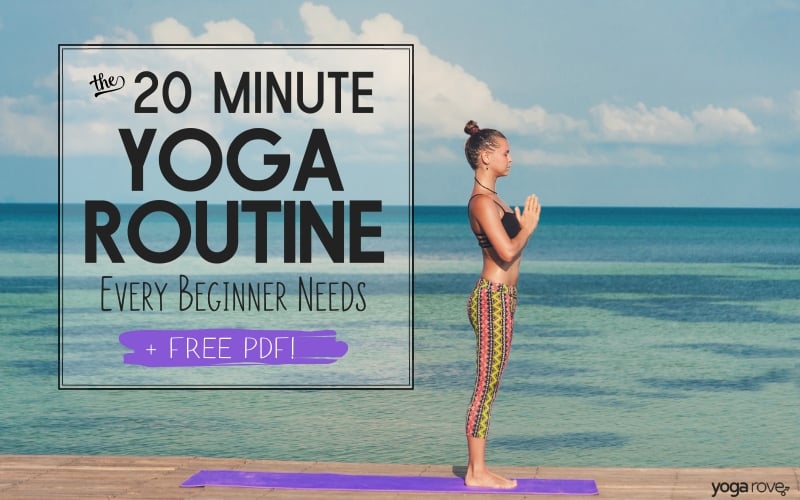
Related Article: The 20 Minute Yoga Routine Every Beginner Needs + Free PDF
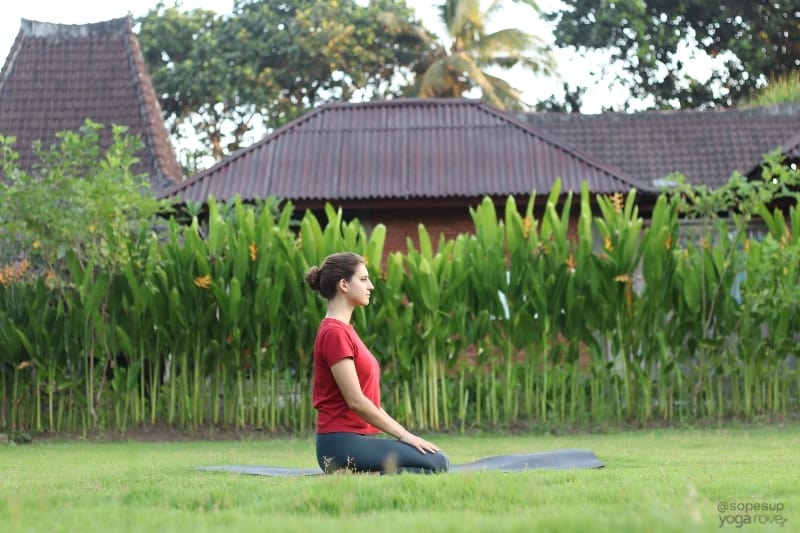
3. Easy Seat (Sukhasana)

There is a lot more to this pose than you may think. This is one of the oldest yoga poses, and although “easy” is in it’s name, it still requires effort to get it right.
This pose is commonly used while meditating as well in the beginning of yoga sequences during breathing exercises and warming up the body.
It also prepares you for more advanced hip opening poses such as Lotus Pose and Bound Angle Pose.
How to do Easy Seat:
- Start seated with your legs crossed, and move any extra flesh underneath you to expose your sit bones.
- Lift up through your chest, push your shoulder blades back, and let your shoulders fall down from your ears. Maintain a straight back.
- You can place a blanket, pillow, or block underneath you to help maintain an upright posture if you have tighter hips or feel discomfort in your knees or back.
4. Hero Pose (Virasana)
This seated pose is great for stretching the thighs, ankles, and knees, as well as improving posture.
This is another pose used as a resting pose in yoga as well as during breathing exercises and meditation, but it may take a bit more practice for those that have tight ankles and knees.
How to do Hero Pose:
- Start on your knees in a kneeling position, with your torso straight and upright. You may place a blanket underneath your knees for more comfort.
- Your knees should be slightly hip distance apart, and your knees should be slightly wider than your hips, untucked.
- Gently push your hips back to sit between your feet. Place your hands on your knees, and make sure to keep a straight back while pulling back the shoulders and lifting through the chest.
5. Downward Facing Dog (Adho Mukha Svānāsana)
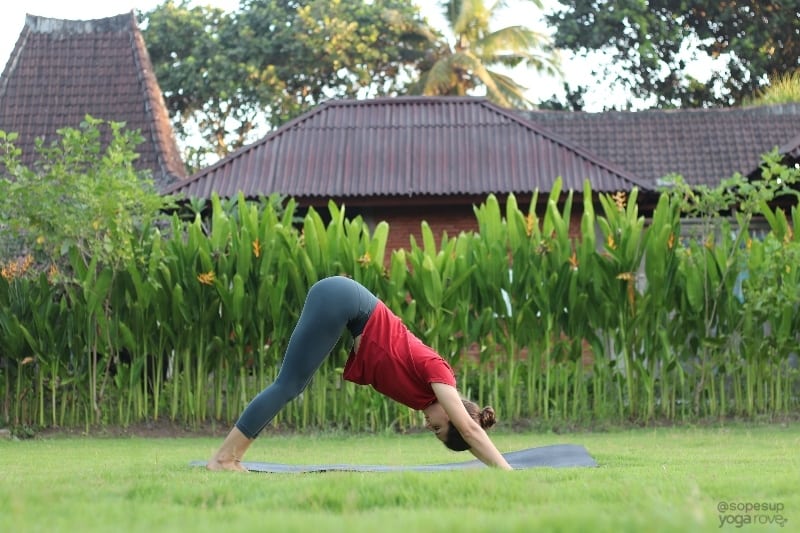
This is one of the most well known poses of yoga in the western world, and truly is an all around amazing pose for stretching and strengthening your entire body.
It teaches you how to distribute your weight properly while building your upper body and core strength, and relieves tension and tightness in your shoulders, back, and legs.
Your entire body needs to be engaged to do this properly and to avoid letting all the weight fall onto your upper body, making it much harder to hold.
How to do Downward Facing Dog:
- Start on your hands and knees with your hands directly underneath your shoulders.
- Tuck your toes, and push your hips back and up into the air. Your heels will most likely not touch the ground when you first start, and that’s okay. The importance here is alignment and feeling the stretch.
- Make sure your back is straight by pushing your hips back as much as you can and pushing away from the floor with your hands, engaging your arms.
- Your fingers should be grounded like in Plank Pose, and arms slightly rotated inwards.
- Bend one leg at a time while you push the other towards the mat to get a deeper stretch in your hamstrings.
6. Child’s Pose (Bālāsana)
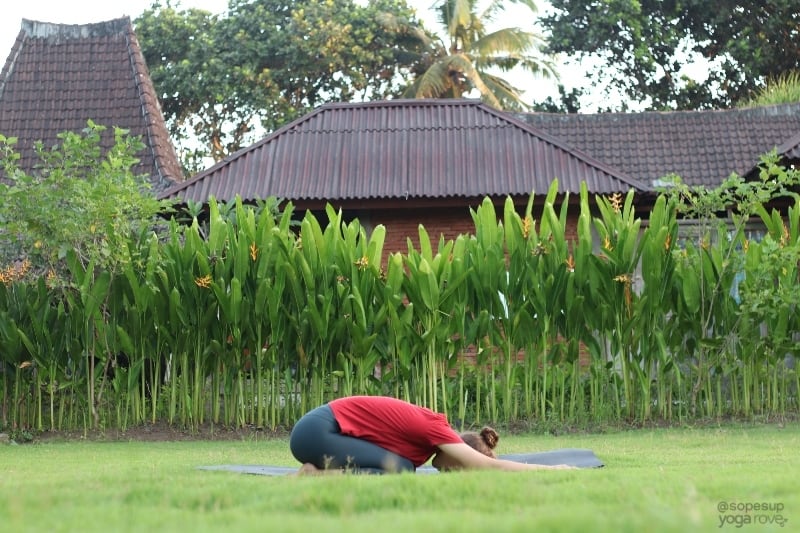
This is a resting pose, but also is very effective in stretching and relieving tension in your back, hips, and ankles.
This is a common pose to come into after a fast paced moving sequence to recenter and catch your breath.
How to do Child’s Pose:
- Start on your hands and knees with your hands directly underneath your shoulders. Your knees should be inner-hip distance apart and feet should be untucked.
- Push your butt back onto your heels as you reach forward with your hands to stretch you back and shoulders. Your forehead should be touching the ground.
7. High Lunge (Utthita Ashwa Sanchalanasana)
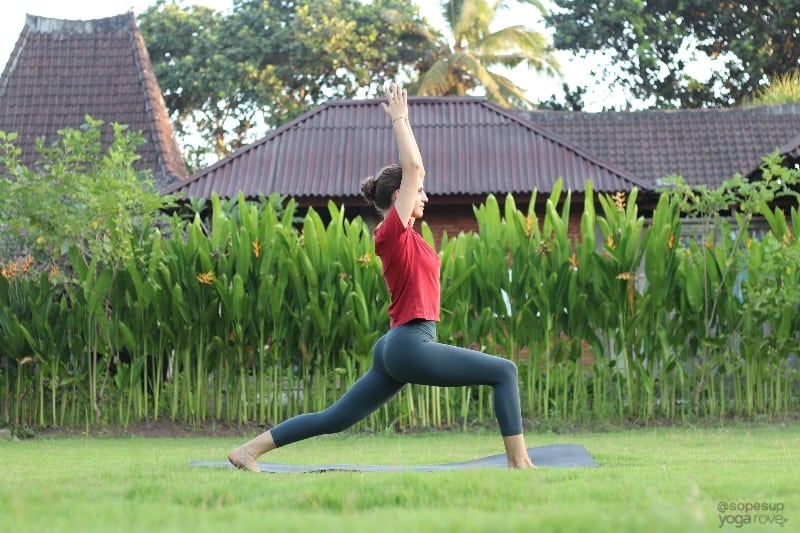
You may be familiar with this pose, as it is used widely in workout routines outside of yoga. It is a excellent core toner, and strengthens your thighs and glutes while giving your hip flexors a deep stretch. It is also a great way to build your balance and distribute your weight.
You will be using this pose a lot in yoga, as it is the base of many advanced poses and a transitioning pose in many beginner yoga workouts.
How to do High Lunge:
- Start in Mountain Pose. Bring your hands up into the air and point your fingertips towards the ceiling. Start to bend your right knee and you hover your left foot and slowly bring it back behind you, stepping onto the ball of your foot. Your heel should be lifted.
- Push through your heel and ground into your front foot. It should be underneath your knee, and your leg should be bent at a 90 degree angle.
- Lift through your chest and engage your core while dropping your shoulders. Stay here for five breaths then repeat on the other side.
8. Low Lunge Pose (Banarasana II)
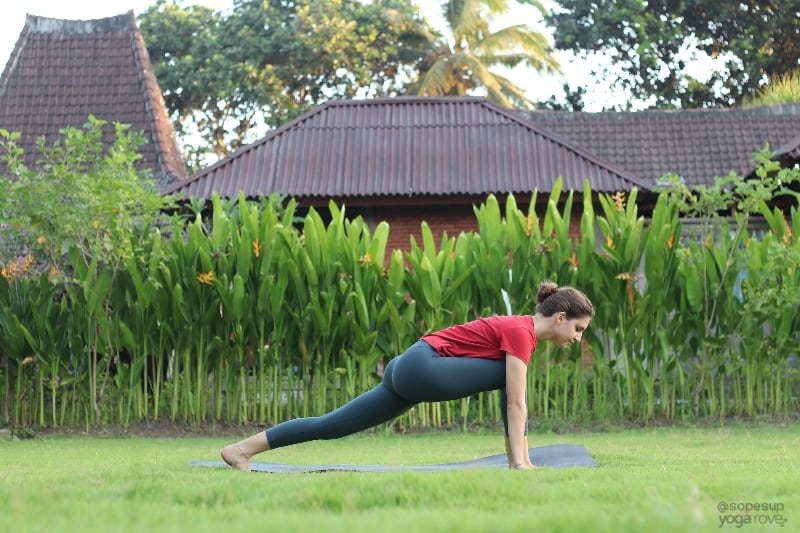
As opposed to high lunge, this is the same concept except your fingertips are touching the floor. But don’t be fooled, this still requires a lot of engagement and really opens up your hips as well as strengthens your core.
This is another common pose used for transitioning and is the foundation of many other poses, so it is very important to be able to do it properly!
How to do Low Lunge Pose:
- Start on your hands and knees. Bring your right knee up between both hands. Lift your back knee up off the floor and extend through the heel.
- Lift through your chest and engage your core while you try to lift up your upper body as much as you can while maintaining a straight back. Keep your front leg at a 90 degree angle with your foot directly under your knee.
- If this is too much of a challenge, start with your back knee on the floor and build up from there.
9. Warrior I (Virabhadrasana I)
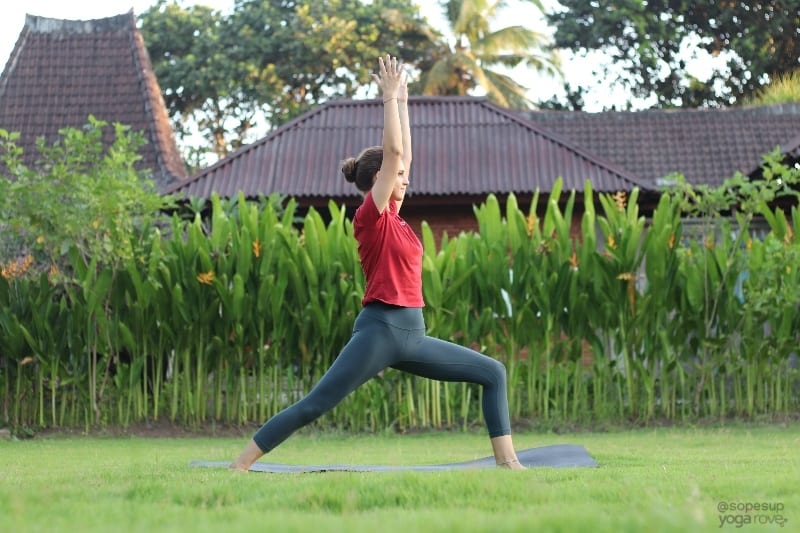
This is the first of the three warrior poses. It looks very similar to a High Lunge, except that your back foot is rotated at an angle and grounded on the floor, allowing for an even deeper hip stretch.
How to do Warrior I:
- There are many different ways to transition into Warrior I, but for starters, begin in Mountain Pose, and take a big step back with one of your legs while lifting your arms up above your head.
- Ground your back foot by turning it on an angle, at about 10 o’clock.
- Bend your front leg at a 90 degree angle, and make sure your foot is directly under your knee. You don’t want your knee to move past your ankle.
- Engage your core and try to maintain your torso facing forward while lifting through your chest.
- Make sure to repeat on the other side to maintain balance throughout your body.
10. Warrior II (Virabhadrasana II)
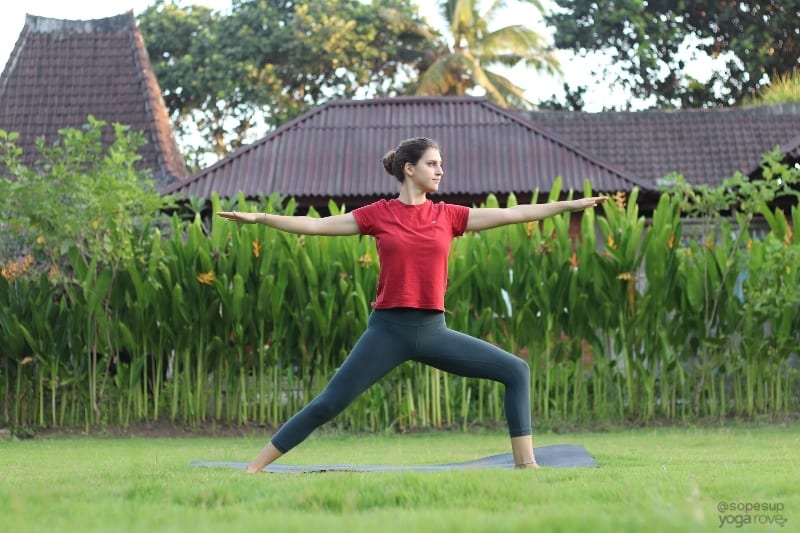
Warrior II is very similar to Warrior I except the positioning of your arms and torso is different. This is a great pose to strengthen your legs, and is typically used as a transition between other poses.
How to do Warrior II:
- From Warrior I, simply float your arms down out straight in front and back of you, keeping them engaged and inline with your shoulders.
- As you are doing this, rotate your torso to face the side of the room and open up your hips. You should be looking over your front fingers. Remember to keep your front leg at a bend and keep the core engaged.
- Hold for five breaths and repeat on the other side.
11. Triangle Pose (Trikonasana)

This is one of the first basic yoga poses you learn when going to a yoga class due to its focus on proper alignment.
You are supposed to be able to fit yourself between two walls in this pose, meaning your body should be completely linear. This makes it a great chest and hip opener, and is also good for stretching your hamstrings.
How to do Triangle Pose:
- From Warrior II Pose, straighten your front leg and slowly begin to hinge forward, making sure to keep your back straight.
- Bring your front hand as close to the ground as you can, but do not let it just hang. If you can’t reach the ground, you can either bring your hand to your ankle or calf, or you can use a yoga block.
- It is important to lift through your chest in this pose, and make sure to keep you core and legs super engaged.
- You back arm should float up into the air, and allow your gaze to follow it, looking over your fingertips.
- Hold for five breaths and repeat on the other side.
12. Tree Pose (Vriksasana)
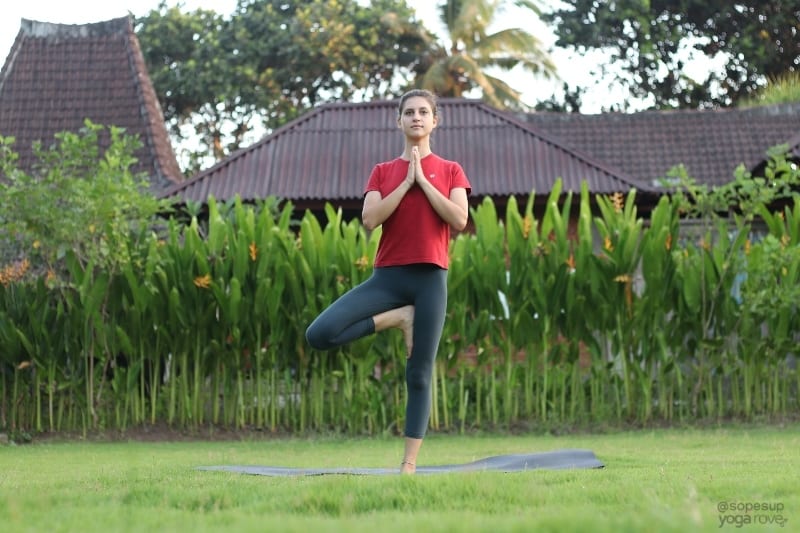
This is a fun balancing pose that helps you improve your stability and prepare you for more advanced balancing poses in the future.
How to do Tree Pose:
- Start in Mountain Pose. Bring your hands together at your heart with fingers spread wide.
- Start to shift your weight onto one leg and slowly lift your other leg up and bring it to rest on your inner thigh.
- To start, it may be easier for you to balance or if you have tight hips to rest it lower on your leg.
- You can choose to keep your hands at your heart or lift them up into the air with fingers spread and arms engaged. Lift through your chest.
- It may help to choose a part of the room or single object to focus on to maintain balance. Try to hold this for five breaths and repeat on the other side.
13. Baby Cobra (Bhujangasana)
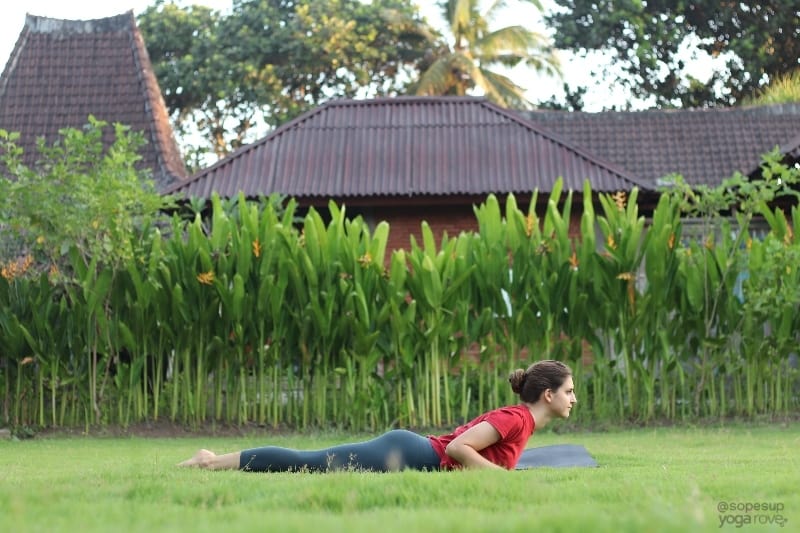
This is the baby of all backbends, and helps prepare you for more intense backbends, like Upward Facing Dog and Bow Pose. It is also a great chest opener for those that have tight shoulders.
How to do Baby Cobra Pose:
- Start on your stomach, face down with legs extending behind you untucked.
- Place your hands flat on the ground right next to your shoulders with your elbows tucked in.
- On your exhale, push your chest and upper abdomen off the ground. Remember, we’re not going into full cobra here, so your arms should still be bent a decent amount.
- Drop your shoulders away from your ears and lift through your chest. Engage your legs and push your feet into the ground.
- Breathe here for 5 seconds then slowly release your forehead or cheek to the ground.
14. Locust Pose (Salabhasana)
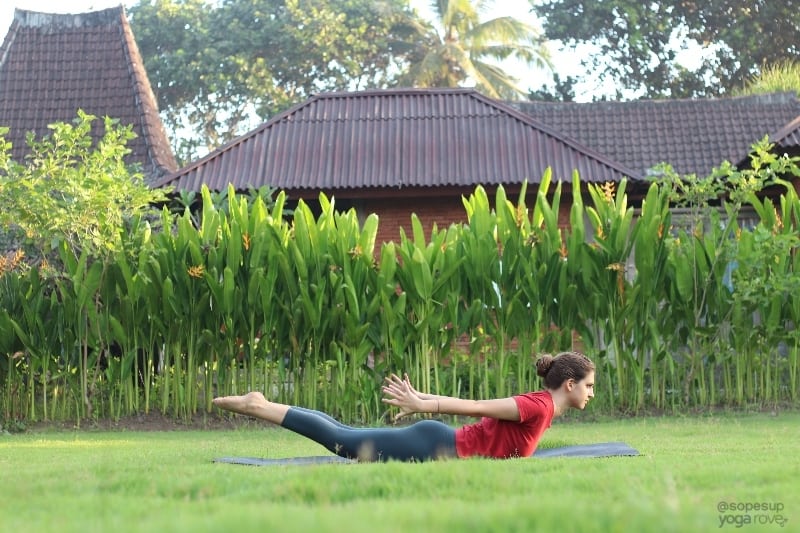
Locust Pose is a mild backbend that is great at strengthening the back, abdominals, and glutes.
Instead of just your upper body lifting off the ground, your lower body lifts as well and your entire body is engaged. The more you build up your core and back strength, the higher you will be able to lift.
How to do Locust Pose:
- Start by lying on your on your stomach with your forehead on the mat and feet untucked.
- Place your hands either straight by your sides or flat on the ground by your shoulders like you did in Baby Cobra.
- On your next inhale, lift everything you can slowly off of the ground. Keep your shoulders away from your ears and lift through your chest.
- Engage your legs and lift them as high as you comfortably can.
- Engage your entire body to keep it lifted for three breaths.
If this is too much of a backbend for you, you can keep your feet pressed into the floor and only lift the top body, kind of like an unsupported Baby Cobra.
15. Cow Pose (Bitilasana)
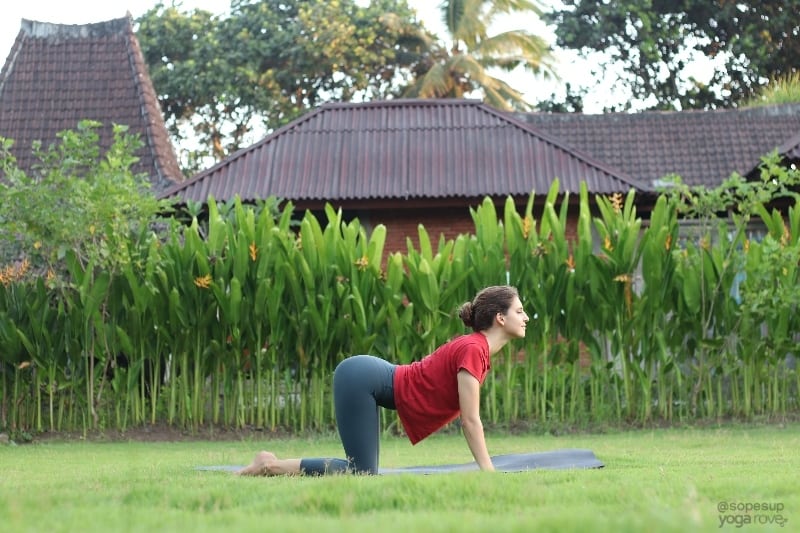
This pose goes hand in hand with Cat Pose to create a “flow”. Although you can of course do this pose alone, pairing the two poses together helps promote mindfulness and relax your mind and body. This pose in particular stretches your abdomen, chest, and neck.
- How to do Cow Pose:
- Start on your hands and knees, hands under shoulders. You can choose to have your feet tucked or untucked.
- As you inhale, lift your chest, arch your back, and let your stomach fall loose.
- Slightly bring your gaze upward to give your neck a good stretch.
- Bring awareness to your shoulders to make sure you aren’t hunching them up towards your ears. Ground through all corners of your hands.
16. Cat Pose (Marjariasana)
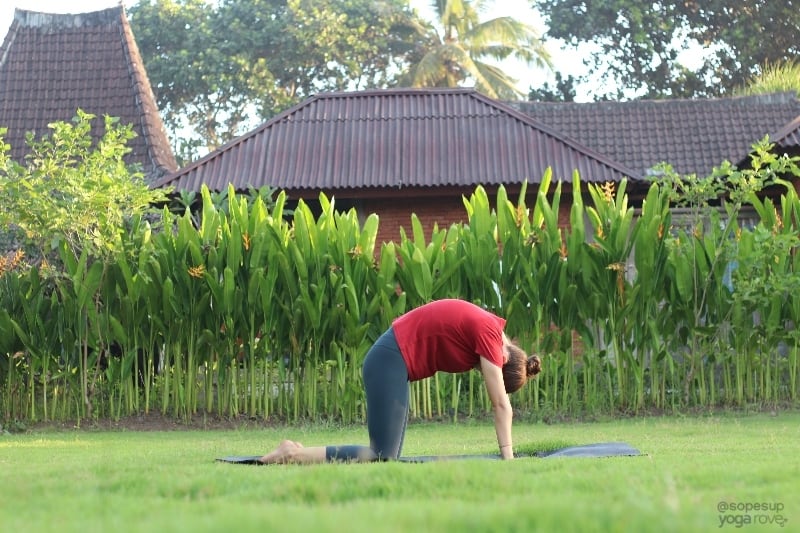
Cat Pose is the second of the two-pose flow. It’s called Cat Pose because you are arching your back into the air like a scared cat. This pose stretches more your shoulders and spine, and give your neck a good stretch as well.
To do Cat Pose:
- From Cow Pose, exhale as your draw your navel in and arch your back towards the ceiling.
- Hollow out your belly and push away from the ground with your hands, tilting your gaze downwards.
Flow through these two poses for as long as you’d like, going into Cow on your inhale, and Cat on your exhale.
17. Corpse Pose (Shavasana)
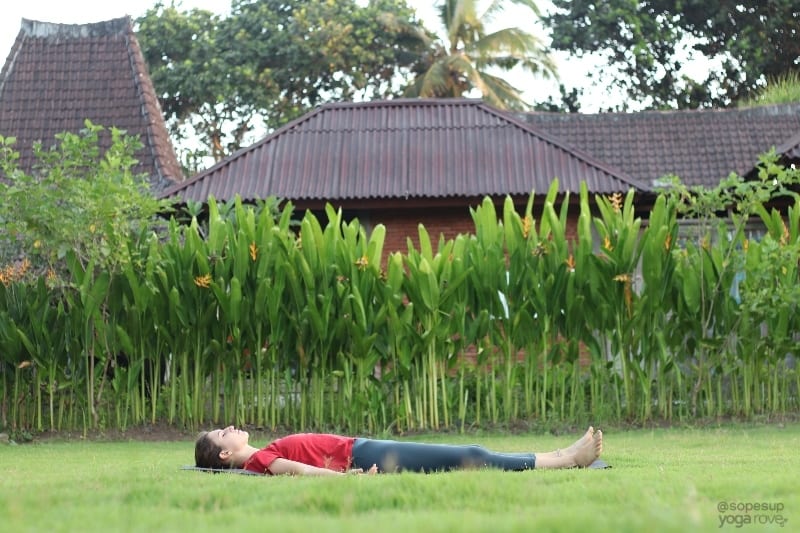
This pose is not at all challenging physically, as it is a resting pose used at the end of a yoga practice. The challenge here is the mental part, and being able to stay still with your breath.
You want to completely relax your body and mind here. This is very difficult for some people starting out and they sometimes skip it all together.
This pose is very effective in relieving stress, anxiety, and decreasing cortisol levels, which aides in weight loss. Take a few moments for yourself to wind down and relax in this pose and soak up the benefits.
How to do Corpse Pose:
- Simply lay on your back, and release all tension in your body. Let all of your limbs fall to the floor, release your shoulders, loosen your jaw, and let your feet fall to the floor.
- Relax and breathe. Focus on your breath, and if an overwhelming amount of thoughts start to appear, start to refocus on your breath by counting the inhales and exhales.
18. Chair Pose (Utkatasana)
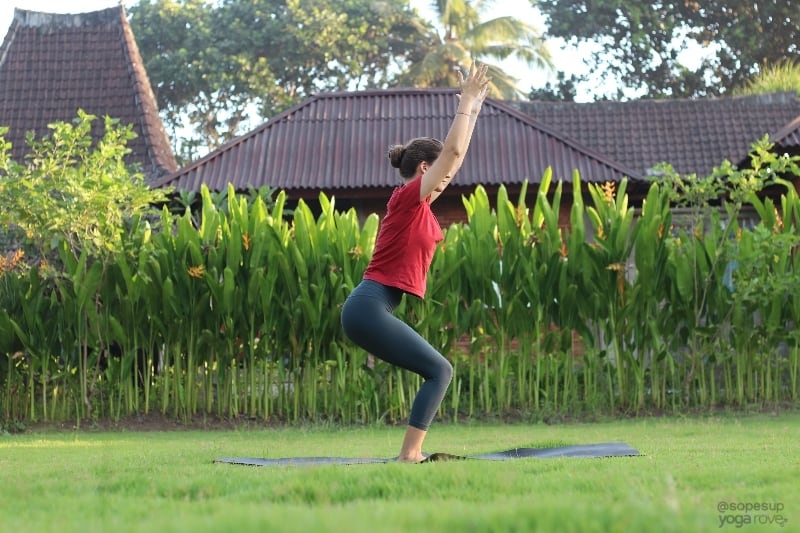
This may look similar to a squat, but it is actually quite different. Your feet are together in this pose, and you are lifting through your upper body as you are grounding through your lower body. It actually requires some balance believe it or not! Practicing this pose will help you build your core and leg strength needed to practice more advanced poses.
How to do Chair Pose:
- Start in Mountain Pose. Make sure your feet are together. Lift your hands up over your head or bring them together at your heart while you bend your knees as much as you can to get them parallel to the floor.
- Try to shift your weight into your heels so you can wiggle all ten toes off the floor while still feeling grounded.
- Engage your core and lift up through your chest, keeping a straight back and letting the shoulder fall from your ears.
- Stay here for five breaths.
19. Half Lord of the Fishes ( Ardha Matsyendrasana)
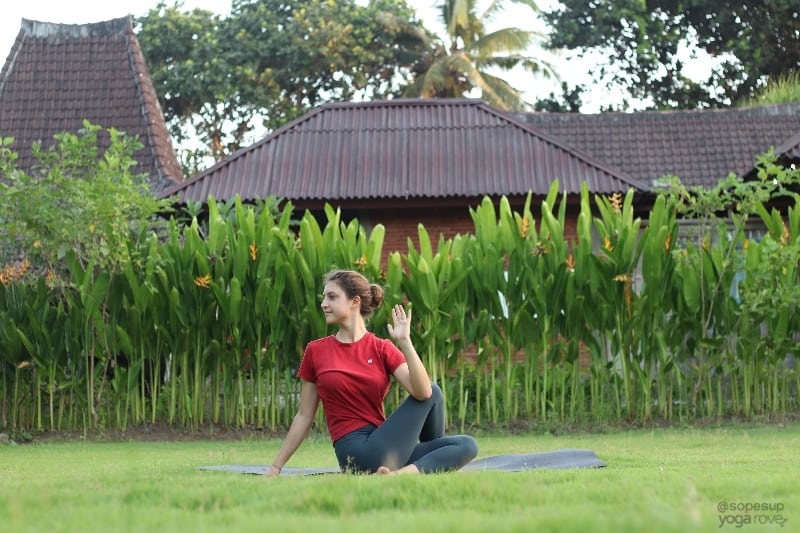
Twists are great for digestion and decompressing your spine. This is one of many twist poses, but I chose to put this one on the list because it is the most gentle stretch out of the bunch.
Practicing Half Lord of the Fishes can help relieve back pain and help improve your posture when practiced diligently.
How to do Half Lord of the Fishes:
- Start seated with your legs out straight in front of you. Make sure you are sitting upright with a straight back.
- Bend your right leg and cross it over your left thigh, placing your right foot flat on the ground. Now bend your left leg, laying your foot right next to your right hip.
- On your exhale, gently twist to your right, bringing your right hand a little bit behind your right hip.
- Bend your left arm and hook your left elbow on the outside of your right knee and use it to bring yourself deeper into the twist on each exhale.
- Keep your back straight and shoulders away from your ears. Let your gaze fall over your right shoulder.
20. Standing Half Forward Bend (Ardha Uttanasana)
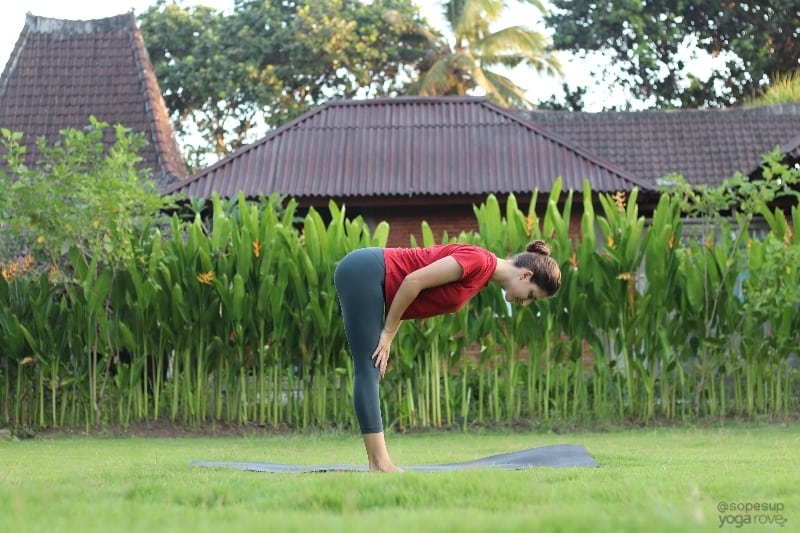
Forward folding poses help relieve tension in your neck, shoulders and back, while improving flexibility and range of motion. I chose to include a half forward bend instead of a full one because a lot of beginners have very tight hamstrings, making it hard to completely fold. Half Forward Bend also helps you remember to keep a straight back in this pose and program you to keep your chest lifted when you attempt full forward folds.
How to do Standing Half Forward Bend:
- Start in Mountain Pose. To help you maintain proper alignment, place your hands on your hips.
- Actively engage you core and stand tall. Push your chest up and forward.
- Start to hinge forward at your hips while keep your back straight and head in line with your body. Fold into your body as much as you can without collapsing your chest, and then drop your hands to your calves or the floor.
- Lengthen through your spine, being mindful of keeping a straight back, and look slightly forward.
Want to save these poses for later? Pin it!
I hope these poses were extremely helpful to you and empower you to begin your own yoga practice!
No matter what reason you are interested in yoga, just start! The benefits are endless and you will absolutely not regret it.
If you need more help getting started, check out our other beginner articles below and be sure to sign up for our Free Resource Library:
- Yoga for Beginners: Tips for Getting Started
- 20 Beginner Yoga Poses to Improve Flexibility
- 20 Minute Full Body Yoga Workout for Beginners (+ Free PDF)
- 5 Minute Beginner Yoga Routine for Stress Relief
- How to Start a Home Yoga Practice as a Beginner
- 100 Yoga Quotes for Inspiration and Motivation (with images)
Ally is a Registered Nurse, Registered Yoga Teacher, and Co-Founder of Yoga Rove with her husband Victor. She first started yoga over 7 years ago when she started her nursing career to combat the physical and mental strain, and now loves to teach and help others.
Very excited to learn everything about yoga for beginners. Plus overall getting in shape. Thank you so much
Christina
You’re so welcome Christina! So excited for you to get started on your journey- please feel free to contact us anytime with any questions and feel free to check out the other beginner yoga articles on our site 🙂
Your articles are very helpful and very encouraging for a beginner like me. This increases my determination to learn more about yoga. Thank you so much! – Clang
So glad to hear that Clang!
Saw this and been wanting to start beginner yoga. I don’t have a mat; alternative suggestions?
As a62 year old RN myself for multiple years I feel a need to heal muscles and joints and believe this would be a good path for me. I appreciate your knowledge and experience of what works for beginners.
If you don’t have a mat that is totally fine- when I first started when I was at home I just practiced on my carpet 🙂 Mats are really helpful for giving you grip and for padding for protection of the joints. So I think if you don’t have a mat you should be fine, just be careful to not practice in socks on a hardwood floor 🙂 Feel free to reach out anytime with any questions! And that is awesome you are a nurse too 🙂
I’m new at Yoga and wanting to learn. Saw your article and was curious. For how long do you do each pose?
Hi Nancy and welcome! The answer is it really depends on your intention with that particular practice- we have a post all about how long to hold poses here: How Long to Hold a Yoga Pose: Beginner’s Guide. Hope that helps 🙂
Thank you so much !
Absolutely! Hope you found it helpful!